1. Wprowadzenie
This manual provides detailed instructions for the installation, operation, maintenance, and troubleshooting of your BERNSTEIN EX412 U-Shape Shower Enclosure. Please read all instructions carefully before beginning installation or use to ensure proper function and safety. Keep this manual for future reference.
2. Instrukcje bezpieczeństwa
- Podczas instalacji należy zawsze nosić odpowiedni sprzęt ochrony osobistej (PPE), obejmujący okulary ochronne i rękawice.
- Handle glass panels with extreme care. Tempered safety glass, while strong, can shatter if struck at the edges or corners.
- Ensure the installation area is level and structurally sound to support the weight of the shower enclosure and its users.
- Nie dokręcaj śrub zbyt mocno, ponieważ może to spowodować uszkodzenie podzespołów lub szkła.
- Trzymaj dzieci i zwierzęta domowe z dala od miejsca instalacji.
- Jeśli masz wątpliwości co do jakiegokolwiek etapu procesu instalacji, skonsultuj się z wykwalifikowanym specjalistą.
3. Zawartość opakowania
Verify that all components are present and undamaged before beginning installation. If any parts are missing or damaged, contact BERNSTEIN customer service.
- U-Shape Shower Enclosure Glass Panels (8mm tempered safety glass with nano-coating)
- Brodzik
- High-quality chrome-plated brass hinges
- Wall mounting profiles and brackets
- Stainless steel door handle
- Adjustable stainless steel support bar
- Stainless steel towel rail
- Assembly materials (screws, seals, etc.)
4. Specyfikacje
| Funkcja | Szczegół |
|---|---|
| Model | EX412 |
| Wymiary (dł. x szer. x wys.) | 120 x 90 x 195 cm (195D x 195H cm for product dimensions) |
| Grubość szkła | 8 mm tempered safety glass (ESG according to DIN-EN12150) |
| Powłoka szklana | Nano-coating for easy cleaning |
| Styl drzwi | Frameless pivot doors |
| Tworzywo | Acrylic (shower tray), Tempered Glass, Stainless Steel, Brass (hinges) |
| Skończyć | Glossy (chrome-plated fittings) |
| Typ instalacji | Montaż na ścianie |
| Zawarte komponenty | Shower enclosure, shower tray, towel rail, mounting hardware |
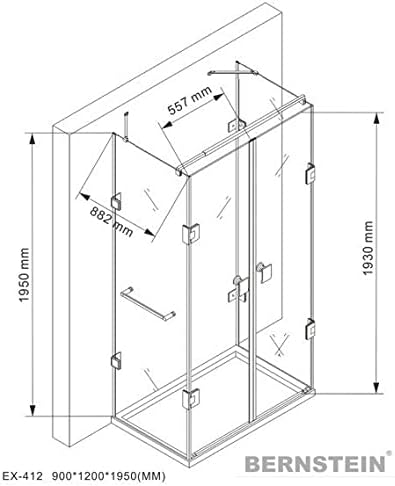
5. Konfiguracja i instalacja
The BERNSTEIN EX412 shower enclosure is designed for straightforward assembly with the included mounting materials. Follow these general steps, referring to the detailed technical drawing for precise measurements and component placement.
5.1 Kontrole przed instalacją
- Ensure the bathroom floor and walls are prepared, waterproofed, and level.
- Confirm that the wall where the enclosure will be mounted is structurally sound.
- Rozpakuj wszystkie elementy i sprawdź ich zawartość na liście.
5.2 Kroki instalacji (ogólne)view)
- Position the Shower Tray: Place the included shower tray in the desired location, ensuring it is level and properly connected to the drainage system.
- Uchwyt ścienny Profiles: Secure the wall mounting profiles to the prepared walls using the provided screws and wall plugs. Ensure they are plumb and at the correct height.
- Montaż stałych paneli szklanych: Ostrożnie umieść stałe panele szklane w ścianiefiles and secure them. Use the adjustable stainless steel support bar to provide additional stability to the fixed panels.
- Zamontuj zawiasy: Mount the high-quality chrome-plated brass hinges to the fixed glass panels and the wall, as indicated in the technical drawing.
- Install Door Panels: Attach the frameless pivot door panels to the hinges. Adjust as necessary to ensure smooth operation and a tight seal when closed.
- Install Door Handle and Towel Rail: Secure the stainless steel door handle and the stainless steel towel rail to the designated glass panels.
- Uszczelnienie i wykończenie: Apply silicone sealant to all external joints between the glass, wall profiles, and shower tray to ensure watertightness. Allow adequate drying time before use.
5.3 Visual Aids for Installation


6. Konserwacja i czyszczenie
Regular cleaning and maintenance will ensure the longevity and appearance of your BERNSTEIN EX412 shower enclosure.
6.1 Czyszczenie szkła
- The 8mm nano-coated safety glass is designed to repel water and reduce limescale buildup.
- After each use, wipe down the glass panels with a soft cloth or squeegee to remove water droplets.
- For deeper cleaning, use a mild, non-abrasive glass cleaner and a soft cloth. Avoid harsh chemicals, abrasive sponges, or scouring powders, as these can damage the nano-coating and glass surface.
- Po umyciu dokładnie wypłucz czystą wodą.
6.2 Frame and Hardware Cleaning
- Clean chrome-plated brass hinges, stainless steel handles, and support bars with a soft, damp szmatka i delikatne mydło.
- Do not use abrasive cleaners, acidic solutions, or steel wool, as these can scratch or corrode the metal finishes.
- Dry all metal parts thoroughly after cleaning to prevent water spots.
6.3 Konserwacja uszczelek
- Regularly inspect the silicone seals for any signs of wear, cracking, or mold.
- Clean seals with a mild anti-mold cleaner if necessary.
- If seals are damaged, they should be replaced promptly to prevent leaks.
7. Rozwiązywanie Problemów
W tej sekcji omówiono typowe problemy, jakie mogą wystąpić w kabinie prysznicowej.
| Problem | Możliwa przyczyna | Rozwiązanie |
|---|---|---|
| Wyciek wody | Improper sealing, damaged seals, incorrect door alignment | Check silicone seals and reapply if necessary. Inspect door seals for damage and replace if needed. Adjust door alignment. |
| Drzwi nie zamykają się prawidłowo | Hinge misalignment, obstruction, worn hinges | Adjust hinges. Check for any obstructions. If hinges are worn, contact support for replacements. |
| Szkło wydaje się mętne lub poplamione | Limescale buildup, soap scum, improper cleaning agents | Use appropriate glass cleaner for nano-coated surfaces. Clean regularly. Avoid abrasive cleaners. |
8. Gwarancja i wsparcie
BERNSTEIN products are manufactured to high-quality standards. For specific warranty information, please refer to the documentation provided at the time of purchase or visit the official BERNSTEIN website. If you require technical assistance, replacement parts, or have any questions not covered in this manual, please contact BERNSTEIN customer support.
Producent: BURSZTYN
Informacje kontaktowe: Please refer to your purchase documentation or the BERNSTEIN official webna naszej stronie znajdziesz najnowsze dane kontaktowe.


