Wstęp
This manual provides detailed instructions for the installation, operation, and maintenance of the ECS Elitegroup B350AM4-M2 Micro ATX Motherboard. This motherboard is designed to support AMD AM4 socket processors, including AMD Ryzen and 7th Gen Athlon processors. It features a 4+2 phase thermal design, 100% solid capacitor design, and dual-channel DDR4 memory architecture supporting up to 64 GB across four DIMM sockets.
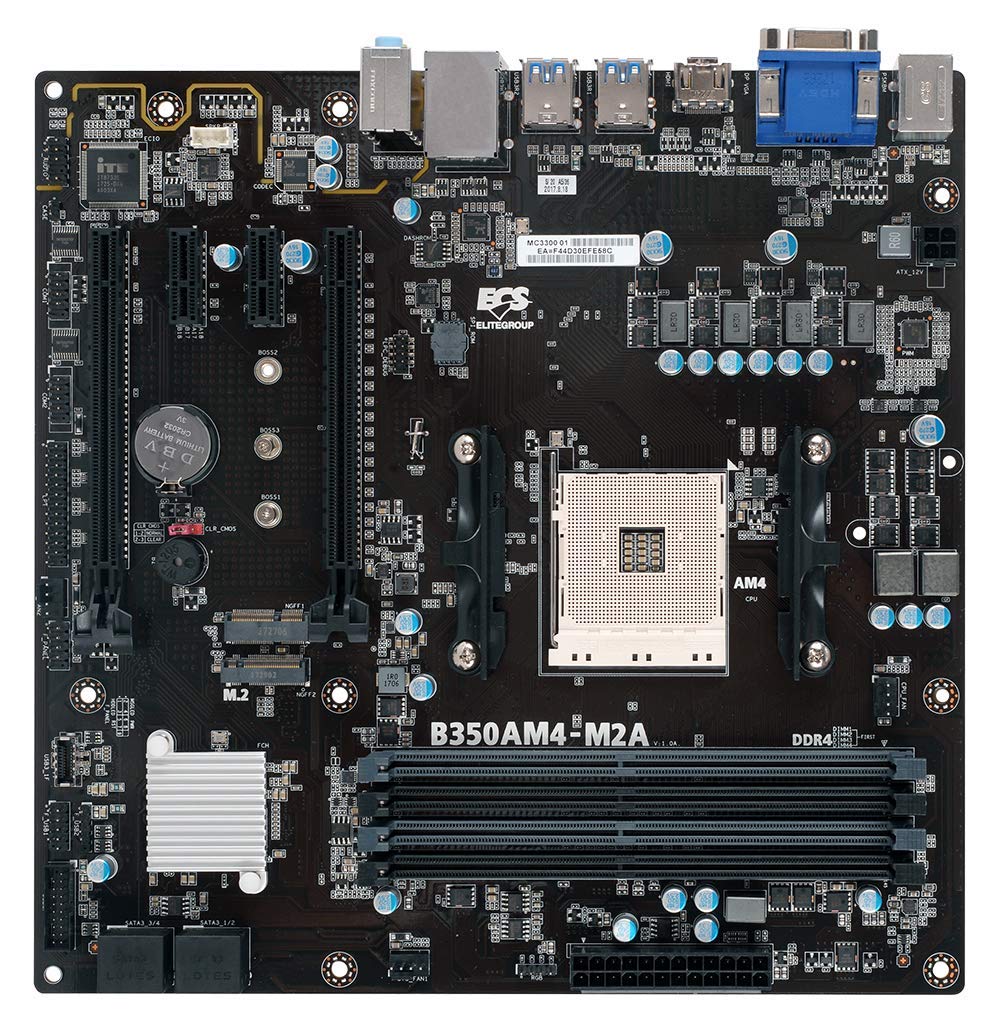
Rysunek 1: Koniecview of the ECS B350AM4-M2 Motherboard, showing its general layout and components.
Zawartość opakowania
Verify that all items listed below are present in the package. If any item is missing or damaged, contact your retailer.
- ECS B350AM4-M2 Motherboard
- Sterowniki na CD
- Instrukcja obsługi (ten dokument)
- Kable SATA
Konfiguracja i instalacja
Before beginning installation, ensure your system is powered off and disconnected from the power outlet. Wear an anti-static wrist strap to prevent electrostatic discharge (ESD) damage to components.
1. Instalacja procesora
- Znajdź gniazdo procesora AM4 na płycie głównej.
- Podnieś dźwignię obciążającą znajdującą się z boku gniazda.
- Dokładnie dopasuj trójkątny znak na procesorze do odpowiadającego mu znaku na gnieździe.
- Ostrożnie umieść procesor w gnieździe, nie używając siły.
- Lower the load lever back into its locked position to secure the CPU.
- Nałóż pastę termoprzewodzącą na powierzchnię procesora i zamontuj chłodnicę procesora zgodnie z instrukcją producenta.
Figure 2: The AM4 CPU socket and surrounding area on the motherboard, where the processor is installed.
2. Instalacja pamięci (RAM)
The B350AM4-M2 motherboard has four 288-pin DDR4 DIMM sockets. For optimal performance, install memory modules in pairs for dual-channel operation. Refer to the motherboard's silkscreen for recommended slot population order.
- Otwórz zaciski na obu końcach gniazda DIMM.
- Dopasuj wycięcie na module pamięci DDR4 do wypustki w gnieździe DIMM.
- Wsuń moduł mocno do gniazda, aż zatrzaski zatrzasną się na swoim miejscu.
- Repeat for additional memory modules.
Figure 3: Location of the four DDR4 DIMM slots for memory installation.
3. Instalacja urządzenia pamięci masowej (SATA i M.2)
Connect SATA storage devices (HDDs/SSDs) to the SATA 6Gb/s ports. For M.2 SSDs, locate the M.2 slot.
- For SATA devices: Connect one end of the SATA data cable to the storage device and the other end to a SATA port on the motherboard. Connect the SATA power cable from your power supply to the device.
- For M.2 SSDs: Insert the M.2 SSD into the M.2 slot at an angle. Push it down and secure it with the provided screw.
4. Instalacja karty rozszerzeń (PCIe)
Install graphics cards or other expansion cards into the appropriate PCI Express slots.
- Dopasuj kartę rozszerzeń do wybranego gniazda PCIe.
- Press down firmly until the card is seated correctly and the retention clip (if present) locks into place.
- Przymocuj kartę do obudowy za pomocą śruby.
5. Połączenia zasilania
Podłącz kable zasilające do płyty głównej.
- Złącze zasilania ATX 24-pinowe: Connect the main 24-pin power cable from your power supply to the corresponding connector on the motherboard.
- 4-pinowe złącze zasilania procesora: Connect the 4-pin CPU power cable (often labeled P4 or ATX12V) from your power supply to the connector near the CPU socket.
6. Panel przedni i złącza USB
Connect your chassis's front panel connectors (power button, reset button, HDD LED, power LED, front USB ports, front audio) to the corresponding headers on the motherboard. Refer to the motherboard layout diagram in the full manual for exact header locations.
Instrukcja obsługi
1. Konfiguracja BIOS/UEFI
The BIOS (Basic Input/Output System) or UEFI (Unified Extensible Firmware Interface) is the firmware that initializes hardware during startup. To access the BIOS/UEFI setup utility:
- Włącz komputer.
- Naciśnij USUNĄĆ key repeatedly during the initial boot screen. The exact key may vary; consult the on-screen prompts.
Within the BIOS/UEFI, you can configure system settings such as boot order, date/time, CPU/memory frequencies, and enable/disable integrated peripherals. Save changes before exiting.
2. Instalacja systemu operacyjnego
After assembling your system, you will need to install an operating system (e.g., Windows 10, Windows Vista, Linux).
- Insert your operating system installation media (USB drive or DVD) into the computer.
- Access the BIOS/UEFI setup and set the boot order to prioritize your installation media.
- Save changes and exit. The system will boot from the installation media.
- Postępuj zgodnie z instrukcjami wyświetlanymi na ekranie, aby zainstalować system operacyjny.
- After installation, install the necessary drivers from the provided driver CD or the ECS Elitegroup webstrona.
Konserwacja
Właściwa konserwacja zapewnia długowieczność i stabilną pracę płyty głównej.
- Usuwanie kurzu: Regularly clean dust from inside your computer case using compressed air. Ensure fans and heatsinks are free from obstructions.
- Aktualizacje BIOS-u: Periodically check the ECS Elitegroup website for updated BIOS versions. BIOS updates can improve compatibility, stability, and performance. Follow the update instructions carefully to avoid system damage.
- Zarządzanie kablami: Zadbaj o prawidłowe ułożenie kabli wewnętrznych, aby poprawić przepływ powietrza i zapobiec zakłóceniom.
Rozwiązywanie problemów
W tej sekcji omówiono typowe problemy, na które możesz natrafić.
Brak zasilania / System się nie włącza
- Check all power connections: 24-pin ATX, 4-pin CPU, and power cables to peripherals.
- Upewnij się, że wyłącznik zasilania jest w pozycji „ON”.
- Verify the front panel power button connector is correctly attached to the motherboard header.
- Przetestuj zasilacz przy użyciu innego systemu lub testera zasilacza, jeśli jest dostępny.
Brak wyświetlacza / Brak testu POST (autotestu po włączeniu zasilania)
- Sprawdź, czy monitor jest podłączony do prawidłowego wyjścia wyświetlacza (zintegrowanej karty graficznej płyty głównej lub oddzielnej karty graficznej).
- Ponownie zamontuj kartę graficzną i moduły pamięci.
- Check if the CPU cooler is properly installed and connected.
- Listen for beep codes. A series of 9 short beeps often indicates a BIOS ROM error, suggesting a potential issue with the motherboard's firmware.
- Try booting with only essential components (CPU, one RAM stick, graphics card if no integrated graphics) to isolate the problem.
Niestabilność systemu / awarie
- Upewnij się, że wszystkie sterowniki są aktualne.
- Sprawdź temperaturę procesora i procesora graficznego, aby zapobiec przegrzaniu.
- Uruchom narzędzia diagnostyczne pamięci RAM, aby sprawdzić, czy nie ma w niej uszkodzonej pamięci.
- Verify that the power supply provides sufficient wattage dla wszystkich komponentów.
Specyfikacje
| Funkcja | Szczegół |
|---|---|
| Marka | ECS Elitegroup |
| Numer modelu | B350AM4-M2 |
| Gniazdo procesora | Gniazdo AM4 |
| Kompatybilne procesory | AMD Ryzen Processors, AMD 7th Gen Athlon Processors |
| Typ chipsetu | Procesor AMD B350 |
| Technologia pamięci RAM | DDR4 |
| Dostępne gniazda pamięci | 4 gniazda DIMM DDR4 288-pinowe |
| Maksymalny rozmiar pamięci RAM | 64 GB |
| Prędkość zegara pamięci | 2667/2400 MHz (non-ECC, Un-buffered SDRAM) |
| Interfejs karty graficznej | PCI Express |
| Total Number of HDMI Ports | 1 (HDMI 1.4a) |
| DisplayPort | Integrated DP with up to 2560x1600 resolution |
| Porty USB 2.0 | 1 (internal header, total ports may vary) |
| Typ złącza S/PDIF | Optyczny |
| Obsługiwany standard magistrali systemowej | SATA 3 |
| Platforma | Windows 10, Windows Vista |
| Waga przedmiotu | 1.15 funtów |
Gwarancja i wsparcie
The ECS Elitegroup B350AM4-M2 Motherboard comes with a 2-letnia gwarancja from the date of purchase. This warranty covers defects in materials and workmanship under normal use. For warranty claims or technical support, please contact your retailer or visit the official ECS Elitegroup webwitryna zawierająca zasoby pomocy technicznej i informacje kontaktowe.
Wsparcie online: For the latest drivers, BIOS updates, and additional support, please visit the ECS Elitegroup official webstrona.