
1. Wprowadzenie
This manual provides detailed instructions for the installation, operation, maintenance, and troubleshooting of your FSP 400W Micro ATX Power Supply (Model FSP400-60GHS(85)-R1). This power supply unit is designed for compact small form factor PC systems, offering 400 watts of power output with 80 Plus Bronze certification for high efficiency. It is compatible with Intel and AMD CPU systems and standard PC configurations.
Please read this manual thoroughly before installation and operation to ensure proper usage and to prevent damage to the unit or other components.
2. Informacje dotyczące bezpieczeństwa
OSTRZEŻENIE: Power supplies contain high voltage komponenty. Nie otwierać zasilacza casing. Wewnątrz nie ma żadnych części nadających się do samodzielnej naprawy. Otwieranieasing will void the warranty and poses a risk of electric shock.
- Przed przystąpieniem do instalacji lub konserwacji należy upewnić się, że zasilacz jest odłączony od gniazdka sieciowego.
- Zasilacz należy zainstalować w dobrze wentylowanym pomieszczeniu.
- Do not operate the power supply in high humidity or extreme temperature environments.
- Należy używać wyłącznie kabli dostarczonych wraz z zasilaczem.
- Przed włączeniem systemu należy upewnić się, że wszystkie kable są solidnie podłączone.
- This product is designed for use in personal computers. Do not use it for any other purpose.
3. Zawartość opakowania
Sprawdź, czy w przesyłce znajdują się wszystkie wymienione poniżej elementy:
- FSP 400W Micro ATX Power Supply (FSP400-60GHS(85)-R1)
- Przewód zasilający AC
- SFX to PS2 Bracket
- Instrukcja obsługi
- Mounting Screws (typically included with PC cases, but sometimes with PSUs)

Figure 3.1: Package Contents. Shows the power supply unit, user manual, various power cables, an AC power cord, and an SFX to PS2 adapter bracket.
4. Koniec produktuview
The FSP400-60GHS(85)-R1 is a compact power supply designed for small form factor systems. Key features include an 80mm cooling fan with thermal sensing technology and an energy-saving 1-watt standby mode.
4.1 Układ fizyczny

Rysunek 4.1: Kątowy view of the FSP 400W Micro ATX Power Supply, highlighting the fan grille, power switch, and AC power input.

Rysunek 4.2: Tył view of the power supply, detailing the main power switch and the AC power input socket.

Rysunek 4.3: Góra view of the power supply, showing the protective grille over the 80mm cooling fan.
4.2 Złącza wyjściowe
The power supply includes various connectors to power your system components:
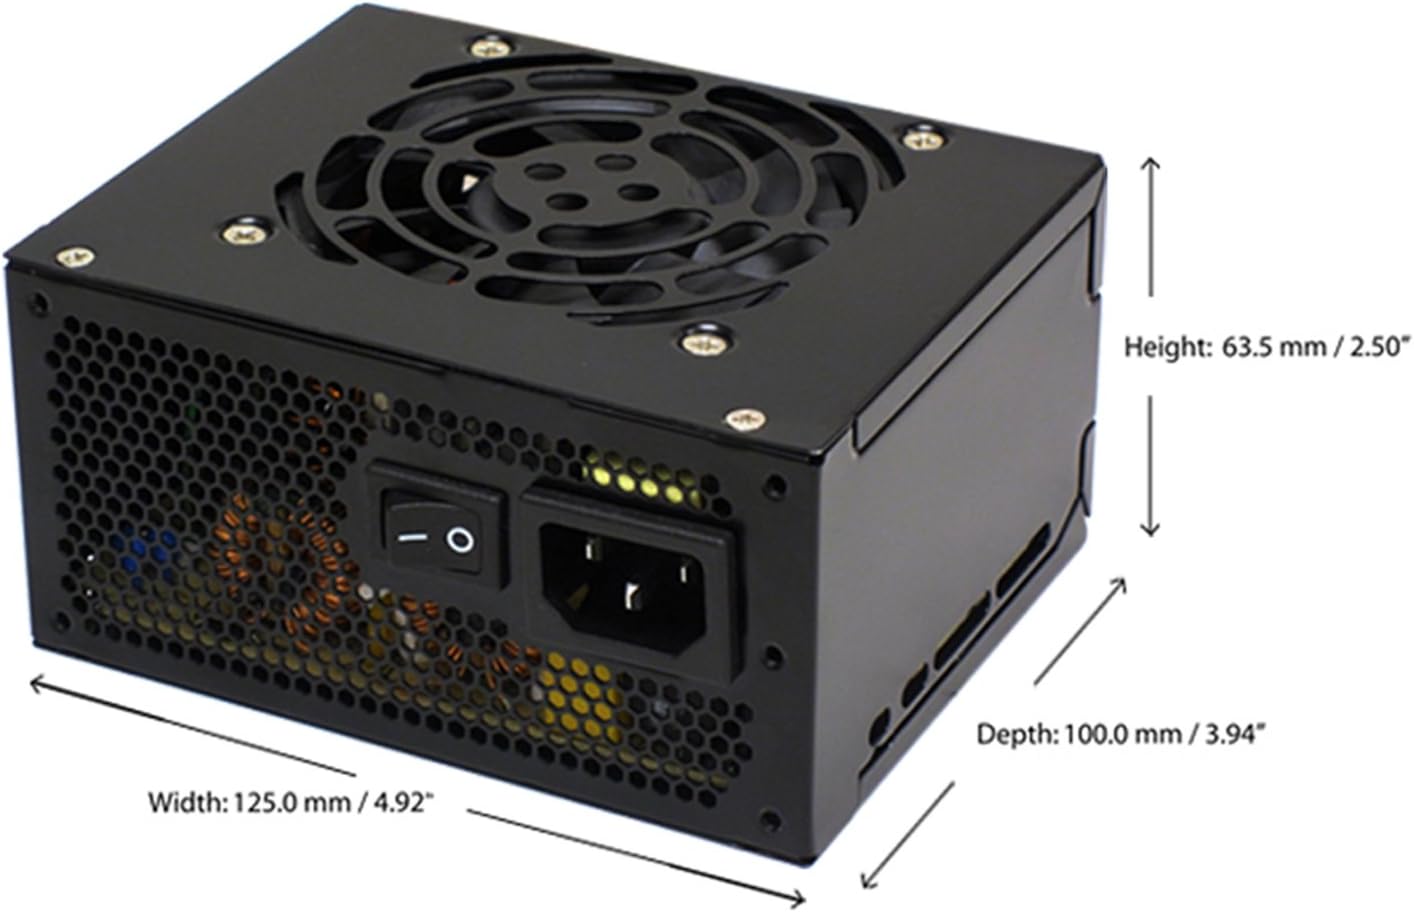
Figure 4.4: Diagram illustrating the types and quantities of output connectors available on the FSP400-60GHS(85)-R1 power supply.
- Main 24 Pin (1): Do zasilania płyty głównej.
- P4 | EPS 4+4 Pin (1): For CPU power.
- PCI-E 8 Pin (6+2) (1): Do kart graficznych.
- Molex 4 Pin (3): For older peripherals and fans.
- Serial ATA 15 Pin (3): For SATA hard drives and SSDs.
- FDD 4 Pin (1): For floppy disk drives or other legacy devices.
5. Konfiguracja i instalacja
Before beginning installation, ensure your computer system is powered off and disconnected from the AC power outlet. It is recommended to wear an anti-static wrist strap to prevent electrostatic discharge (ESD) damage to components.
5.1 Instalacja zasilacza
- Przygotuj sprawę: Open your computer case. Identify the power supply mounting area.
- Montaż zasilacza:
- For SFX cases: Insert the FSP400-60GHS(85)-R1 directly into the SFX power supply bay and secure it with screws.
- For standard ATX cases: Attach the included SFX to PS2 bracket to the power supply. Then, mount the power supply with the bracket into the ATX power supply bay and secure it with screws.

Figure 5.1: The FSP 400W Micro ATX Power Supply shown with the SFX to PS2 adapter bracket installed, ready for mounting in a standard ATX case.

Figure 5.2: Illustration demonstrating how the SFX power supply fits into a PS2 (ATX) case using the provided adapter bracket.
5.2 Kable połączeniowe
Connect the appropriate cables to your motherboard and components. Refer to your motherboard and component manuals for specific connection points.
- Zasilanie płyty głównej: Connect the 24-pin ATX connector to the corresponding socket on your motherboard.
- Moc procesora: Connect the 4+4-pin EPS/ATX 12V connector to the CPU power socket on your motherboard.
- Moc karty graficznej: If your graphics card requires external power, connect the 6+2-pin PCI-E connector(s) to the graphics card.
- Urządzenia pamięci masowej: Connect SATA power connectors to your SATA hard drives, SSDs, and optical drives.
- Urządzenia peryferyjne: Use Molex 4-pin connectors for case fans or other legacy peripherals as needed.
- Zarządzanie kablami: Ułóż kable w sposób zapewniający właściwy przepływ powietrza wewnątrz obudowy.
Once all internal connections are made, close your computer case.
5.3 Połączenie zewnętrzne
- Podłącz przewód zasilający prądu zmiennego do gniazda prądu zmiennego w zasilaczu.
- Podłącz drugi koniec przewodu zasilającego do uziemionego gniazdka ściennego lub listwy przeciwprzepięciowej.
- Ensure the power switch on the back of the power supply is in the "OFF" (O) position before plugging it in.
6. Instrukcja obsługi
6.1 Włączanie systemu
- After all connections are secure, flip the power switch on the back of the power supply to the "ON" (I) position.
- Naciśnij przycisk zasilania na obudowie komputera, aby uruchomić system.
6.2 Thermal Control System
The FSP400-60GHS(85)-R1 features an 80mm cooling fan with thermal sensing technology. This system automatically adjusts the fan speed based on the internal temperature of the power supply, optimizing cooling performance while minimizing noise.
6.3 Energy Saver Standby Mode
This power supply is designed with an energy-saving 1-watt standby mode, reducing power consumption when the system is in a low-power state or turned off but still connected to AC power.
7. Konserwacja
Właściwa konserwacja zapewnia długowieczność i optymalną wydajność zasilacza.
- Czyszczenie: Periodically clean the exterior of the power supply and its fan grille to prevent dust buildup. Use a soft, dry cloth or compressed air. Ensure the power supply is disconnected from AC power before cleaning.
- Wentylacja: Ensure that the power supply's fan and ventilation openings are not obstructed. Good airflow is crucial for cooling.
- Integralność kabla: Regularnie sprawdzaj wszystkie kable zasilające pod kątem oznak zużycia, przetarcia lub uszkodzeń. Uszkodzone kable należy natychmiast wymienić.
Do not attempt to open the power supply unit for internal cleaning or repair. This will void the warranty and can be dangerous.
8. Rozwiązywanie Problemów
Jeśli masz problemy z zasilaniem, zapoznaj się z poniższymi typowymi problemami i ich rozwiązaniami:
8.1 Brak zasilania systemu
- Check AC Power: Ensure the AC power cord is securely plugged into both the power supply and a working wall outlet.
- Przycisk zasilania: Verify that the power switch on the back of the power supply is in the "ON" (I) position.
- Połączenia wewnętrzne: Confirm that the 24-pin ATX and 4+4-pin EPS/ATX 12V connectors are firmly seated in the motherboard.
- Zwarcie: Disconnect all peripheral power cables (SATA, Molex, PCI-E) and attempt to power on. If the system powers on, a short circuit may exist in one of the connected components or cables. Reconnect them one by one to identify the faulty component.
8.2 Niestabilność systemu lub losowe wyłączanie się systemu
- Przeciążać: Ensure your system's power requirements do not exceed the 400W capacity of the power supply.
- Wentylacja: Check for proper airflow within the case and ensure the power supply's fan is not obstructed. Overheating can cause instability.
- Połączenia kablowe: Re-check all power connections to ensure they are secure. Loose connections can lead to intermittent power delivery.
8.3 Nadmierny hałas wentylatora
- Nagromadzenie kurzu: Clean the fan grille and fan blades with compressed air.
- Przeszkoda: Ensure no cables or foreign objects are interfering with the fan's rotation.
- Środowisko operacyjne: High ambient temperatures can cause the thermal control system to increase fan speed. Ensure adequate room ventilation.
If troubleshooting steps do not resolve the issue, contact FSP customer support or your retailer for assistance.
9. Specyfikacje
Detailed technical specifications for the FSP400-60GHS(85)-R1 power supply:
| Nazwa modelu | FSP 400W Micro ATX Power Supply |
| Numer modelu | FSP400-60GHS(85)-R1 |
| Marka | FSP |
| Moc wyjściowatage | 400 watów |
| Certyfikacja 80 Plus | 80 Plus Brąz |
| Współczynnik kształtu | Micro ATX (SFX with PS2 bracket) |
| Metoda chłodzenia | Air (80mm fan with thermal control) |
| Projekt zasilacza | Nie-modułowy |
| Wejście Voltage | 100–265 V (prąd przemienny) |
| Wymiary (dł. x szer. x wys.) | 4.9 x 3.9 x 2.5 cala (125.0 x 100.0 x 63.5 mm) |
| Waga przedmiotu | 2.31 funtów |
| Kompatybilne urządzenia | Personal Computer (AMD/Intel CPU systems) |
| Złącza | Main 24 Pin (1), P4 | EPS 4+4 Pin (1), PCI-E 8 Pin (6+2) (1), Molex 4 Pin (3), Serial ATA 15 Pin (3), FDD 4 Pin (1) |
| Zgodność środowiskowa | RoHS, Lead-Free, Green Product (G.P) |

Figure 9.1: Physical dimensions of the FSP 400W Micro ATX Power Supply.

Figure 9.2: Illustrative diagram showing typical cable lengths for the power supply connectors.
10. Informacje o gwarancji
The FSP 400W Micro ATX Power Supply (FSP400-60GHS(85)-R1) is covered by a 3-letnia gwarancja producenta. This warranty guarantees the quality and performance of the product for the specified period from the date of purchase.
The warranty covers defects in materials and workmanship under normal use. It does not cover damage resulting from improper installation, accidents, misuse, abuse, natural disasters, or unauthorized modifications or repairs. Opening the power supply casing spowoduje unieważnienie gwarancji.
For warranty claims or service, please retain your proof of purchase and contact FSP customer support.
11. Obsługa klienta
If you require further assistance, have questions, or need to report an issue that cannot be resolved using the troubleshooting guide, please contact FSP customer support.
- FSP Webstrona: Visit the official FSP webwitryna zawierająca informacje o produkcie, odpowiedzi na często zadawane pytania i zasoby pomocy technicznej.
- Informacje kontaktowe: Refer to the FSP website or your product packaging for the most current customer service contact details (phone, email, or support portal).
When contacting support, please have your product model number (FSP400-60GHS(85)-R1) and proof of purchase readily available.