1. Wprowadzenie
This manual provides essential instructions for the safe and efficient operation of your Automatic Mini Double Station Mug Heat Press Transfer Machine. Please read this manual thoroughly before use to ensure proper setup, operation, and maintenance.
This machine is designed for sublimation printing on various mug sizes, featuring a double station design for increased efficiency.
2. Instrukcje bezpieczeństwa
- Zawsze należy używać urządzenia na stabilnej, odpornej na ciepło powierzchni.
- Keep hands clear of heating elements during operation to prevent burns.
- Zapewnić odpowiednią wentylację w miejscu pracy.
- Nie wystawiaj urządzenia na działanie wody ani nadmiernej wilgoci.
- Odłącz urządzenie od gniazdka elektrycznego, gdy nie jest używane, a także przed czyszczeniem/konserwacją.
- Do not attempt to modify or repair the machine yourself. Contact qualified personnel for service.
- Trzymać dzieci i zwierzęta domowe z dala od pracującej maszyny.
3. Zawartość opakowania
Sprawdź, czy w opakowaniu znajdują się wszystkie elementy:
- 1x Double Mug Heat Press Machine
- 1x Instrukcja obsługi w języku angielskim (ten dokument)
- 2x 11oz Heating Pads (pre-installed or included separately)
Jeśli brakuje jakichkolwiek elementów lub są one uszkodzone, prosimy o kontakt z obsługą klienta.
4. Konfiguracja
- Rozpakowywanie: Carefully remove the heat press machine from its packaging. Retain packaging for future storage or transport.
- Umieszczenie: Place the machine on a flat, stable, and heat-resistant surface. Ensure there is adequate space around the machine for ventilation and safe operation.
- Podłączenie zasilania: Ensure the machine's power switch is in the OFF position. Plug the machine into a standard 110V AC power outlet.
- Inspekcja wstępna: Before first use, inspect the heating pads and control panel for any visible damage.

Rycina 1: Przód view of the Double Mug Heat Press Machine. This image shows the overall design with two mug stations and the central control panel.
5. Instrukcja obsługi
5.1 Panel sterowania ponadview

Figure 2: Close-up of the LCD control panel. The panel features an LCD display for temperature and time, along with buttons for timing, temperature adjustment, and mode selection for left and right stations.
The machine features an LCD control panel for setting temperature and time. It allows for independent control of each mug station.
5.2 Podstawowe kroki operacyjne
- Włączanie: Włącz główny wyłącznik zasilania. Wyświetlacz LCD się zaświeci.
- Ustaw temperaturę: Use the temperature adjustment buttons (often indicated by '+' and '-' or specific temperature setting buttons) to set the desired transfer temperature. The recommended transfer temperature is 180°C (356°F).
- Ustaw czas: Use the timing adjustment buttons to set the desired transfer time. The recommended transfer time is 90 seconds.
- Ogrzewanie wstępne: Allow the machine to preheat until it reaches the set temperature. The display will show the current temperature.
- Prepare Mug: Wrap your sublimation print around the mug, securing it with heat-resistant tape. Ensure the print is flat against the mug surface.
- Włóż kubek: Carefully place the prepared mug into the heating pad of one or both stations. Ensure the mug is centered and the heating pad fully encompasses the printed area.
- Zastosuj nacisk: Zamknij clamp handle to apply even pressure to the mug. The machine is designed to accommodate various mug sizes (6OZ, 9OZ, 11OZ, 12OZ, 17OZ) with appropriate heating pads.
- Rozpocznij transfer: Press the start button (often labeled 'Timing' or 'Start') for the respective station. The timer will begin counting down.
- Usuń kubek: Once the timer reaches zero, carefully open the clamp handle and remove the hot mug using heat-resistant gloves.
- Ochłonąć: Place the mug on a heat-resistant surface to cool. Once cool, carefully remove the sublimation paper.

Figure 3: A mug correctly positioned within the heating element of the heat press machine, ready for the sublimation process.
5.3 Workflow Diagram
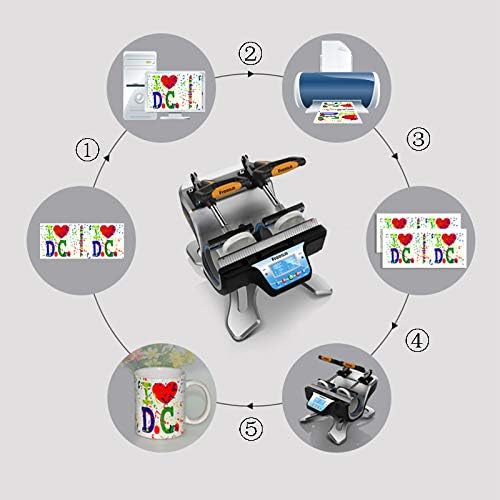
Figure 4: A visual representation of the sublimation printing process, from designing and printing the image to pressing it onto the mug and the final result.
5.4 Replacing Heating Pads
The heating pads are replaceable to accommodate different mug sizes. The machine includes two 11oz heating pads. For other sizes, contact customer support.

Rysunek 5: Szczegółowy view of the heating element, showing its construction and how it secures the mug for heat transfer.
- Wyłącz i odłącz: Ensure the machine is turned off and unplugged from the power source. Allow the heating pads to cool completely.
- Luzowanie elementów złącznych: Locate the fasteners securing the heating pad to the machine frame. Loosen or remove them as required.
- Disconnect Pad: Carefully disconnect the electrical connector for the heating pad.
- Usuń starą podkładkę: Slide out the old heating pad.
- Zainstaluj nową podkładkę: Insert the new heating pad, ensuring it is correctly aligned.
- Połącz i zabezpiecz: Reconnect the electrical connector and secure the heating pad with the fasteners.
- Test: Plug in the machine and perform a test run to ensure the new heating pad functions correctly.
6. Konserwacja
- Czyszczenie: After each use, ensure the machine is cool and unplugged. Wipe down the exterior surfaces with a soft, dry cloth. Do not use abrasive cleaners or solvents.
- Pielęgnacja poduszki grzewczej: Inspect heating pads regularly for wear or damage. Replace if necessary to ensure consistent heat transfer.
- Składowanie: Gdy urządzenie nie jest używane, przechowuj je w suchym i wolnym od kurzu pomieszczeniu.
7. Rozwiązywanie Problemów
| Problem | Możliwa przyczyna | Rozwiązanie |
|---|---|---|
| Maszyna nie włącza się. | Niepodłączony; wyłączony wyłącznik zasilania; uszkodzone gniazdko elektryczne. | Sprawdź połączenie przewodu zasilającego; upewnij się, że wyłącznik zasilania jest w pozycji WŁĄCZONY; przetestuj gniazdko, podłączając inne urządzenie. |
| Temperatura nie osiąga ustawionej wartości. | Nieprawidłowe ustawienie temperatury; uszkodzony element grzejny. | Verify temperature setting; allow more time for preheating; contact support if issue persists. |
| Nierówne wyniki transferu. | Uneven pressure; worn heating pad; incorrect mug placement. | Ensure mug is centered and clamp is fully engaged; inspect heating pad for wear; ensure print is flat on mug. |
| Timer nie działa. | Incorrect operation; control panel issue. | Review operating instructions for timer activation; contact support. |
8. Specyfikacje
| Model | Automatic Mini Double Station Mug Heat Press Transfer Machine |
| Compatible Mug Sizes | 6OZ, 9OZ, 11OZ, 12OZ, 17OZ |
| Tomtage | 110 V |
| Moc | 280 W + 280 W (łącznie 560 W) |
| Temperatura transferu | 180°C (356°F) |
| Czas transferu | 90 Seconds (Adjustable) |
| Model sterowania | Sterowanie LCD |
| Waga | 14.6 funta (7.2 kg) |
| Wymiary całkowite | 14.5" x 12" x 13.38" (37 x 30.6 x 34 cm) |
| Typ wtyczki | Wtyczka amerykańska |
9. Gwarancja i wsparcie
No specific warranty information is provided with this product. For technical support, replacement parts (such as different sized heating pads), or any operational questions, please refer to the seller or manufacturer's contact information provided at the point of purchase.