1. Wprowadzenie
Thank you for choosing the Andoer Mini 49-LED Camera Video Light. This compact and versatile lighting solution is designed to enhance your photography and videography with bright, dimmable illumination. Featuring 49 high-quality LED beads, a 6000K color temperature, and a CRI of ≥90, it provides natural and soft white light. Its design includes multiple hot shoe bases for interlocking with other lights and a standard hot shoe mount with a 1/4-inch thread for broad compatibility with cameras and light stands.

Rycina 1.1: Przód view of the Andoer Mini 49-LED Camera Video Light.
2. Informacje dotyczące bezpieczeństwa
Please read and understand all safety precautions before using this product to prevent damage or injury.
- Nie wystawiaj urządzenia na działanie wody ani nadmiernej wilgotności.
- Unikaj bezpośredniego światła diod LED, ponieważ emituje ono bardzo jasne światło.
- Nie należy podejmować prób demontażu ani modyfikacji lampy. Naprawy powinny być wykonywane wyłącznie przez wykwalifikowany personel.
- Use only specified AA batteries. Ensure correct polarity when inserting batteries.
- Wyjmij baterie, jeśli latarka nie będzie używana przez dłuższy czas.
- Przechowywać w miejscu niedostępnym dla dzieci.
3. Konfiguracja
3.1 Instalacja baterii
- Znajdź pokrywę komory baterii znajdującą się z tyłu latarki.
- Otwórz pokrywę.
- Włóż dwie (2) baterie AA, zwracając uwagę na prawidłową biegunowość (+/-), zgodnie ze wskazaniami wewnątrz komory.
- Dokładnie zamknij pokrywę komory baterii.

Figure 3.1: Open battery compartment for AA battery installation.
3.2 Montaż światła
The Andoer Mini 49-LED Camera Video Light offers versatile mounting options:
- On-Camera Hot Shoe: The light features a standard hot shoe mount at its base. Slide this mount into your camera's hot shoe slot and tighten the locking ring for a secure fit.
- 1/4-inch Thread: The hot shoe mount also includes a 1/4-inch thread, allowing it to be attached to light stands, tripods, or other accessories with a compatible screw.

Figure 3.2: The video light mounted on a DSLR camera's hot shoe.
3.3 Interlocking Multiple Lights
For enhanced lighting effects, multiple Andoer Mini 49-LED lights can be interlocked. The light is equipped with hot shoe bases on three sides (top, left, right).
- Mount the first light onto your camera or stand.
- Take a second light and slide its hot shoe mount into one of the hot shoe bases on the first light.
- Repeat for additional lights as needed.

Figure 3.3: Multiple lights interlocked for broader illumination.
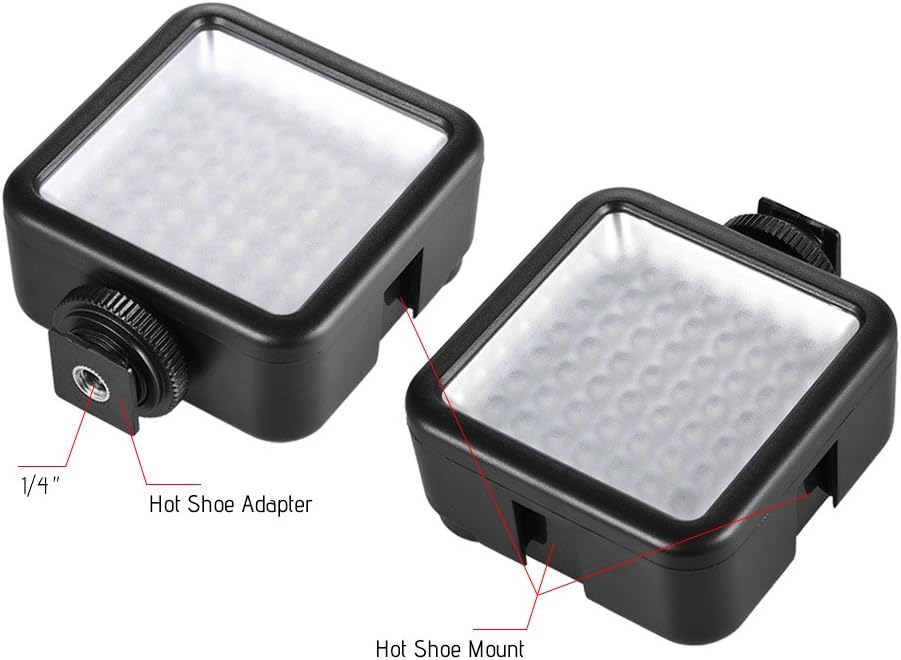
Figure 3.4: Detail of the hot shoe adapter and mount for interlocking.
4. Instrukcja obsługi
4.1 Włączanie/wyłączanie i regulacja jasności
The light features a single rotary knob for both power control and brightness adjustment.
- Włączanie: Rotate the knob clockwise from the 'OFF' position. The light will turn on at its lowest brightness setting.
- Dostosuj jasność: Continue rotating the knob clockwise to increase brightness from 0% to 100%. Rotate counter-clockwise to decrease brightness.
- Wyłączone: Rotate the knob counter-clockwise until it clicks into the 'OFF' position.

Figure 4.1: The ON/Dimmer rotary knob on the back of the light.

Figure 4.2: Visual representation of 0-100% dimmable brightness.
5. Konserwacja
- Czyszczenie: Do czyszczenia zewnętrznej części lampy należy używać miękkiej, suchej ściereczki. Nie należy używać środków czyszczących o właściwościach ściernych ani rozpuszczalników.
- Składowanie: Store the light in a cool, dry place away from direct sunlight and extreme temperatures. Remove batteries if storing for extended periods.
- Pielęgnacja baterii: Replace batteries when the light output becomes dim or inconsistent. Dispose of used batteries responsibly according to local regulations.
6. Rozwiązywanie Problemów
| Problem | Możliwa przyczyna | Rozwiązanie |
|---|---|---|
| Światło się nie włącza. | Baterie są rozładowane lub nieprawidłowo włożone. | Sprawdź biegunowość baterii. Wymień je na nowe baterie AA. |
| Light dims quickly or is inconsistent. | Niski poziom naładowania baterii. | Wymień na nowe baterie AA. |
| Światło nie jest solidnie zamontowane. | Mounting knob/ring is loose. | Ensure the hot shoe locking ring is tightened. |
7. Specyfikacje
| Funkcja | Specyfikacja |
|---|---|
| Model | W49 |
| Ilość diod LED | 49 sztuki |
| Moc wyjściowa | 5.5 W |
| Temperatura barwowa | 6000 tys. |
| CRI (wskaźnik oddawania barw) | ≥90 |
| Zakres przyciemniania | 0% - 100% |
| Źródło zasilania | 2 baterie AA (brak w zestawie) |
| Życie | Do 50,000 godzin |
| Montowanie | Hot Shoe Mount, 1/4-inch Thread |
| Wymiary produktu | 3.15 x 1.22 x 2.56 cala (8 x 3.1 x 6.5 cm) |
| Waga przedmiotu | 3.36 uncji (95.25 grama) |

Rysunek 7.1: Wymiary produktu.
8. Informacje o gwarancji
Specific warranty details for the Andoer Mini 49-LED Camera Video Light are typically provided at the point of purchase or within the product packaging. Please retain your proof of purchase for any warranty claims. For detailed warranty terms and conditions, please refer to the documentation included with your product or contact the seller/manufacturer directly.
9. Wsparcie
If you encounter any issues or have questions regarding your Andoer Mini 49-LED Camera Video Light that are not covered in this manual, please contact the retailer from whom you purchased the product. Alternatively, you may visit the official Andoer website for further support and contact information.