1. Wprowadzenie
This manual provides essential information for the safe and effective use of your Vivibright GP90 UP Portable Video Projector. Please read it thoroughly before operating the device and retain it for future reference. The Vivibright GP90 UP is a portable video projector featuring an Android 4.42 operating system, 3200 lumens brightness, and 1280x800 native resolution, designed for multimedia entertainment and presentations.
2. Instrukcje bezpieczeństwa
- Nie blokuj otworów wentylacyjnych. Zapewnij odpowiedni przepływ powietrza wokół projektora, aby zapobiec przegrzaniu.
- Nie wystawiaj projektora na działanie deszczu i wilgoci, aby uniknąć porażenia prądem elektrycznym lub pożaru.
- Unikaj patrzenia bezpośrednio w obiektyw projektora, gdyamp jest włączony, ponieważ jasne światło może uszkodzić wzrok.
- Ustaw projektor na stabilnej i równej powierzchni, aby zapobiec jego upadkowi.
- Używaj wyłącznie zasilacza dołączonego do projektora.
- Nie próbuj samodzielnie demontować ani naprawiać projektora. Wszelkie prace serwisowe powierzaj wykwalifikowanemu personelowi.
- Trzymaj projektor z dala od źródeł ciepła i bezpośredniego światła słonecznego.
3. Zawartość opakowania
Sprawdź, czy w opakowaniu znajdują się wszystkie elementy:
- Vivibright GP90 UP Projector
- Kabel zasilający
- Remote Control (may not be included with all models)
- Instrukcja obsługi (ten dokument)
4. Koniec produktuview
Zapoznaj się z podzespołami projektora i portami połączeniowymi.
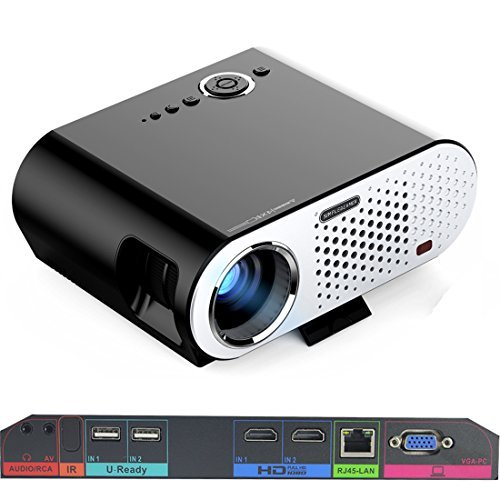
Image: The Vivibright GP90 UP projector showing its top controls, lens, and various input/output ports on the rear panel. The top features power and navigation buttons. The front has the projection lens. The rear panel includes Audio/RCA, IR receiver, two USB ports (U-Ready), two HDMI ports (HD), an RJ45-LAN port, and a VGA-PC port.
4.1 Panel przedni
- Soczewka projekcyjna: Emituje obraz.
4.2 Panel górny
- Przyciski sterujące: Power, navigation, and menu access.
4.3 Rear Panel (Input/Output Ports)
- AUDIO/RCA: Audio output and composite video input.
- IR: Odbiornik podczerwieni do zdalnego sterowania.
- IN 1 / IN 2 (USB): Two USB ports for connecting USB storage devices.
- IN 1 / IN 2 (HDMI): Two HDMI inputs for digital video and audio sources.
- RJ45-LAN: Port Ethernet do przewodowego połączenia sieciowego.
- VGA-PC: VGA input for connecting to computers.
5. Konfiguracja
5.1 Umieszczenie
- Place the projector on a flat, stable surface or mount it on a ceiling or tripod.
- Ensure the projector is positioned directly in front of the screen or wall. Avoid angled placement as horizontal keystone correction is not available.
- The optimal projection distance ranges from 1.2m to 8.5m, producing screen sizes from 35 to 280 inches. For a 100-inch image, a distance of approximately 3 meters is recommended.
5.2 Połączenie zasilania
- Podłącz kabel zasilający do wejścia zasilania projektora.
- Plug the other end of the power cable into a suitable electrical outlet (90~240V/50~60Hz).
5.3 Podłączanie urządzeń wejściowych
- HDMI: Connect an HDMI cable from your source device (e.g., laptop, Blu-ray player, gaming console) to one of the projector's HDMI ports.
- USB: Insert a USB flash drive or external hard drive into a USB port to access media files.
- VGA: Connect a VGA cable from your computer to the projector's VGA-PC port.
- AV: Use an RCA cable to connect older devices to the AV input.
- LAN: Connect an Ethernet cable to the RJ45-LAN port for a wired internet connection.
5.4 Regulacja ostrości i zniekształcenia trapezowego
- Centrum: Obróć pierścień ostrości wokół obiektywu, aż wyświetlany obraz będzie ostry i wyraźny.
- Korekcja Keystone'a: Use the manual vertical keystone correction feature (±15°) to adjust the image shape if the projector is not perfectly perpendicular to the screen. This corrects trapezoidal distortion.
6. Instrukcja obsługi
6.1 Włączanie/wyłączanie
- Włączanie: Press the power button on the projector or the remote control. The indicator light will change, and the projector will start.
- Wyłączone: Press the power button again. Confirm shutdown if prompted. Allow the projector to cool down before unplugging.
6.2 Nawigacja po systemie operacyjnym Android
- The projector runs on Android 4.42. Use the remote control or connect a wireless mouse (recommended for easier navigation) to interact with the interface.
- Access pre-installed apps or download compatible applications from the app store. Note that some newer applications may not be compatible with Android 4.42.
6.3 Projekcja bezprzewodowa
- Wi-Fi: Connect to a wireless network via the settings menu. Supports dual-band Wi-Fi 2.4G.
- Bluetooth: Supports Bluetooth 4.0 for connecting wireless devices such as speakers. Note that Bluetooth audio output may only be available when using USB or Android sources, not HDMI.
- Wireless Push (EZCast / Miracast / Airplay): Use compatible apps on your smartphone or tablet to mirror your device's screen to the projector. Ensure your device and the projector are on the same Wi-Fi network.
6.4 Ustawienia audio
- The projector features built-in 4Ω, 5W stereo speakers with SRS sound technology.
- For enhanced audio, connect external speakers via the Audio Out port or wirelessly via Bluetooth (when using Android or USB sources).
7. Konserwacja
7.1 Czyszczenie
- Obiektyw: Używaj miękkiej, niepozostawiającej włókien ściereczki przeznaczonej specjalnie do soczewek optycznych. Nie używaj środków ściernych.
- Casing: Przetrzyj zewnętrzną część projektora miękką, suchą ściereczką. W przypadku uporczywych zabrudzeń użyj lekko szorowatego detergentu.amp ściereczką i dokładnie osuszyć.
- Otwory wentylacyjne: Periodically clean the ventilation openings with a soft brush or compressed air to prevent dust buildup, which can affect performance and lifespan.
7.2 Przechowywanie
- Jeśli projektor nie będzie używany przez dłuższy czas, należy go przechowywać w chłodnym i suchym miejscu, z dala od bezpośredniego światła słonecznego i ekstremalnych temperatur.
- Cover the lens with its cap to protect it from dust and scratches.
8. Rozwiązywanie Problemów
| Problem | Możliwa przyczyna | Rozwiązanie |
|---|---|---|
| Brak wyświetlanego obrazu | Zasilanie niepodłączone; Nie wybrano źródła sygnału; Założona osłona obiektywu | Sprawdź połączenie zasilania; Wybierz prawidłowe źródło sygnału wejściowego; Zdejmij osłonę obiektywu |
| Obraz jest rozmazany | Nie ustawiono ostrości; Projektor jest za blisko/za daleko | Adjust focus ring; Adjust projection distance |
| Obraz ma kształt trapezu | Projektor nie jest ustawiony prostopadle do ekranu | Adjust vertical keystone correction; Reposition projector to be centered |
| Brak dźwięku | Volume too low; Muted; External speakers not connected/selected | Increase volume; Unmute; Check external speaker connections/settings |
| Wireless projection unstable | Weak Wi-Fi signal; Device incompatibility; Outdated Android OS | Ensure strong Wi-Fi signal; Check device compatibility with Miracast/Airplay; Consider wired connection if issues persist with older Android version. |
9. Specyfikacje
| Funkcja | Szczegół |
|---|---|
| Marka | Vivibright |
| Model | GP90 UP |
| System operacyjny | Android 4.42 |
| Jasność | 3200 Lumens (LED Luminous efficiency) |
| Rozdzielczość natywna | 1280 x 800 (supports up to 1080P) |
| Współczynnik kontrastu | 3000:1 (Dynamic up to 10,000:1) |
| Rozmiar projekcji | 35-280 cala |
| Odległość projekcji | 1.2 m - 8.5 m |
| Współczynnik rzutu | 1.45:1 |
| Korekcja trapezowa | Ręczny w pionie ±15° |
| Żywotność źródła światła | Do 30,000 godzin |
| Łączność | Wi-Fi (2.4G), Bluetooth 4.0, 2x HDMI, 2x USB, VGA, AV, RJ45-LAN |
| Audio | Built-in 4Ω, 5W stereo speakers with SRS sound |
| Zasilacz | 90 ~ 240 V/50 ~ 60 Hz |
| Wymiary produktu | Wymiary 27 x 22 x 9 cm |
| Waga przedmiotu | 3.17 kilogramów |
10. Gwarancja i wsparcie
For warranty information and technical support, please refer to the documentation provided at the time of purchase or contact Vivibright customer service. Keep your purchase receipt as proof of purchase for warranty claims.