1. Wprowadzenie
This manual provides comprehensive instructions for the safe and effective use of the PCE Instruments PCE-170 A Light Meter. This device is designed for measuring illuminance (lux or foot-candles) in various environments, such as offices, factories, and outdoor settings. It features a wide measurement range, fast response time, and a compact design for ease of use.
Przed rozpoczęciem korzystania z urządzenia należy uważnie przeczytać instrukcję i zachować ją do wykorzystania w przyszłości.
2. Informacje dotyczące bezpieczeństwa
Observe the following safety precautions to prevent injury and avoid damage to the device:
- Nie wystawiaj urządzenia na działanie ekstremalnych temperatur, wilgoci ani bezpośredniego światła słonecznego.
- Unikaj silnych wibracji i uderzeń.
- Nie próbuj otwierać ani modyfikować urządzenia. Wszelkie prace serwisowe zlecaj wykwalifikowanemu personelowi.
- Keep the light sensor clean and free from obstructions to ensure accurate readings.
- Aby zapobiec wyciekowi baterii, wyjmij ją, jeśli urządzenie nie będzie używane przez dłuższy czas.
- Zużyte baterie i urządzenie należy utylizować zgodnie z lokalnymi przepisami.
3. Koniec produktuview
The PCE-170 A Light Meter consists of a main unit with a display and control buttons, and an integrated light sensor.

Rysunek 1: Przód view of the PCE-170 A Light Meter, showing the display, control buttons, and light sensor at the top.
3.1 Składniki
- Czujnik światła: Located at the top of the device, protected by a white dome. This silicon photodiode measures incident light.
- Wyświetlacz LCD: A 5-digit display showing measurement values, units (lux/fc), and function indicators (e.g., AUTO RANGE, HOLD, MIN, MAX).
- Przycisk zasilania (włącz/wyłącz): Włącza lub wyłącza urządzenie.
- Przycisk CAL: Used for zero adjustment.
- Przytrzymaj przycisk: Zamraża aktualny odczyt na wyświetlaczu.
- fc/lx Button: Toggles between foot-candle (fc) and lux (lx) measurement units.
- Przycisk ZAKRES: Manually selects measurement ranges or activates auto-ranging.
- Komora baterii: Located at the rear, houses the 9V battery.

Rysunek 2: Z bliska view of the LCD display, showing a reading of "534 lx" and "AUTO RANGE 4 000".
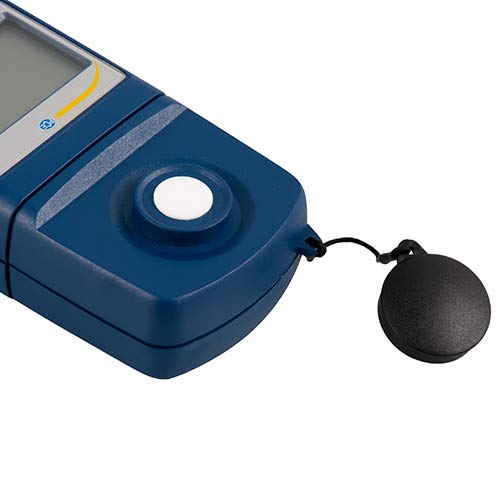
Rysunek 3: Szczegółowy view of the light sensor at the top of the device, with its protective cap removed.
4. Konfiguracja
4.1 Instalacja baterii
- Znajdź pokrywę komory baterii z tyłu urządzenia.
- Slide the cover open or unscrew it, depending on the model.
- Insert one 9V battery, observing the correct polarity (+/-).
- Dokładnie załóż pokrywę komory baterii.
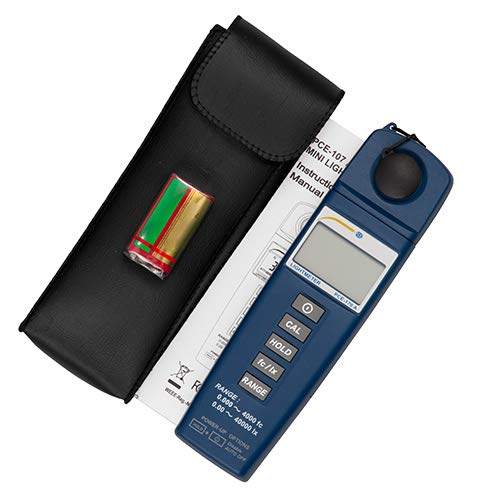
Rysunek 4: The PCE-170 A Light Meter shown with its carrying case and the included 9V battery, ready for installation.
4.2 Pierwsze włączenie zasilania
Naciśnij Moc button to turn on the device. The display will illuminate and show a reading. If the battery symbol appears, replace the battery.
5. Instrukcja obsługi
5.1 Wykonywanie pomiaru
- Włącz urządzenie za pomocą Moc przycisk.
- Ensure the light sensor is clean and unobstructed.
- Position the light sensor at the location where illuminance is to be measured. Ensure the sensor is facing the light source directly for accurate readings.
- The current illuminance value will be displayed on the LCD.

Rysunek 5: A user measuring light levels in an office environment with the PCE-170 A Light Meter.
5.2 Changing Measurement Units (fc/lx)
Naciśnij fc/lx button to toggle between foot-candles (fc) and lux (lx) units. The selected unit will be indicated on the display.
5.3 Funkcja HOLD
Naciśnij TRZYMAĆ button to freeze the current reading on the display. Press it again to release the hold and resume live measurements.
5.4 Zero Adjustment (CAL)
Aby wykonać kalibrację zera:
- Place the light sensor in a completely dark environment (e.g., cover it with the protective cap or place it in a dark box).
- Naciśnij CAL Na wyświetlaczu powinno pojawić się „0.00” lub wartość bardzo bliska zeru.
- Jeżeli na wyświetlaczu nie pojawi się zero, powtórz proces.
5.5 Wybór zakresu
The device typically operates in auto-ranging mode. To manually select a range or cycle through available ranges, press the RANGE button. The display will indicate the active range. Press and hold the RANGE button to return to auto-ranging mode.
5.6 Min/Max Function (Power-Up Option)
The PCE-170 A supports Min/Max recording. To activate this feature, refer to the power-up options indicated on the device label (e.g., press and hold a specific button during power-on). This function records the minimum and maximum illuminance values detected during a measurement session.
6. Konserwacja
6.1 Czyszczenie
Wipe the device with a soft, dry cloth. Do not use abrasive cleaners or solvents. Keep the light sensor clean and free of dust or smudges, as this can affect measurement accuracy.
6.2 Przechowywanie
When not in use, store the PCE-170 A Light Meter in its carrying case in a cool, dry place, away from direct sunlight and extreme temperatures. Remove the battery if storing for extended periods.
7. Rozwiązywanie Problemów
| Problem | Możliwa przyczyna | Rozwiązanie |
|---|---|---|
| Urządzenie się nie włącza. | Rozładowana lub nieprawidłowo zainstalowana bateria. | Sprawdź biegunowość baterii lub wymień ją na nową baterię 9 V. |
| Na wyświetlaczu pojawia się komunikat „OL” (Przeciążenie). | Light intensity exceeds the current measurement range. | Switch to a higher measurement range using the RANGE button, or move to a less intensely lit area. |
| Niedokładne odczyty. | Dirty sensor, incorrect zero adjustment, or sensor not facing light source correctly. | Clean the sensor, perform zero adjustment in darkness, and ensure the sensor is properly oriented. |
| Wyświetlacz jest pusty lub miga. | Niski poziom naładowania baterii. | Wymień baterię 9V. |
8. Specyfikacje
| Parametr | Wartość |
|---|---|
| Zakresy pomiarowe | 0.00 ... 40,000 lux / 0.000 ... 4000 fc |
| Rezolucja | 0.01 luksów / 0.001 fc |
| Dokładność | ±3% of measurement value + 5 digits |
| Wskaźnik przeciążenia | "OL" |
| Szybkość pomiaru | Co 2 sekund |
| Temperatura pracy | 0 ... 40°C / 32 ... 104°F |
| Czujnik światła | Silicon photodiode, corrected cosine angle |
| Wyświetlacz | 5-cyfrowy wyświetlacz LCD |
| Źródło zasilania | Bateria 9V (w zestawie) |
| Wymiary | 33 x 54 x 196 mm / 1.3 x 2.1 x 7.7 cala |
| Waga | 180 g / <1 lb (approx. 9.17 ounces) |
8.1 Zakres dostawy
The standard delivery package includes:
- 1 x PCE-170 A Lux Meter
- 1 bateria 9V
- 1 x Etui transportowe
- 1 x Instrukcja obsługi (ten dokument)
9. Gwarancja i wsparcie
PCE Instruments provides a warranty for this product against defects in materials and workmanship. For specific warranty terms and conditions, please refer to the warranty card included with your purchase or visit the official PCE Instruments website. For technical support, service, or calibration inquiries, please contact PCE Instruments customer service.
PCE Instruments USA: Odwiedź sklep