
PatrolEyes PE-DV5-2
Instrukcja obsługi kamery nasobnej PatrolEyes PE-DV5-2
1296P HD 32GB GPS Auto IR Night Vision Police Body Camera
1. Wprowadzenie
Thank you for choosing the PatrolEyes PE-DV5-2 Body Camera. This device is designed for professional use, offering high-definition video recording, advanced night vision capabilities, and integrated GPS for reliable evidence collection. This manual will guide you through the setup, operation, and maintenance of your new body camera to ensure optimal performance and longevity.
2. Zawartość opakowania
Sprawdź, czy w przesyłce znajdują się wszystkie elementy:
- PatrolEyes PE-DV5-2 Body Camera
- Battery (Included Components)
- Kabel USB do ładowania/danych danych
- Ładowarka sieciowa
- Klip montażowy
- Instrukcja obsługi (ten dokument)
3. Części i elementy sterujące
Familiarize yourself with the various parts and controls of your PatrolEyes PE-DV5-2 body camera.

Rysunek 3.1: Przód view of the PatrolEyes PE-DV5-2 body camera, highlighting the central camera lens, surrounding infrared (IR) lights for night vision, and the PatrolEyes logo at the bottom. The device has a rugged, black casing.

Rysunek 3.2: Front-side perspective of the PatrolEyes PE-DV5-2 body camera, providing a clearer view of the camera lens and the array of control buttons located on the side panel, including the yellow button at the top.

Rysunek 3.3: Strona view of the PatrolEyes PE-DV5-2 body camera, prominently featuring the red record button and the covered USB port for charging and data transfer.
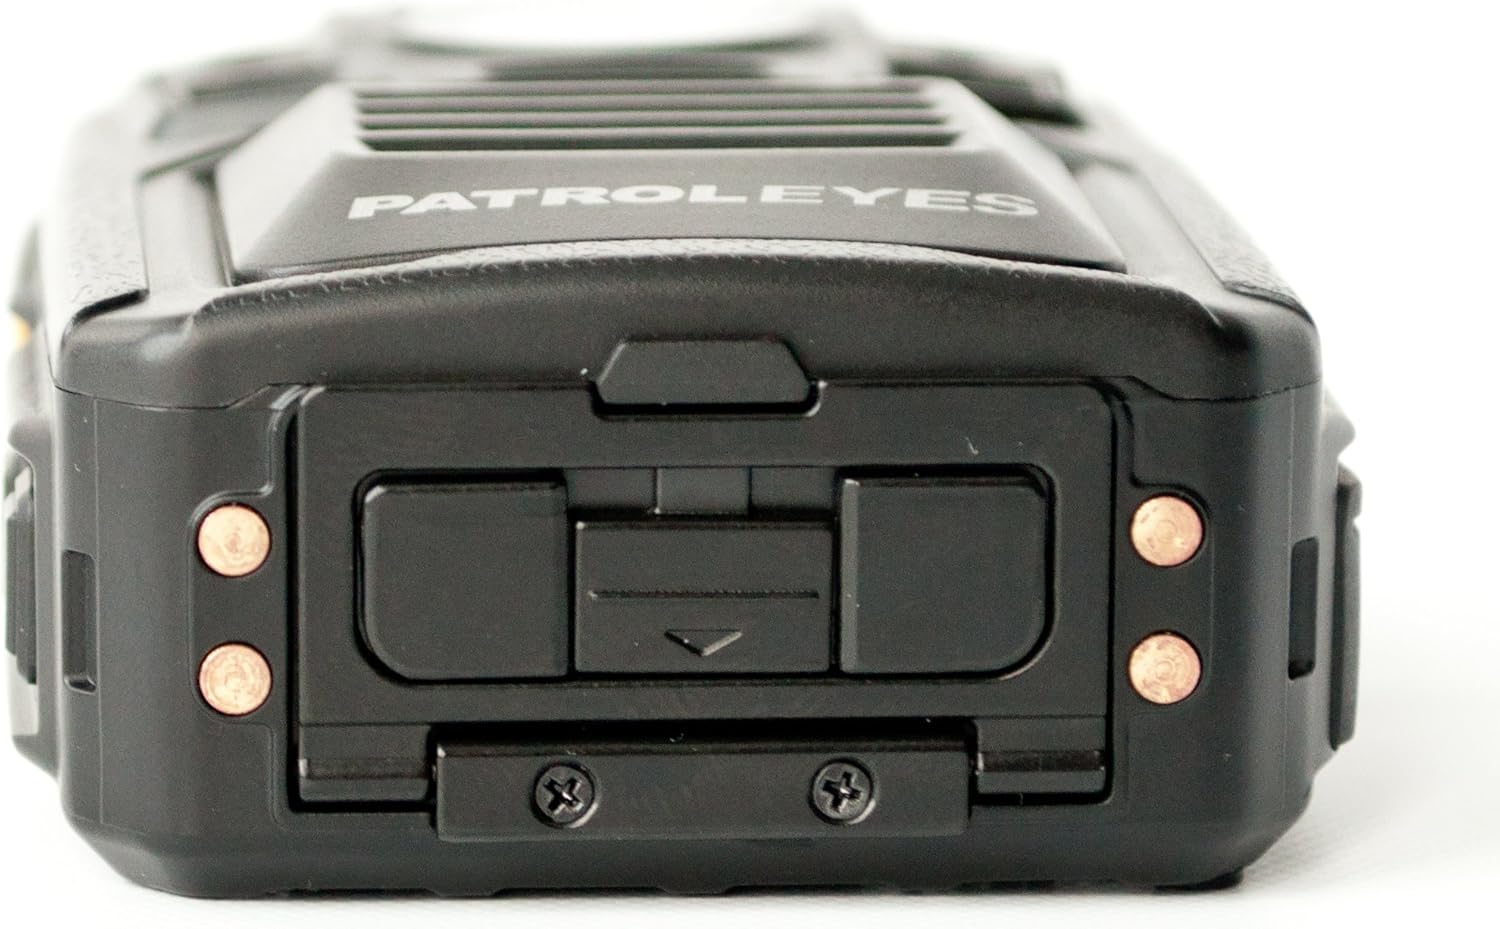
Rysunek 3.4: Szczyt view of the PatrolEyes PE-DV5-2 body camera, displaying the GPS indicator light and other top-mounted features.

Rysunek 3.5: Spód view of the PatrolEyes PE-DV5-2 body camera, revealing the charging contacts designed for use with a docking station.
4. Rozpoczęcie pracy
4.1. Ładowanie akumulatora
Before first use, fully charge the camera's battery. The camera comes with a rechargeable battery.
- Podłącz kabel ładujący USB do portu USB aparatu.
- Plug the other end of the USB cable into the wall charger and then into a power outlet.
- Zaświeci się kontrolka ładowania. Po zakończeniu ładowania zmieni kolor lub zgaśnie.
Alternatively, use a compatible docking station (sold separately) for charging.
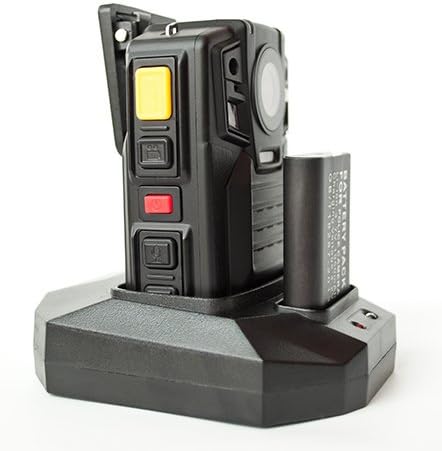
Rysunek 4.1: The PatrolEyes body camera securely placed in its docking station, which also features a dedicated slot for charging an additional battery pack.

Rysunek 4.2: Tył view of the PatrolEyes docking station, clearly showing the power input port and the USB data port for connecting to a computer.
4.2. Włączanie/wyłączanie zasilania
- Włączanie: Press and hold the Power button for a few seconds until the device vibrates and the indicator lights turn on.
- Aby wyłączyć: Press and hold the Power button until the device vibrates and the indicator lights turn off.
4.3. Attaching the Mounting Clip
Attach the provided mounting clip to the back of the camera. This allows you to securely fasten the camera to your uniform or gear.
5. Obsługa aparatu
5.1. Nagrywanie wideo
The camera supports video capture resolutions of 1080p, 480p, and 720p.
- Upewnij się, że kamera jest włączona.
- Naciśnij dedykowany Przycisk nagrywania (often red) once to start video recording. The recording indicator light will flash.
- Naciśnij Przycisk nagrywania again to stop recording. The indicator light will stop flashing.
5.2. Robienie zdjęć
The camera has an effective still resolution of 33 MP.
- While in standby mode or during video recording, press the Przycisk ze zdjęciem raz, aby uchwycić nieruchomy obraz.
5.3. Widzenie nocne (IR)
The camera features auto IR night vision with a range of 30 feet, utilizing infrared light sources.
- The camera is equipped with automatic infrared (IR) activation. In low-light conditions, the IR lights will automatically turn on to provide clear night vision footage.
5.4. Funkcjonalność GPS
The integrated GPS module automatically records location data with your video footage. Ensure the camera has a clear view nieba w celu optymalnego odbioru sygnału GPS.
5.5. Odtwarzanie
Możesz ponownieview nagrane filmy i zdjęcia bezpośrednio na ekranie aparatu.
- Enter Playback mode via the menu or a dedicated button (refer to on-screen prompts).
- Poruszaj się po files using the directional buttons.
- Press the OK/Select button to play a video or view zdjęcie.
5.6. Podłączanie do komputera
Przenieść files, connect the camera to a computer using the provided USB cable.
- Włącz kamerę.
- Podłącz aparat do komputera za pomocą kabla USB.
- Aparat będzie widoczny na Twoim komputerze jako dysk wymienny.
- You can now access and transfer video and photo files.
6. Konserwacja i pielęgnacja
6.1. Czyszczenie
- Przetrzyj korpus aparatu miękką ściereczką.amp płótno. Nie używaj ostrych środków chemicznych ani ściernych środków czyszczących.
- Do czyszczenia soczewek należy używać specjalnej ściereczki i płynu do czyszczenia soczewek, aby uniknąć zarysowań.
6.2. Przechowywanie
- Przechowuj kamerę w chłodnym, suchym miejscu, z dala od bezpośredniego światła słonecznego i ekstremalnych temperatur.
- Ensure the battery is partially charged (around 50%) if storing for extended periods to preserve battery life.
6.3. Pielęgnacja baterii
- Unikaj częstego całkowitego rozładowywania akumulatora.
- Należy używać wyłącznie oryginalnych lub zatwierdzonych akcesoriów do ładowania.
7. Rozwiązywanie Problemów
| Problem | Możliwa przyczyna | Rozwiązanie |
|---|---|---|
| Kamera się nie włącza. | Niski poziom naładowania baterii lub jej brak. | Całkowicie naładuj baterię. |
| Nie można nagrywać filmów/robić zdjęć. | Magazyn pełny. | Przenosić files to a computer and delete them from the camera. |
| Słaba jakość obrazu/wideo. | Zabrudzony obiektyw; słabe warunki oświetleniowe. | Clean the lens; ensure IR is active in low light. |
| GPS nie odbiera sygnału. | Przeszkoda view nieba; do użytku wewnątrz pomieszczeń. | Przenieś się na otwartą przestrzeń na świeżym powietrzu. |
| Komputer nie rozpoznał kamery. | Wadliwy kabel USB; problem ze sterownikiem. | Try a different USB port/cable; ensure camera is powered on. |
8. Specyfikacje
| Funkcja | Szczegół |
|---|---|
| Numer modelu | PE-DV5-2 |
| Rozdzielczość przechwytywania wideo | 1080p, 480p, 720p |
| Efektywna rozdzielczość obrazu nieruchomego | 33 MP |
| Szybkość klatek | 30 klatek na sekundę |
| Zakres noktowizora | 30 stóp |
| Technologia łączności | Bezprzewodowy (Wi-Fi) |
| Źródło zasilania | Zasilany bateryjnie |
| Zawarte komponenty | Bateria |
| Międzynarodowa Ocena Ochrony | IP54 |
| Cechy specjalne | Czujnik ruchu, widzenie nocne |
| Zastosowanie wewnątrz/na zewnątrz | Wewnątrz, Na zewnątrz |
| Producent | PatrolOczy |
| Pierwsza dostępna data | 14 maja 2017 r. |
9. Informacje o gwarancji
PatrolEyes products typically come with a limited manufacturer's warranty. Please refer to the warranty card included with your purchase or visit the official PatrolEyes webSzczegółowe warunki gwarancji znajdziesz na stronie. Zachowaj dowód zakupu na wypadek roszczeń gwarancyjnych.
10. Obsługa klienta
For technical assistance, troubleshooting beyond this manual, or inquiries about your PatrolEyes PE-DV5-2 body camera, please contact PatrolEyes customer support. Contact information can typically be found on the manufacturer's webmiejscu lub na opakowaniu produktu.
Zasoby internetowe: Visit the official PatrolEyes webwitryna z odpowiedziami na często zadawane pytania, aktualizacjami oprogramowania i dodatkowymi materiałami pomocniczymi.
Powiązane dokumenty - PE-DV5-2
 |
Instrukcja obsługi kamery nasobnej PatrolEyes LITE: obsługa, ustawienia i przewodnik po oprogramowaniu Kompleksowa instrukcja obsługi kamery nasobnej PatrolEyes LITE obejmująca konfigurację, obsługę, funkcje nagrywania, oprogramowanie Cam Manager, łączność WiFi/Bluetooth i file zarządzanie poprzez web przeglądarka i aplikacja mobilna. |
 |
PatrolEyes Flip User Manual User manual for the PatrolEyes Flip body camera. Includes instructions for operation, WiFi setup, button functions, and device maintenance. |
 |
PatrolEyes FLEX Body Camera User Manual Comprehensive user manual for the PatrolEyes FLEX body camera, covering setup, operation, features, charging, and troubleshooting. Learn how to use your FLEX device effectively. |
 |
Instrukcja obsługi stacji dokującej PE-DV10 PRO Informacje na temat stacji dokującej PE-DV10 PRO, rozwiązania dokującego USB 3.0 dla 10 kamer PE-DV10 PRO, wraz ze szczegółowymi danymi technicznymi, funkcjami i procesem przesyłania danych. |
 |
PATROLEYES PHD-1080W User Manual: Operation and Features Guide This user manual for the PATROLEYES PHD-1080W provides detailed instructions on device operation, including charging, recording modes (video, audio, photo), motion detection, WiFi connectivity, HDMI output, and settings configuration. |
 |
PatrolEyes SC-DVAI Mini DVR with Button/IR Body Camera User Manual User manual for the PatrolEyes SC-DVAI Mini DVR with Button/IR Body Camera, detailing its parts, setup, charging, connecting, operation, and video retrieval. |
Ask a question about this manual
Ask about setup, troubleshooting, compatibility, parts, safety, or missing instructions. Manuals+ will review the question and use this page’s manual context to help answer it.