1. Wprowadzenie
This manual provides detailed instructions for the installation, operation, and maintenance of your SpeedTech Lights K-Force 55 Full Size LED Strobe Light Bar. Please read this manual thoroughly before installation and use to ensure proper function and safety. This product is designed for emergency vehicle warning applications.

Obraz 1.1: Koniecview of the SpeedTech Lights K-Force 55 Full Size LED Strobe Light Bar. This image displays the complete light bar unit, highlighting its sleek design and LED modules.
2. Informacje dotyczące bezpieczeństwa
Always prioritize safety during installation and operation. Failure to follow these instructions may result in property damage, injury, or improper product function.
- Ensure the vehicle's power is disconnected before beginning installation.
- Mount the light bar securely to prevent detachment during vehicle operation.
- Verify all wiring connections are correct and insulated to prevent short circuits.
- Do not look directly into the light bar when it is active, as the intense light can cause eye strain or temporary vision impairment.
- This product is SAE J845 Certified, indicating compliance with specific performance standards for emergency warning lights.

Image 2.1: Certification and Warranty. This image shows the 'SAE J595 Certified' and '5 Year Warranty' labels, indicating the product's adherence to safety standards and manufacturer support.
3. Zawartość opakowania
Proszę sprawdzić opakowanie, aby upewnić się, że znajdują się w nim wszystkie elementy:
- SpeedTech Lights K-Force 55 LED Strobe Light Bar
- Skrzynka sterownicza
- Mounting Hardware (including universal gutter brackets)
- Wiązka przewodów
- Instrukcja obsługi (ten dokument)
4. Konfiguracja i instalacja
Proper installation is crucial for the performance and longevity of your light bar. If you are unsure about any step, consult a qualified professional.
4.1 Montaż listwy świetlnej
- Identify a suitable mounting location on the vehicle roof, ensuring clear visibility and secure attachment points.
- Use the provided universal gutter brackets to secure the light bar to the vehicle. Ensure the brackets are tightened sufficiently to prevent movement.
- Verify the light bar is level and stable before proceeding with wiring.
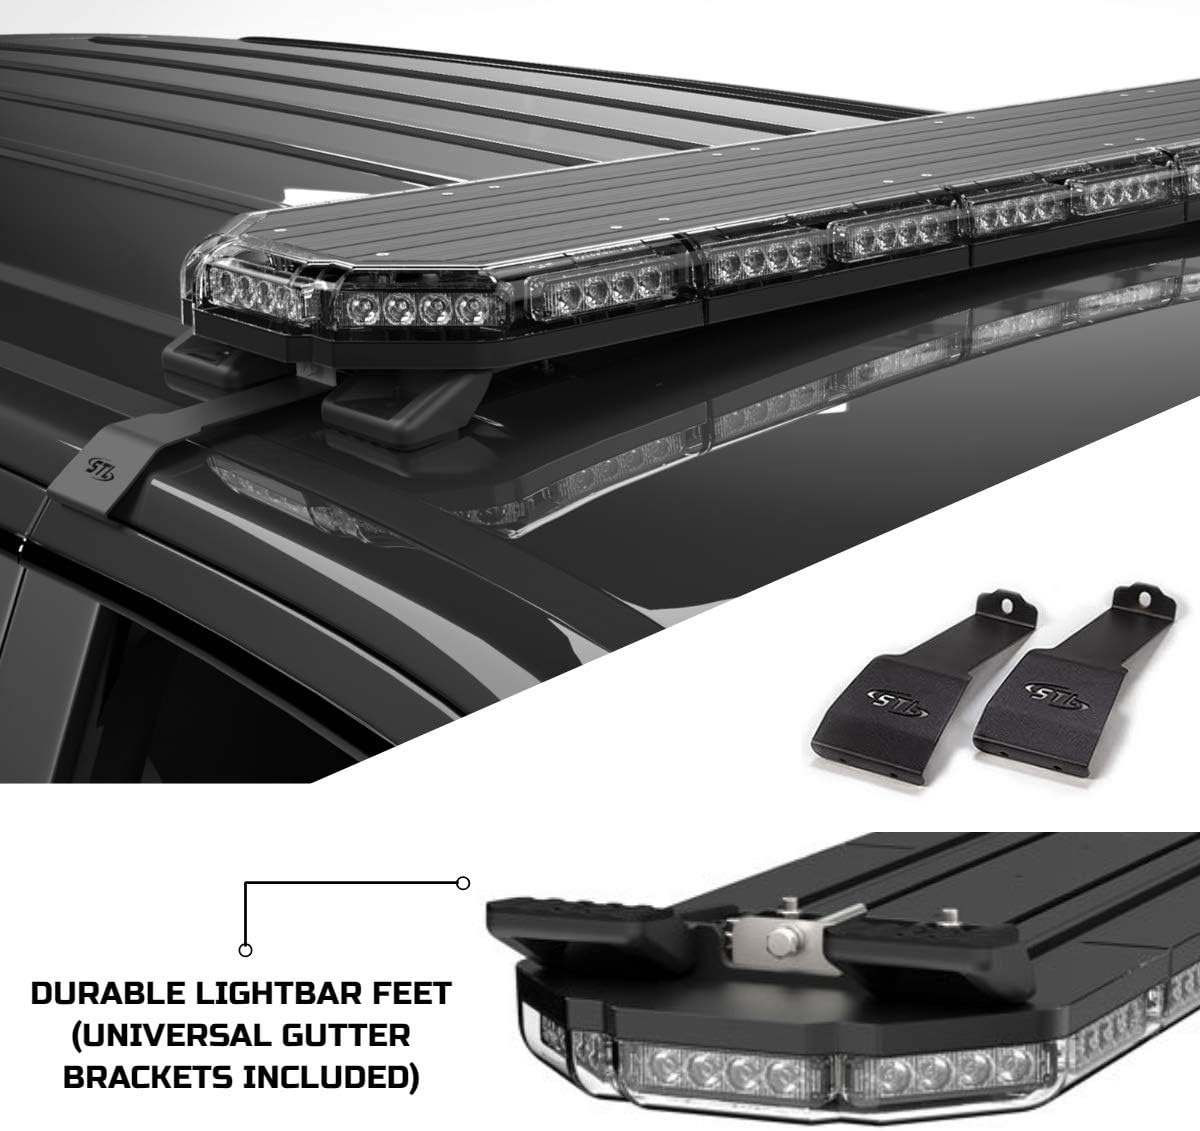
Image 4.1: Mounting Hardware. This image illustrates the durable light bar feet and the included universal gutter brackets, designed for secure roof mounting.
4.2 połączeń przewodów
Connect the light bar to the vehicle's electrical system using the provided wiring harness and control box. Refer to the wiring diagram included with your product for specific connections.
- Connect the main power wire to a fused 12V DC power source.
- Connect the ground wire to a suitable chassis ground point.
- Route all wires carefully, avoiding hot surfaces, sharp edges, and moving parts. Secure wiring with cable ties.
- Connect the light bar to the control box using the designated connector.

Image 4.2: Installation Overview. This diagram shows the light bar mounted on a vehicle, highlighting the universal gutter brackets and the remote control box with its various functions.
5. Instrukcja obsługi
The K-Force 55 light bar is controlled via the included control box, offering multiple flash patterns and operational modes.

Image 5.1: Control Box Features. This image details the control box, showing buttons for various functions including power, flash pattern selection, traffic advisor, alley lights, cruise mode, and auxiliary control.
5.1 Control Box Functions
- ON/OFF Power Slide Switch: Controls power to different sections of the light bar.
- Position 1: Front of bar on
- Position 2: Back of bar on
- Position 3: Full bar on
- Przycisk TRYB: Cycles through the 34 available flash patterns. The system features memory recall, retaining the last selected pattern.
- PATTERN Button: Changes the flash pattern.
- TD (Traffic Advisor) Button: Activates traffic advisor patterns (left, right, center out). Use directional arrow buttons to select.
- ALLEY Button: Activates alley lights.
- CRUISE Button: Activates cruise mode, providing a steady burn illumination.
- Przycisk AUX: Controls an auxiliary output for additional lighting or equipment.
- Przycisk NOC: Activates night mode, which typically dims the light output for reduced intensity in low-light conditions.
- Strzałki kierunkowe: Used to control traffic advisor patterns (left, right, center out).
6. Konserwacja
The K-Force 55 light bar is designed for durability and minimal maintenance. Regular cleaning and inspection will help ensure optimal performance.
- Czyszczenie: Clean the lens and housing with a soft cloth and mild soap and water. Avoid abrasive cleaners or solvents that could damage the polycarbonate lens.
- Kontrola: Periodically check all mounting hardware for tightness and inspect wiring for any signs of wear, fraying, or damage.
- The unit features weatherproof housing, designed to withstand harsh environments.
7. Rozwiązywanie Problemów
If you encounter issues with your K-Force 55 light bar, refer to the following common problems and solutions:
| Problem | Możliwa przyczyna | Rozwiązanie |
|---|---|---|
| Pasek świetlny nie włącza się. | Brak zasilania, luźne połączenie, przepalony bezpiecznik. | Check power source, verify all connections, inspect and replace fuse if necessary. |
| Some LEDs are not functioning. | Damaged LED module, wiring issue. | Contact SpeedTech Lights support for assistance. |
| Flash patterns are erratic. | Faulty control box, power fluctuation. | Zapewnij stabilne zasilanie. Jeśli problem będzie się powtarzał, skontaktuj się z pomocą techniczną. |
| Light bar is loose on the roof. | Mounting hardware not tightened. | Re-tighten all mounting bolts and brackets. |
8. Specyfikacje
- Model: K-Force 55
- Numer części producenta: F-KFT55RR
- Marka: SpeedTech Lights
- Kolor: Czerwony/Czerwony
- Kolor soczewki: Czerwony
- Materiał soczewki: Poliwęglan
- Wymiary (dł. x szer. x wys.): 59 x 15 x 7 cala
- Waga przedmiotu: 37 funta
- Dodatek specjalny: Wodoodporny
- Ocena bezpieczeństwa: SAE J845 Certified
- Wzory błysku: 34 (with memory recall)
- Funkcje sterowania: TD (Traffic Advisor), Alley, Cruise Mode, Night Mode, Auxiliary Control

Image 8.1: Product Dimensions. This diagram provides the key measurements of the light bar, indicating its length, width, and height for installation planning.
9. Gwarancja i wsparcie
The SpeedTech Lights K-Force 55 LED Strobe Light Bar comes with a 5-letnia gwarancja. For warranty claims, technical support, or any questions regarding your product, please contact SpeedTech Lights directly.
Producent: SpeedTech Lights
Webstrona: Visit the SpeedTech Lights Store on Amazon
Please have your model number (K-Force 55) and manufacturer part number (F-KFT55RR) available when contacting support.