Wstęp
Welcome to the user manual for your iRV Technology iRV66 RV Radio Stereo. This comprehensive guide provides detailed instructions for the installation, operation, and maintenance of your new entertainment system. The iRV66 is designed to provide high-quality audio and video entertainment in your recreational vehicle, featuring AM/FM radio, CD/DVD playback, MP3/MP4/USB/SD compatibility, HDMI connectivity, Digital 5.1 Surround Sound, and Bluetooth capabilities across three independent zones.
Please read this manual thoroughly before operating the unit to ensure proper use and to maximize your enjoyment of its features. Keep this manual for future reference.
Główne cechy
- RV DVD Player with 5.1 channels Surround sound for an immersive audio experience.
- Bluetooth 4.1 with phone app control for seamless wireless audio streaming and device management.
- Three HDMI outputs with Audio Return Channel (ARC) for versatile display connections.
- Two HDMI inputs, including one conveniently located on the front panel for easy access.
- USB port for media playback and device charging.
- SD card slot for additional media playback options.
- AM/FM tuner for radio reception.
- Three independent speaker zones for customized audio distribution.
Co jest w pudełku
Po rozpakowaniu sprawdź, czy w przesyłce znajdują się wszystkie poniższe elementy:
- iRV66 RV Radio Stereo Unit
- Zdalne sterowanie
- Wiring Harnesses (including adaptors for Concertone ZX500/600/690/700 and Genesis GT-3.0)
- Instrukcja obsługi

Image: The iRV66 unit's included accessories, showing the remote control, various wiring harnesses, and the operation manual.
Produkt ponadview
Panel przedni

Image: Front panel of the iRV66 unit, displaying the power button, speaker zone selectors, disc slot, display screen, control buttons (SRC, AM/FM, Clock, Setup, Mute, Audio), volume and select knobs, and front input ports.
The front panel provides access to all primary controls and inputs. Key elements include:
- Przycisk zasilania: Włącza lub wyłącza urządzenie.
- Speaker Zone Buttons (1, 2, 3): Activates or deactivates individual speaker zones.
- Przycisk BT: Inicjuje tryb parowania Bluetooth.
- Gniazdo na płytę: For inserting CDs and DVDs.
- Przycisk wysuwania: Ejects discs from the slot.
- Przycisk SRC (Źródło): Cycles through input sources (AM/FM, CD, DVD, USB, SD, HDMI, Bluetooth).
- Przycisk AM/FM: Wybiera pomiędzy pasmami radiowymi AM i FM.
- Przycisk zegara: Wyświetla i ustawia czas.
- Przycisk konfiguracji: Dostęp do ustawień i konfiguracji systemu.
- Przycisk wyciszenia: Wycisza lub włącza dźwięk.
- Przycisk dźwięku: Adjusts audio settings like bass, treble, balance, and fader.
- Pokrętło głośności: Dostosowuje główny poziom głośności.
- Wybierz pokrętło: Umożliwia nawigację po menu i potwierdzanie wyborów.
- Przyciski sterowania odtwarzaniem: Play/Pause, Stop, Skip Forward/Backward, Fast Forward/Rewind.
Front Input Ports
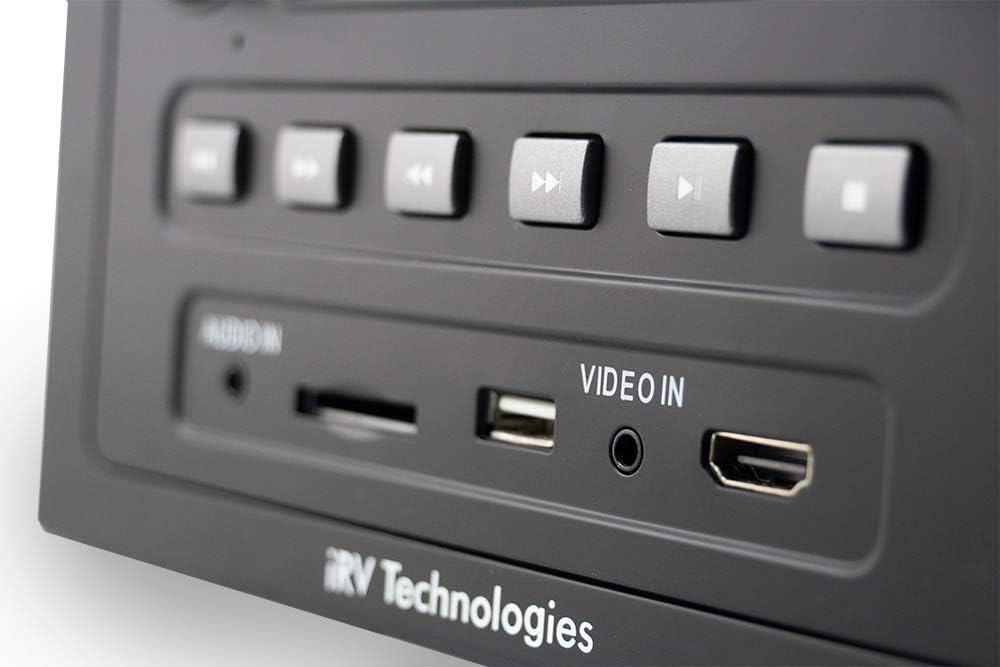
Obraz: szczegółowy view of the front panel's input section, highlighting the Audio In (3.5mm jack), SD card slot, USB port, Video In (3.5mm jack), and HDMI In port.
The front panel features convenient input ports for various media and devices:
- Wejście audio: Wejście pomocnicze 3.5 mm dla zewnętrznych urządzeń audio.
- SD: SD card slot for playing media files.
- USB: USB port for playing media files from USB drives and charging compatible devices.
- Wejście wideo: 3.5mm auxiliary input for external video sources.
- Wejście HDMI: HDMI input for connecting external HDMI devices like game consoles or streaming sticks.
Panel tylny i złącza

Image: The back of the iRV66 unit, displaying multiple RCA audio and video output jacks, along with other connectors for power and speakers.
The rear panel houses the main power, speaker, and additional audio/video connections. These are crucial for integrating the iRV66 into your RV's entertainment system.
Konfiguracja i instalacja
Proper installation is key to the performance of your iRV66 unit. It is recommended that installation be performed by a qualified technician.
Schemat okablowania
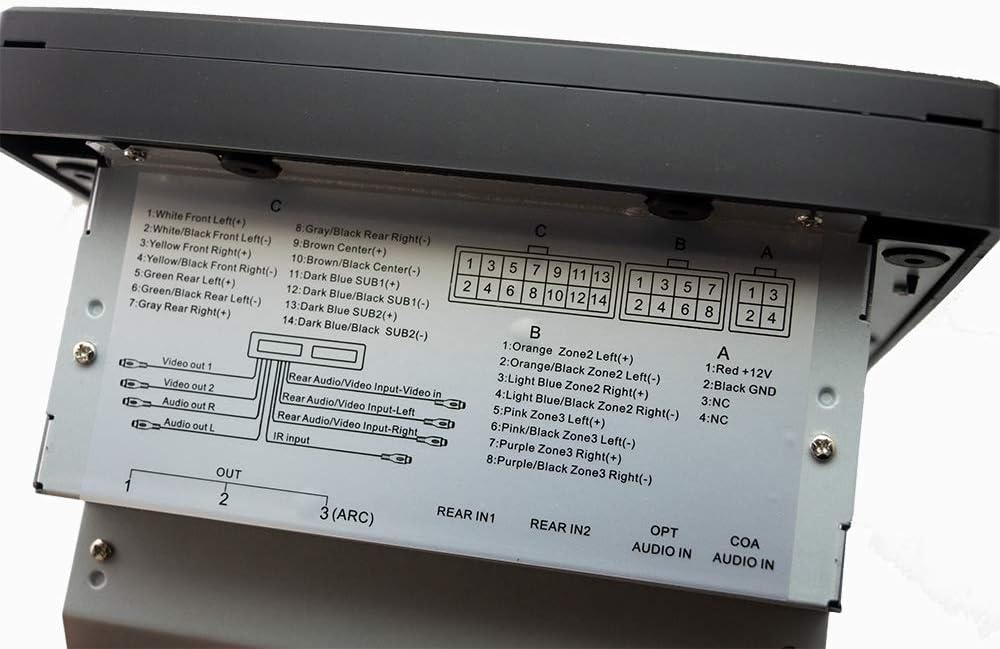
Image: A close-up of the wiring label on the top of the iRV66 unit, detailing the pin assignments for power, ground, speaker zones (Front, Rear, Center, Subwoofer), and various audio/video inputs and outputs.
Refer to the wiring diagram located on the top of the unit for precise connection details. Ensure all connections are secure and correctly matched to prevent damage to the unit or your RV's electrical system.
- Power (A1): Red wire for +12V constant power.
- Ground (A2): Black wire for ground connection.
- Speaker Zone 1 (C): White/Black (Front Left), White (Front Left+), Gray/Black (Rear Right), Gray (Rear Right+), Yellow/Black (Front Right), Yellow (Front Right+), Green/Black (Rear Left), Green (Rear Left+), Brown (Center+), Brown/Black (Center-), Dark Blue (SUB1+), Dark Blue/Black (SUB1-), Dark Blue (SUB2+), Dark Blue/Black (SUB2-).
- Speaker Zone 2 (B): Orange/Black (Zone2 Left+), Orange (Zone2 Left-), Light Blue/Black (Zone2 Right+), Light Blue (Zone2 Right-).
- Speaker Zone 3 (B): Pink/Black (Zone3 Left+), Pink (Zone3 Left-), Purple/Black (Zone3 Right+), Purple (Zone3 Right-).
- Wyjścia wideo: Video Out 1, Video Out 2.
- Wyjścia audio: Audio Out R, Audio Out L.
- Rear Audio/Video Inputs: Rear Audio/Video Input-Left, Rear Audio/Video Input-Right, Rear Video Input.
- Wejście podczerwieni: Do zewnętrznego odbiornika podczerwieni.
- Wyjścia HDMI: HDMI 1, HDMI 2, HDMI 3 (ARC).
- Wejście audio optyczne: OPT AUDIO IN.
- Wejście audio koncentryczne: COA AUDIO IN.
Replacement for Existing Units
The iRV66 is designed as a direct replacement for Concertone ZX500, ZX600, ZX690, ZX700, and Genesis GT-3.0 units. It includes specific wire adaptors to facilitate a plug-and-play installation, minimizing the need for re-wiring.

Image: Two sets of wire adaptor harnesses, one labeled for Concertone ZX500/ZX600/ZX690 and the other for Concertone ZX700/Genesis GT-3.0, designed to simplify the replacement process.
To replace your old unit:
- Carefully remove the existing unit from its mounting location.
- Disconnect all existing wiring harnesses.
- Identify the correct adaptor harness provided with your iRV66 that matches your old unit's wiring.
- Connect the adaptor harness to your RV's existing wiring.
- Connect the other end of the adaptor harness to the iRV66 unit.
- Slide the iRV66 unit into the mounting opening and secure it.
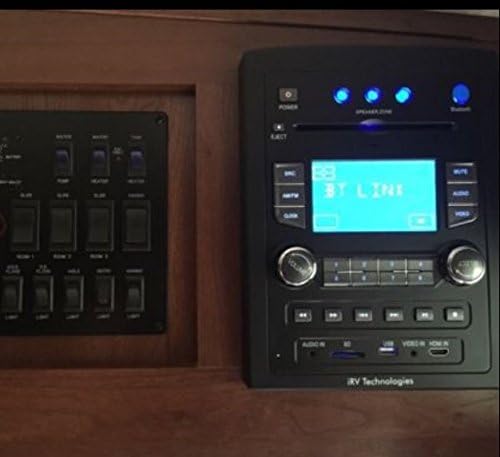
Image: The iRV66 unit seamlessly installed in an RV's interior panel, demonstrating its fit and integration with other vehicle controls.
Instrukcja obsługi
Podstawowa obsługa
- Włączanie/wyłączanie: Naciśnij MOC na panelu przednim lub pilocie.
- Regulacja głośności: Obróć TOM Obróć pokrętło zgodnie z ruchem wskazówek zegara, aby zwiększyć głośność, lub przeciwnie do ruchu wskazówek zegara, aby ją zmniejszyć.
- Wybór źródła: Naciśnij SRC button repeatedly to cycle through available input sources (AM/FM, CD, DVD, USB, SD, HDMI, Bluetooth).
- Niemy: Naciśnij NIEMY Naciśnij przycisk, aby tymczasowo wyciszyć dźwięk. Naciśnij ponownie, aby przywrócić.
Odtwarzanie multimediów (CD/DVD/USB/SD)
- Wkładanie nośników: Gently insert a CD or DVD into the disc slot. The unit will automatically begin playback. For USB drives or SD cards, insert them into the respective front panel ports.
- Sterowanie odtwarzaniem: Use the Play/Pause, Stop, Skip Forward/Backward, and Fast Forward/Rewind buttons on the front panel or remote for media control.
- Wysuwanie płyt: Naciśnij WYRZUCAĆ button to remove a disc.
Parowanie Bluetooth
- Upewnij się, że Bluetooth jest włączony w Twoim urządzeniu mobilnym.
- Naciśnij BT button on the iRV66 front panel. The display will show "BT PAIRING" or similar.
- On your mobile device, search for available Bluetooth devices and select "iRV66".
- Once paired, the unit will confirm the connection, and you can stream audio wirelessly.
Łączność HDMI
The iRV66 supports multiple HDMI connections for both input and output.
- Wejście HDMI: Connect external HDMI devices (e.g., game console, streaming stick) to the front HDMI input or one of the rear HDMI inputs. Select the corresponding HDMI source using the SRC przycisk.
- Wyjście HDMI: Connect the iRV66 to your RV's display(s) using the HDMI output ports on the rear. HDMI Output 3 supports ARC (Audio Return Channel) for simplified audio routing from compatible TVs.
Strefy mówców
The iRV66 features three independent speaker zones, allowing you to control audio output to different areas of your RV.
- Press the numbered speaker zone buttons (1, 2, 3) on the front panel to toggle each zone on or off.
- Zone 1 supports Digital 5.1 Surround Sound, while Zones 2 and 3 provide stereo output.
Konserwacja
To ensure the longevity and optimal performance of your iRV66 unit, follow these maintenance guidelines:
- Czyszczenie: Use a soft, dry cloth to clean the exterior of the unit. For stubborn marks, slightly dampen the cloth with water. Avoid using harsh chemicals, solvents, or abrasive cleaners, as they can damage the finish.
- Pielęgnacja dysków: Handle CDs and DVDs by their edges. Clean discs with a soft, lint-free cloth, wiping from the center outwards. Avoid scratched or dirty discs, as they can cause playback issues and potentially damage the disc drive.
- Wentylacja: Ensure the unit has adequate ventilation. Do not block any ventilation openings, as this can lead to overheating.
- Wyłączanie, gdy nie jest używane: If the RV will be stored for an extended period, it is advisable to power off the unit and disconnect it from the main power source if possible.
Rozwiązywanie problemów
If you encounter issues with your iRV66 unit, refer to the following table for common problems and their solutions.
| Problem | Możliwa przyczyna | Rozwiązanie |
|---|---|---|
| Urządzenie nie włącza się. | Brak zasilania; Przepalony bezpiecznik; Nieprawidłowe okablowanie. | Check RV's 12V power supply; Inspect and replace fuse if necessary; Verify wiring connections. |
| Brak dźwięku. | Volume too low; Mute activated; Incorrect source selected; Speaker zones off; Speaker wiring issues. | Increase volume; Deactivate mute; Select correct source; Activate desired speaker zones; Check speaker connections. |
| Disc not playing or ejecting. | Disc inserted incorrectly; Disc is dirty or scratched; Unit malfunction. | Ensure disc is inserted correctly; Clean or try a different disc; Power cycle the unit. |
| Brak połączenia Bluetooth. | Bluetooth not in pairing mode; Device too far; Interference; Previously paired device connected. | Ensure iRV66 is in pairing mode; Move device closer; Reduce interference; Disconnect from other devices. |
| Pilot nie działa. | Dead batteries; Obstruction; Incorrect angle. | Replace batteries; Remove obstructions; Point remote directly at the unit's IR receiver. |
If the problem persists after attempting these solutions, please contact iRV Technologies customer support or a qualified service technician.
Specyfikacje
| Funkcja | Specyfikacja |
|---|---|
| Numer modelu | iRV66 |
| Wymiary produktu (dł. x szer. x wys.) | 8 x 6 x 11 cala |
| Waga przedmiotu | 6 funta |
| Źródło zasilania | Przewodowy elektryczny (12 V DC) |
| Technologia łączności | Bluetooth 4.1, USB, SD, HDMI, Optical, Coaxial |
| Typ głośnika | Surround (Zone 1), Stereo (Zones 2 & 3) |
| Wyjście audio | 200 watts total peak power |
| Wyjścia HDMI | 3 (z obsługą ARC) |
| Wejścia HDMI | 2 (1 z przodu, 1 z tyłu) |
| Obsługiwane media | CD, DVD, MP3, MP4, JPEG |
| Producent | ATP Products, Inc. |
Gwarancja i wsparcie
The iRV66 unit is manufactured by ATP Products, Inc. For specific warranty information, including coverage duration and terms, please refer to the warranty card included with your purchase or visit the official iRV Technologies webZachowaj dowód zakupu na wypadek roszczeń gwarancyjnych.
For technical support, troubleshooting assistance beyond this manual, or service inquiries, please contact iRV Technologies customer support directly. Contact information can typically be found on the manufacturer's webmiejscu lub w opakowaniu produktu.
You can also refer to the official User Manual in PDF format for more detailed information: Pobierz instrukcję obsługi (PDF)