
1. Wprowadzenie
This instruction manual provides essential information for the proper installation, function, and maintenance of the Fermax Veo-XS DUOX Connector 9408. This connector is designed to facilitate the integration of compatible Fermax monitors into a DUOX digital intercom system. Please read this manual thoroughly before proceeding with installation or use.
2. Informacje dotyczące bezpieczeństwa
Aby zapobiec uszkodzeniu urządzenia lub obrażeniom personelu, należy przestrzegać następujących środków ostrożności:
- Zagrożenie elektryczne: Installation should only be performed by qualified personnel. Disconnect power to the intercom system before beginning any installation or maintenance work.
- Warunki środowiskowe: Do not expose the connector to moisture, extreme temperatures, or direct sunlight. Ensure the installation location is dry and well-ventilated.
- Odpowiednie narzędzia: Use appropriate tools for installation to avoid damaging the connector or wiring.
- Zgodność systemu: Ensure the connector is used only with compatible Fermax Veo-XS DUOX monitors and DUOX systems as specified.
3. Zawartość opakowania
Sprawdź, czy w opakowaniu znajdują się wszystkie komponenty:
- 1x Fermax Veo-XS DUOX Connector 9408
- 1x Set of mounting screws (if applicable)
- 1x Quick installation guide (refer to this manual for full details)
4. Konfiguracja i instalacja
The Fermax Veo-XS DUOX Connector 9408 is designed for straightforward integration. Follow these steps for proper installation:
- Odłączenie zasilania: Before starting, ensure that the main power supply to the DUOX intercom system is completely disconnected to prevent electrical shock or damage to components.
- Zidentyfikuj punkty połączeń: Locate the designated connection port on the rear of your Fermax Veo-XS DUOX monitor. This port is specifically designed to accept the 9408 connector.
- Attach Connector: Carefully align the Fermax 9408 connector with the port on the monitor. Gently push the connector into place until it is securely seated. Ensure there is no excessive force applied.
- Secure Mounting (if applicable): If your installation requires additional securing, use the provided mounting screws to fasten the connector or monitor assembly to the wall or mounting box.
- Connect DUOX Bus: Connect the DUOX bus wiring from your intercom system to the appropriate terminals on the 9408 connector. Refer to the wiring diagram provided with your DUOX system or monitor for correct polarity and terminal assignments.
- Ponowne podłączenie zasilania: Once all connections are secure and verified, restore power to the DUOX intercom system.
- Test systemu: Perform a functional test of the intercom system to ensure the monitor and connector are operating correctly.
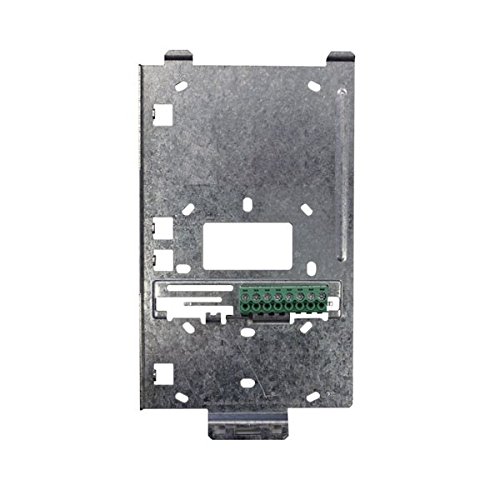
Image 1: The Fermax Veo-XS DUOX Connector 9408. This image shows the compact design of the connector, highlighting its connection points for integration with the Veo-XS DUOX monitor and the DUOX system wiring.
For detailed wiring diagrams and specific instructions regarding your overall DUOX system, consult the main installation manual for your Fermax DUOX monitor and system components.
5. Instrukcja obsługi
The Fermax Veo-XS DUOX Connector 9408 is a passive component designed to establish the necessary electrical and data connection between a compatible Fermax Veo-XS DUOX monitor and the DUOX intercom system bus. It does not have user-operable controls or functions.
Once correctly installed, the connector enables the monitor to receive power and data signals from the DUOX system and transmit signals back. All operational aspects, such as answering calls, opening doors, or adjusting monitor settings, are controlled directly through the connected Fermax Veo-XS DUOX monitor. Refer to the specific user manual for your Fermax Veo-XS DUOX monitor for detailed operating instructions.
6. Konserwacja
The Fermax Veo-XS DUOX Connector 9408 requires minimal maintenance.
- Czyszczenie: If necessary, gently wipe the exterior of the connector with a soft, dry cloth. Do not use abrasive cleaners, solvents, or excessive moisture, as these can damage the device.
- Kontrola: Periodically inspect the connections to ensure they remain secure. If any wiring appears loose or damaged, disconnect power and re-secure or replace the wiring as needed by a qualified technician.
- Brak części nadających się do samodzielnej naprawy przez użytkownika: The connector contains no user-serviceable parts. Do not attempt to open or repair the unit, as this will void the warranty and may cause damage or injury.
7. Rozwiązywanie Problemów
If you experience issues with your intercom system after installing the Fermax Veo-XS DUOX Connector 9408, consider the following troubleshooting steps:
- Brak zasilania monitora:
- Ensure the main power supply to the DUOX system is active.
- Verify that the connector is securely seated in the monitor's port.
- Check the DUOX bus wiring connections to the connector for proper polarity and secure contact.
- No Audio/Video on Monitor:
- Confirm all DUOX bus wiring connections are correct and tight.
- Refer to the troubleshooting section of your Fermax Veo-XS DUOX monitor's manual, as the issue may lie with the monitor itself or other system components.
- Ensure the DUOX system central unit is functioning correctly.
- Połączenie przerywane:
- Inspect all wiring for any signs of damage or loose connections.
- Ensure the connector is fully engaged with the monitor.
If problems persist after performing these checks, contact a qualified technician or Fermax technical support for assistance.
8. Specyfikacje
| Funkcja | Specyfikacja |
|---|---|
| Numer modelu | 9408 |
| Marka | FERMAX |
| Waga produktu | 500 gramów |
| Numer referencyjny producenta | TMMDH |
| ASIN | B06XZMSDRL |
| Liczba jednostek | 1.0 Liczba |
| Zgodność | Fermax Veo-XS DUOX Monitors, DUOX Intercom Systems |
9. Gwarancja i wsparcie
The Fermax Veo-XS DUOX Connector 9408 is covered by the standard manufacturer's warranty. Please refer to the warranty documentation provided with your purchase or visit the official Fermax webSzczegółowe warunki gwarancji można znaleźć na naszej stronie.
For technical support, service, or inquiries regarding the product, please contact Fermax customer service or your authorized Fermax distributor. Contact information can typically be found on the Fermax official webstronie internetowej lub na opakowaniu produktu.