
1. Koniec produktuview
The GeoVision GV-EFD4700-0F is an indoor, fixed, mini-sized network camera designed for day and night surveillance. It features an automatic IR-cut filter and integrated IR LEDs to ensure clear imaging in various lighting conditions. This model offers an entry-level surveillance solution with essential features and high image quality.
Główne cechy obejmują:
- 1/3" progressive scan super low lux CMOS sensor for minimal illumination at 0.02 lux.
- Dual streams supporting H.265, H.264, and MJPEG codecs.
- Video resolutions up to 20 fps at 2592 x 1520, 25 fps at 2560 x 1440, and 30 fps at 2048 x 1520.
- Intelligent IR with a distance of up to 15 meters (50 ft).
- Wide Dynamic Range Pro (WDR Pro) for clear images in high-contrast scenes.
- 3D noise reduction for improved image clarity.
- Built-in microphone for audio monitoring.
- 2-axis mechanism (pan / tilt) for flexible positioning.
- Power options: DC 12V or Power over Ethernet (PoE IEEE 802.3af).
2. Zawartość opakowania
Proszę sprawdzić, czy wszystkie elementy znajdują się w opakowaniu i są w dobrym stanie po jego otwarciu:
- GeoVision GV-EFD4700-0F Mini Fixed IP Dome Camera
- Zestaw śrub montażowych
- Szablon instalacji
- Quick Start Guide / Instruction Manual (this document)
3. Informacje dotyczące bezpieczeństwa
Read these instructions carefully before installation and operation. Keep this manual for future reference.
- Źródło zasilania: Use only the specified power adapter (DC 12V) or a compliant PoE (IEEE 802.3af) switch. Incorrect voltagMoże to spowodować uszkodzenie urządzenia.
- Instalacja: Ensure the camera is securely mounted to prevent it from falling. Installation should be performed by qualified personnel if necessary.
- Środowisko: Ta kamera jest przeznaczona do użytku wewnątrz pomieszczeń. Nie wystawiaj jej na działanie wody, wilgoci ani ekstremalnych temperatur.
- Czyszczenie: Przed czyszczeniem odłącz zasilanie. Użyj miękkiej, suchej ściereczki. Nie używaj środków czyszczących w płynie ani aerozolu.
- Serwisowanie: Nie próbuj samodzielnie naprawiać tego produktu. Wszelkie czynności serwisowe należy powierzyć wykwalifikowanemu personelowi serwisowemu.
4. Konfiguracja i instalacja
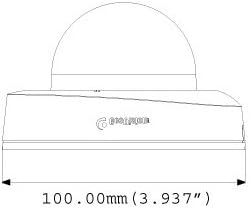
4.1 Wymiary fizyczne
Understand the camera's dimensions for proper placement and mounting.

4.2 Opcje montażu
The GV-EFD4700-0F supports both ceiling and wall-surface mounting.


4.3 Kroki instalacji
- Wybierz lokalizację: Choose a suitable indoor location for optimal surveillance coverage.
- Przygotuj powierzchnię: Use the provided installation template to mark drilling points on the ceiling or wall.
- Wiercenie otworów: Drill pilot holes according to the template. Insert wall anchors if necessary.
- Bezpieczna kamera: Attach the camera base to the mounting surface using the supplied screws.
- Podłącz kable: Connect the Ethernet cable for network and PoE, or a DC 12V power adapter and a separate Ethernet cable.
- Dostosuj kąt: Loosen the adjustment screws to pan and tilt the camera lens to the desired viewkąta nachylenia. Po ustawieniu dokręć śruby.
4.4 Konfiguracja początkowa
After physical installation and power connection, access the camera's web interface for initial setup:
- Połączenie internetowe: Ensure the camera is connected to your network. It will typically obtain an IP address via DHCP.
- Odkryj aparat: Use GeoVision's IP Device Utility software or a network scanner to find the camera's IP address.
- Dostęp Web Interfejs: Otwórz web przeglądarki i wpisz adres IP kamery.
- Login: Enter the default username and password (refer to the Quick Start Guide or GeoVision documentation for default credentials). Change these immediately for security.
- Podstawowe ustawienia: Configure network settings, date/time, video resolution, and recording preferences.
5. Obsługa aparatu
5.1 Na żywo View i nagrywanie
Once configured, you can access the live video feed through the web interface or compatible NVR/VMS software. The camera supports continuous recording, scheduled recording, and event-triggered recording (e.g., motion detection).
- Kompresja H.265: Utilizes H.265 video codec for efficient storage and reduced network bandwidth while maintaining high image quality.
- WDR Pro: Wide Dynamic Range Pro enhances image visibility in scenes with both very bright and very dark areas.
- Funkcjonalność IR: The built-in IR LEDs automatically activate in low-light conditions, providing clear black and white images up to 15 meters.
5.2 Detekcja ruchu i alerty
Configure motion detection zones and sensitivity within the camera's web interface. The camera can be set to trigger recordings, send email alerts, or notify your VMS upon detecting motion.
5.3 Monitorowanie dźwięku
The integrated microphone allows for audio monitoring of the surveillance area. Audio settings can be adjusted via the web interfejs.
6. Konserwacja
6.1 Czyszczenie
Regularly clean the camera lens and housing to ensure optimal image quality. Use a soft, lint-free cloth. For stubborn dirt, a slightly damp Można użyć ściereczki z łagodnym detergentem, a następnie wytrzeć do sucha. Unikać środków czyszczących o działaniu ściernym i rozpuszczalników.
6.2 aktualizacji oprogramowania sprzętowego
Okresowo sprawdzaj GeoVision website for firmware updates. Firmware updates can provide new features, performance improvements, and security enhancements. Follow the instructions provided with the firmware update package carefully to avoid damaging the device.
7. Rozwiązywanie Problemów
If you encounter issues with your GV-EFD4700-0F camera, refer to the following common problems and solutions:
- Brak zasilania:
- Check if the power adapter is securely connected and providing 12V DC.
- If using PoE, ensure the Ethernet cable is connected to a PoE-enabled switch or injector and that the switch port is active.
- Brak transmisji wideo:
- Verify network connectivity. Ping the camera's IP address.
- Ensure the camera's IP address, subnet mask, and gateway settings are correct.
- Check if the video stream settings (e.g., resolution, frame rate) are compatible with your viewing software or NVR.
- Restart the camera by disconnecting and reconnecting power.
- Słaba jakość obrazu:
- Wyczyść obiektyw aparatu.
- Sprawdź, czy w polu widzenia kamery nie ma przeszkód. view.
- Adjust WDR Pro settings in the web interface for high-contrast scenes.
- Ensure sufficient lighting for optimal color images; IR will provide black and white in low light.
- Nie można uzyskać dostępu Web Interfejs:
- Confirm the camera's IP address is correct.
- Upewnij się, że komputer znajduje się w tym samym segmencie sieci co kamera.
- Spróbuj innego web przeglądarka.
- Tymczasowo wyłącz wszelkie oprogramowanie zapory sieciowej na swoim komputerze.
If problems persist, contact GeoVision technical support.
8. Specyfikacje
| Funkcja | Szczegół |
|---|---|
| Nazwa modelu | GV-EFD4700-0F |
| Czujnik obrazu | 1/3" progressive scan super low lux CMOS |
| Efektywna rozdzielczość obrazu nieruchomego | 4 MP |
| Minimalne oświetlenie | 0.02 XNUMX luksów |
| Kompresja wideo | H.265, H.264, MJPEG |
| Max. Częstotliwość wyświetlania klatek | 30 fps at 2048 x 1520 |
| Odległość IR | Do 15 m (50 stóp) |
| Obiektyw | 2.8 mm (stały) |
| Zakres dynamiczny | WDR Pro |
| Redukcja szumów | Redukcja szumów 3D |
| Audio | Wbudowany mikrofon |
| Pan/Tilt Mechanism | 2-osiowy |
| Moc wejściowa | DC 12 V / PoE (IEEE 802.3af) |
| Technologia łączności | Wired (Ethernet), Wi-Fi (for certain functions/protocols) |
| Zastosowanie wewnątrz/na zewnątrz | Wnętrz |
| Wymiary (element) | 3.9 x 3.9 x 2.4 cala (100 x 100 x 60.8 mm) |
| Waga (przedmiot) | 5.28 uncji |
| Kolor | Biały |
| Producent | USA Vision Systems |
9. Informacje o gwarancji
GeoVision products typically come with a limited manufacturer's warranty. Specific warranty terms, conditions, and duration may vary by region and retailer. Please refer to the warranty card included with your purchase or visit the official GeoVision webSzczegółowe informacje o gwarancji i procedurach rejestracji znajdziesz na stronie. Zachowaj dowód zakupu na wypadek roszczeń gwarancyjnych.
10. Wsparcie
For technical assistance, product inquiries, or further support, please utilize the following resources:
- GeoVision Official Webstrona: Odwiedzać www.geovision.com.tw for product documentation, FAQs, software downloads, and support contact information.
- Wsparcie techniczne: Contact GeoVision's technical support team through their website or the contact details provided in your product's packaging.
- Zasoby internetowe: Przeglądaj fora i społeczności internetowe w celu znalezienia porad i rozwiązań tworzonych przez użytkowników.

