
1. Wprowadzenie
This manual provides detailed instructions for the installation, operation, and maintenance of your ASRock AB350M-HDV MicroATX Motherboard. The ASRock AB350M-HDV is designed to support AMD Socket AM4 A-Series APUs (Bristol Ridge) and Ryzen Series CPUs (Summit Ridge), featuring a Digi Power design and 7 Power Phase design for stable performance. It supports DDR4 memory and offers various connectivity options including SATA3, USB 3.0, and an Ultra M.2 slot.
2. Koniec produktuview
The ASRock AB350M-HDV motherboard is a MicroATX form factor board, ideal for compact PC builds. It features essential components for a modern computing system.

Rysunek 2.1: Kątowy view of the ASRock AB350M-HDV Motherboard, showcasing its compact MicroATX design and various components.
Główne cechy:
- Supports AMD Socket AM4 A-Series APUs (Bristol Ridge) and Ryzen Series CPUs (Summit Ridge).
- DDR4 memory support up to 3200+ (OC) for Ryzen CPUs and 2400 for A-series APUs.
- 1 PCIe 3.0 x16 slot and 1 PCIe 2.0 x1 slot for expansion cards.
- 4 SATA3 ports and 1 Ultra M.2 (PCIe Gen3 x4 & SATA3) slot for storage.
- 6 USB 3.0 ports (2 front, 4 rear) and 2 USB 2.0 ports for peripheral connectivity.
- Integrated Gigabit Ethernet for network connectivity.
- Video outputs: VGA, DVI, HDMI.

Rysunek 2.2: Widok z góry na dół view of the ASRock AB350M-HDV Motherboard, highlighting the CPU socket, RAM slots, M.2 slot, and PCIe slots.
3. Konfiguracja i instalacja
Follow these steps carefully to install your ASRock AB350M-HDV motherboard and its components.
3.1 Instalacja procesora
- Znajdź gniazdo procesora AM4 na płycie głównej.
- Podnieś dźwignię obciążającą znajdującą się z boku gniazda.
- Dopasuj trójkątny znak na procesorze do odpowiadającego mu znaku na gnieździe. Ostrożnie włóż procesor do gniazda, nie używając siły.
- Opuść dźwignię obciążenia, aby zamocować procesor na miejscu.
- Zainstaluj chłodzenie procesora zgodnie z instrukcją producenta.
3.2 Instalacja pamięci RAM
- Locate the DDR4 DIMM slots. This motherboard has 4 slots.
- Otwórz zaciski na obu końcach gniazda DIMM.
- Dopasuj wycięcie na module RAM do wypustki w gnieździe DIMM.
- Wsuń moduł RAM mocno do gniazda, aż zatrzaski zatrzasną się na miejscu. Upewnij się, że oba zatrzaski są zamknięte.
3.3 Instalacja urządzenia pamięci masowej (SATA i M.2)
Dyski SATA:
- Podłącz jeden koniec kabla danych SATA do portu SATA3 na płycie głównej.
- Podłącz drugi koniec kabla danych SATA do dysku twardego lub dysku SSD.
- Podłącz kabel zasilający SATA do zasilacza (PSU) i urządzenia pamięci masowej.
Dysk SSD M.2:
- Locate the Ultra M.2 slot on the motherboard.
- Remove the M.2 screw and standoff from the slot.
- Włóż dysk SSD M.2 do gniazda pod kątem 30 stopni.
- Push the M.2 SSD down and secure it with the screw and standoff.
3.4 Połączenia zasilania
- Connect the 24-pin ATX power connector from your PSU to the 24-pin power socket on the motherboard.
- Connect the 8-pin (or 4-pin) ATX 12V power connector from your PSU to the corresponding socket near the CPU.
3.5 Połączenia na panelu przednim
Connect the cables from your PC case (Power Button, Reset Button, HDD LED, Power LED, USB, Audio) to the corresponding headers on the motherboard. Refer to the motherboard layout diagram in your physical manual for exact header locations.
3.6 Instalacja karty graficznej
- Znajdź gniazdo PCIe 3.0 x16.
- Zdejmij odpowiednią osłonę gniazda rozszerzeń z obudowy komputera.
- Align the graphics card with the PCIe slot and press it down firmly until it clicks into place.
- Przymocuj kartę graficzną do obudowy za pomocą śrubki.
- Connect any required PCIe power cables from your PSU to the graphics card.
4. Instrukcja obsługi
4.1 Pierwsze uruchomienie i konfiguracja BIOS-u/UEFI
- Po zmontowaniu wszystkich elementów podłącz monitor, klawiaturę i mysz.
- Włącz system.
- Podczas uruchamiania naciśnij wielokrotnie przycisk USUNĄĆ or F2 klawisz, aby wejść do narzędzia konfiguracji BIOS/UEFI.
- In the BIOS, you can configure boot order, system time, and other advanced settings. Save changes and exit to boot into your operating system installation media.
4.2 Instalacja sterownika
After installing your operating system, install the necessary drivers for the motherboard components. These typically include chipset drivers, audio drivers, LAN drivers, and any specific utility drivers. Drivers can be found on the ASRock official webwitryna dla konkretnego modelu płyty głównej.
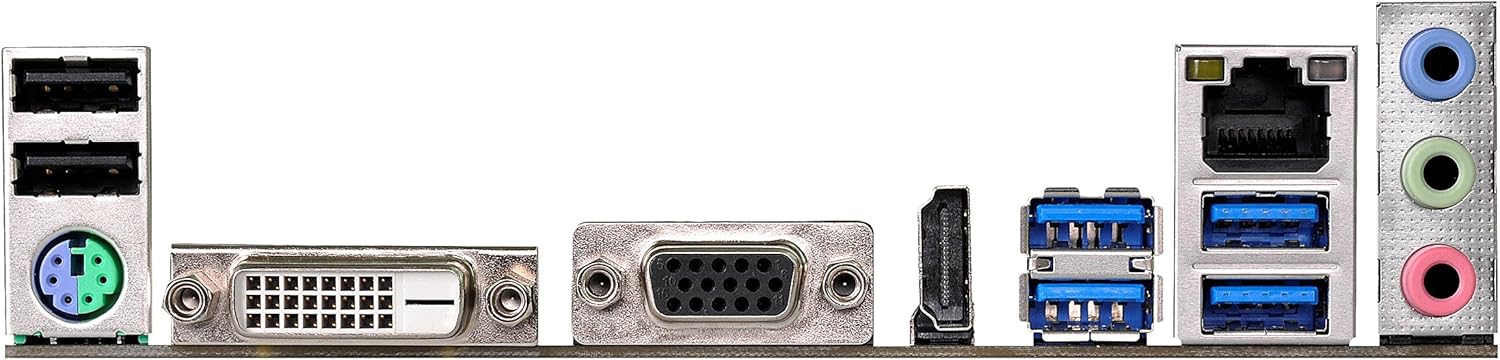
Figure 4.1: Rear I/O panel of the ASRock AB350M-HDV Motherboard, showing USB ports, video outputs (VGA, DVI, HDMI), LAN port, and audio jacks.
5. Konserwacja
Właściwa konserwacja zapewnia długowieczność i optymalną wydajność płyty głównej.
5.1 Czyszczenie
- Regularnie usuwaj kurz z płyty głównej i podzespołów przy użyciu sprężonego powietrza.
- Przed czyszczeniem należy upewnić się, że system jest wyłączony i odłączony od zasilania.
- Unikaj stosowania płynnych środków czyszczących bezpośrednio na podzespołach.
5.2 Aktualizacje BIOS-u/UEFI
Okresowo sprawdzaj ASRock website for BIOS/UEFI updates. Updates can improve compatibility, stability, and performance. Follow the instructions provided by ASRock carefully when performing a BIOS update to avoid system damage.
6. Rozwiązywanie Problemów
W tej sekcji znajdziesz rozwiązania typowych problemów, na jakie możesz natrafić.
6.1 Brak zasilania / Brak testu POST (autotest po włączeniu zasilania)
- Sprawdź połączenia zasilania: Ensure the 24-pin and 8-pin (or 4-pin) CPU power connectors are securely seated.
- Verify PSU: Test your power supply unit (PSU) to ensure it is functional and providing adequate power.
- Ponowne osadzenie komponentów: Remove and re-install the CPU, RAM, and graphics card to ensure they are properly seated.
- Wyczyść pamięć CMOS: Refer to your physical manual for instructions on how to clear the CMOS (Complementary Metal-Oxide-Semiconductor) settings, which can resolve boot issues.
6.2 Brak wyjścia wyświetlacza
- Połączenie monitora: Ensure your monitor is correctly connected to the graphics card or motherboard (if using an APU with integrated graphics).
- Karta graficzna: If using a dedicated graphics card, ensure it is properly installed and has sufficient power. Test with another graphics card if possible.
- APU Compatibility: If using an AMD A-Series APU, ensure your monitor is connected to the motherboard's video outputs (VGA, DVI, HDMI). Ryzen CPUs without integrated graphics require a dedicated graphics card.
6.3 System operacyjny nie uruchamia się
- Kolejność rozruchu: Check the BIOS/UEFI settings to ensure the correct boot device (e.g., SSD/HDD with OS) is prioritized.
- Urządzenie pamięci masowej: Verify that your storage device is detected in the BIOS.
- Instalacja systemu operacyjnego: If the OS is newly installed, ensure the installation process completed successfully.
7. Specyfikacje
| Marka | ASRock |
| Nazwa modelu | AB350M-HDV |
| Gniazdo procesora | Gniazdo AM4 |
| Typ chipsetu | AMD Cypel B350 |
| Kompatybilne procesory | AMD A-Series APUs (Bristol Ridge), Ryzen Series CPUs (Summit Ridge) |
| Technologia pamięci RAM | DDR4 |
| Prędkość zegara pamięci | 2133 MHz (Base), up to 3200+ (OC) for Ryzen CPU |
| Dostępne gniazda pamięci | 4 |
| Interfejs karty graficznej | PCI Express (1x PCIe 3.0 x16, 1x PCIe 2.0 x1) |
| Total SATA Ports | 4 (SATA 3) |
| Gniazdo M.2 | 1 (Ultra M.2, PCIe Gen3 x4 & SATA3) |
| Łączna liczba portów USB | 8 (6x USB 3.0, 2x USB 2.0) |
| Wyjścia wideo | VGA, DVI, HDMI |
| Typ głównego złącza zasilania | 24-pinowe ATX |
| Współczynnik kształtu | MicroATX |
| Waga przedmiotu | 1.3 funtów |
8. Informacje o gwarancji
The ASRock AB350M-HDV Motherboard comes with a 1 rok gwarancji. For specific terms and conditions, please refer to the warranty card included with your product or visit the official ASRock webstrona.
9. Wsparcie
For further assistance, technical support, or driver downloads, please visit the official ASRock webstrona:
You can also find contact information for customer service and support resources on their webstrona.