
1. Wprowadzenie
Thank you for choosing the OSD Audio PRE-1 High Definition Preamplifier. This unit is designed to enhance your audio experience by providing versatile source selection and precise audio control. The PRE-1 acts as a central hub for various audio components, including turntables, CD/DVD players, and tape decks, delivering a clean and powerful signal to your main ampliyfikator.
This manual provides detailed instructions for the proper setup, operation, and maintenance of your PRE-1 preamplifier. Please read this manual thoroughly before operating the unit to ensure optimal performance and longevity.
2. Ważne informacje dotyczące bezpieczeństwa
- Źródło zasilania: Connect the unit only to the type of power source indicated on the marking label.
- Wentylacja: Ensure adequate ventilation. Do not block any ventilation openings. Install in accordance with the manufacturer’s instructions.
- Woda i wilgoć: Nie należy używać urządzenia w pobliżu wody ani narażać go na działanie kapiącej lub zachlapanej wody.
- Ciepło: Nie należy instalować w pobliżu źródeł ciepła, takich jak grzejniki, kratki wentylacyjne, piece lub inne urządzenia (w tym amp(lifiers) wytwarzające ciepło.
- Czyszczenie: Czyścić wyłącznie suchą szmatką.
- Serwisowanie: Nie próbuj samodzielnie naprawiać tego produktu. Wszelkie czynności serwisowe należy powierzyć wykwalifikowanemu personelowi serwisowemu.
- Grunt: To urządzenie musi być prawidłowo uziemione.
3. Zawartość opakowania
Sprawdź, czy w przesyłce znajdują się następujące elementy:
- OSD Audio PRE-1 High Definition Preampżywsze
- Kabel zasilający
- Instrukcja obsługi (ten dokument)
4. Koniec produktuview
4.1. Panel przedni
The front panel provides access to all primary controls and a microphone input for convenient use.

This image displays the front panel of the OSD Audio PRE-1 Preamplifier, including its physical dimensions for installation planning.

Szczegółowy view of the left side of the PRE-1's front panel, highlighting the Microphone Level, Bass, Midrange, and Treble adjustment knobs.

Szczegółowy view of the right side of the PRE-1's front panel, showing the Loudness, Balance, and Volume controls, along with input selection and function buttons.
- Przycisk zasilania: Włącza lub wyłącza urządzenie.
- Wejście mikrofonowe: 1/4-inch jack for connecting a microphone.
- Poziom mikrofonu: Reguluje głośność wejścia mikrofonowego.
- Kontrola basu: Reguluje wyjście niskiej częstotliwości.
- Kontrola środka: Adjusts the mid-range frequency output.
- Kontrola tonów wysokich: Reguluje wyjście wysokiej częstotliwości.
- Głośność: Engages or disengages a loudness contour for enhanced bass and treble at low volumes.
- Balansować: Reguluje balans kanału lewego i prawego.
- Tom: Regulacja głośności głównej dla wszystkich wyjść.
- Wybór wejścia: Rotary knob to choose between Phono, AUX1, AUX2, and CD/DVD inputs.
- Tape Button: Activates the Tape Monitor loop.
- Przycisk mono: Combines stereo signals into a monaural output.
- Filtr niski: Engages a low-frequency cut-off filter.
- Niemy: Silences all audio output.
4.2. Panel tylny
The rear panel houses all the necessary input and output connections for your audio system.
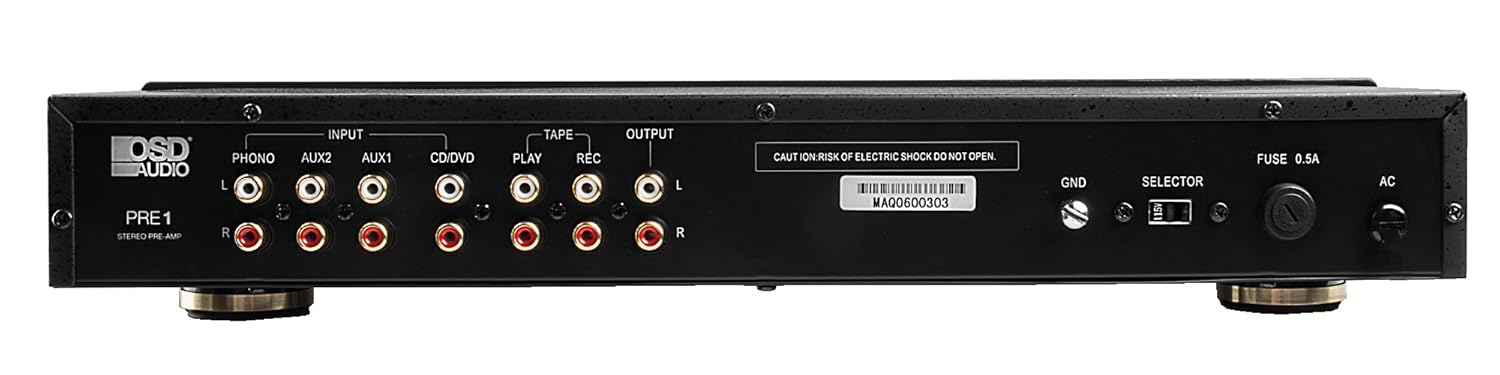
The rear panel of the PRE-1 Preamplifier, showing all input and output connections for various audio devices.
- Phono Input (L/R): RCA inputs for connecting a turntable. Includes a ground terminal.
- AUX1 Input (L/R): RCA inputs for general auxiliary devices.
- AUX2 Input (L/R): RCA inputs for a second auxiliary device.
- CD/DVD Input (L/R): RCA inputs for CD or DVD players.
- Tape Play (L/R): RCA inputs for the playback output of a tape deck or other recording device.
- Tape Rec (L/R): RCA outputs for connecting to the recording input of a tape deck or other recording device.
- Wyjście (L/P): RCA outputs to connect to your main power ampliyfikator.
- Zacisk uziemienia (GND): Łączy się z przewodem uziemiającym gramofonu w celu redukcji brumu.
- Przełącznik wyboru: For internal configuration (typically left in default position unless specified).
- bezpiecznik: Replace only with the specified fuse type and rating.
- Wejście zasilania prądem zmiennym: Connects to the supplied power cable.
5. Konfiguracja i połączenia
Follow these steps to properly set up your OSD Audio PRE-1 PreampLiyfikator:
- Umieszczenie: Place the PRE-1 on a stable, flat surface, ensuring adequate ventilation around the unit. Avoid placing it near heat sources or in direct sunlight.
- Wyłączone: Ensure all audio components, including the PRE-1 and your main amplifier, are turned off before making any connections.
- Połącz źródła:
- Obrotnica: Connect the RCA cables from your turntable to the Phono Input (L/R) on the PRE-1. Connect the turntable's ground wire to the GND terminal on the PRE-1.
- Odtwarzacz CD/DVD: Connect the RCA cables from your CD/DVD player to the CD/DVD Input (L/R).
- Other Devices (e.g., Streamer, Tuner): Connect RCA cables from these devices to the AUX1 Input (L/R) or AUX2 Input (L/R).
- Tape Deck: Connect the playback outputs of your tape deck to the Tape Play (L/R) inputs. Connect the recording inputs of your tape deck to the Tape Rec (L/R) wyjścia.
- Połącz się z AmpLiyfikator: Połącz Output (L/R) RCA jacks on the PRE-1 to the input jacks of your main power ampliyfikator.
- Podłączenie zasilania: Podłącz dostarczony kabel zasilający do Wejście zasilania prądem zmiennym on the rear panel of the PRE-1, then plug it into a suitable wall outlet.
- Pierwsze włączenie: Turn on your main power amplifier first, then turn on the PRE-1. When powering off, turn off the PRE-1 first, then your main ampliyfikator.
6. Instrukcja obsługi
Once your PRE-1 is connected, follow these steps for basic operation:
- Wybierz wejście: Użyj Wybór wejścia rotary knob on the front panel to choose the desired audio source (Phono, AUX1, AUX2, CD/DVD).
- Dostosuj głośność: Zacznij od Tom knob at its minimum setting. Begin playing your selected audio source and slowly increase the volume to a comfortable listening level.
- Regulacja tonów: Użyj Bas, Średni, I Potroić knobs to adjust the tonal characteristics of your audio. Turn clockwise to increase, counter-clockwise to decrease.
- Kontrola równowagi: Dostosuj Balansować knob to fine-tune the left and right channel output for optimal stereo imaging.
- Głośność: Naciśnij Głośność button to activate a contour that boosts bass and treble frequencies, which can be beneficial at lower listening volumes. Press again to deactivate.
- Filtr niski: Naciśnij Niski filtr button to engage a filter that reduces very low frequencies. This can help eliminate rumble from turntables or other unwanted low-frequency noise. Press again to deactivate.
- Mononukleoza: Naciśnij Mononukleoza button to combine the left and right stereo channels into a single monaural signal. This is useful for playing mono recordings. Press again for stereo.
- Niemy: Naciśnij Niemy button to instantly silence the audio output. Press again to restore sound.
- Użycie mikrofonu: Podłącz mikrofon do Wejście mikrofonowe. Adjust the microphone's volume using the Poziom mikrofonu pokrętło.
- Tape Monitoring/Recording: If you have a tape deck connected, select the appropriate input for playback. To record, ensure your tape deck is set to record and the PRE-1 is passing the desired source through the Tape Rec outputs.
7. Konserwacja
Proper care and maintenance will ensure the longevity and optimal performance of your PRE-1 Preampliyfikator.
- Czyszczenie: Use a soft, dry cloth to clean the exterior of the unit. Do not use liquid cleaners, aerosols, or harsh chemicals, as they may damage the finish or internal components.
- Wentylacja: Periodically check that the ventilation openings are free from dust and obstructions.
- Znajomości: Occasionally check all cable connections to ensure they are secure. Loose connections can lead to signal loss or interference.
- Składowanie: Jeśli urządzenie będzie przechowywane przez dłuższy czas, należy odłączyć je od gniazdka elektrycznego i przechowywać w chłodnym, suchym miejscu, z dala od bezpośredniego światła słonecznego i ekstremalnych temperatur.
8. Rozwiązywanie Problemów
If you experience issues with your OSD Audio PRE-1, refer to the following common problems and solutions:
| Problem | Możliwa przyczyna | Rozwiązanie |
|---|---|---|
| Brak zasilania | Power cable not connected; Power outlet not active; Blown fuse | Ensure power cable is securely connected. Test the outlet with another device. Check and replace the fuse if necessary (refer to specifications for fuse type). |
| Brak dźwięku | Incorrect input selected; Volume too low; Mute engaged; Loose audio cables; Main amplifier off or incorrect input selected | Select the correct input source. Increase the volume. Disengage Mute. Check all RCA cable connections. Ensure your main amplifier is on and set to the correct input. |
| Zniekształcony dźwięk | Volume too high (clipping); Incorrect tone control settings; Faulty cables | Reduce the volume. Adjust Bass, Mid, and Treble controls to neutral or desired settings. Try replacing audio cables. |
| Brzęczenie lub buczenie | Ground loop; Loose ground wire (Phono); Interference from other electronics | Ensure turntable ground wire is connected to the PRE-1's GND terminal. Try moving the PRE-1 or other audio components away from power cables or other electronic devices. Use a ground loop isolator if necessary. |
| Mikrofon nie działa | Mic not connected; Mic Level too low; Faulty microphone | Ensure microphone is securely plugged into the Mic Input. Increase the Mic Level. Test with another microphone if available. |
9. Specyfikacje
Below are the technical specifications for the OSD Audio PRE-1 PreampLiyfikator:
| Funkcja | Specyfikacja |
|---|---|
| Model | PRZED-1 |
| Marka | Dźwięk OSD |
| Liczba kanałów | 2 |
| Typ montażu | Montaż powierzchniowy |
| UPC | 819603012446 |
| ASIN | B01MPYJLPX |
| Producent | Dźwięk OSD |
10. Gwarancja i wsparcie
OSD Audio products are designed for reliability and performance. For specific warranty details and terms, please refer to the warranty card included with your product or visit the official OSD Audio website. If you require technical assistance or have questions not covered in this manual, please contact OSD Audio customer support.
OSD Audio Customer Support: Please visit the OSD Audio webStrona zawierająca informacje kontaktowe i zasoby pomocy.