1. Wprowadzenie
This user manual provides comprehensive instructions for the setup, operation, maintenance, and troubleshooting of your CipherLab 1500P HP 1D Corded Barcode Scanner. Please read this manual thoroughly before using the device to ensure proper functionality and to maximize its lifespan. Keep this manual for future reference.
2. Koniec produktuview
The CipherLab 1500P HP is a high-performance 1D corded barcode scanner designed for efficient data capture. It comes with a USB cable for connectivity and an autosense stand for hands-free operation.
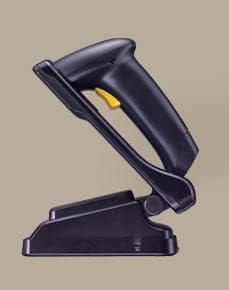
Rysunek 2.1: CipherLab 1500P HP barcode scanner placed in its autosense stand. The scanner is black with a yellow trigger button, and the stand is also black, providing a stable base for the scanner.
Zawartość opakowania:
- CipherLab 1500P HP Barcode Scanner
- Kabel połączeniowy USB
- Autosense Stand
- This User Manual (or link to digital version)
3. Konfiguracja
- Rozpakuj urządzenie: Carefully remove the barcode scanner, USB cable, and autosense stand from their packaging.
- Podłącz kabel USB:
- Locate the USB port on the base of the barcode scanner.
- Insert the smaller end of the USB cable into the scanner's port.
- Insert the larger USB-A end of the cable into an available USB port on your host computer or point-of-sale (POS) system.
- Instalacja sterownika (Plug & Play): The CipherLab 1500P HP is typically a plug-and-play device. Your operating system should automatically detect and install the necessary drivers. Wait for the installation to complete (usually indicated by a notification).
- Position the Autosense Stand: Place the autosense stand on a stable, flat surface. The stand is designed to hold the scanner in an optimal position for hands-free scanning.
- Place Scanner in Stand: Gently place the barcode scanner into the autosense stand. Ensure it is securely seated. The scanner will automatically switch to presentation mode when placed in the stand, allowing it to detect and scan barcodes without pressing the trigger.
- Testuj łączność: Open a text editor (e.g., Notepad, WordPad) or a compatible application on your computer. Scan a known barcode. The scanned data should appear in the text editor, confirming successful setup.
4. Instrukcja obsługi
Tryb przenośny:
- Remove the scanner from the autosense stand.
- Skieruj okno skanera w stronę kodu kreskowego, który chcesz zeskanować.
- Press and hold the yellow trigger button. A red scanning line will emit from the scanner.
- Position the scanner so the red line crosses the entire barcode.
- Once the barcode is successfully read, the scanner will emit an audible beep and/or a visual indicator (e.g., LED flash). The data will be transmitted to your connected device.
- Zwolnij przycisk spustowy.
Autosense (Presentation) Mode:
- Ensure the scanner is securely placed in the autosense stand.
- Hold the barcode in front of the scanner's window.
- The scanner will automatically detect the barcode and activate its scanning engine.
- Once the barcode is successfully read, the scanner will emit an audible beep and/or a visual indicator. The data will be transmitted to your connected device.
Wskazówki dotyczące skanowania:
- Ensure the barcode is clean and not damaged.
- Dostosuj odległość między skanerem a kodem kreskowym, aby zapewnić optymalny odczyt.
- Avoid scanning at extreme angles; try to keep the scanner perpendicular to the barcode.
- W przypadku powierzchni odbijających światło, spróbuj lekko przechylić skaner, aby uniknąć odblasków.
5. Konserwacja
- Czyszczenie:
- Regularly clean the scanning window with a soft, lint-free cloth.
- W przypadku uporczywych zabrudzeń, delikatnieampen the cloth with water or a mild, non-abrasive cleaner. Do not spray cleaner directly onto the scanner.
- Avoid using harsh chemicals, solvents, or abrasive materials, as these can damage the scanner's surface or internal components.
- Składowanie: Przechowuj skaner w chłodnym i suchym miejscu, z dala od bezpośredniego światła słonecznego i ekstremalnych temperatur.
- Pielęgnacja kabli: Unikaj nadmiernego zginania lub skręcania kabla USB, ponieważ może to spowodować uszkodzenie wewnętrznych przewodów.
- Pielęgnacja stoiska: Keep the autosense stand clean and free of obstructions to ensure the scanner can be placed and removed smoothly.
6. Rozwiązywanie Problemów
| Problem | Możliwa przyczyna | Rozwiązanie |
|---|---|---|
| Skaner nie odczytuje kodów kreskowych. |
|
|
| Żadne dane nie są przesyłane do komputera. |
|
|
| Skaner wydaje sygnał dźwiękowy, ale nie przesyła danych. |
|
|
7. Specyfikacje
| Funkcja | Szczegół |
|---|---|
| Model | 1500P HP (33-A1500PCBKU001) |
| Typ | 1D Corded Barcode Scanner |
| Łączność | USB |
| Dołączone akcesoria | USB Cable, Autosense Stand |
| Producent | CipherLab |
| ASIN | B01MDRIJRS |
| Pierwsza dostępna data | 24 stycznia 2024 r. |
8. Gwarancja i wsparcie
For specific warranty information regarding your CipherLab 1500P HP barcode scanner, please refer to the warranty card included with your product or contact your point of purchase. Warranty terms may vary by region and reseller.
For technical support, driver downloads, or additional product documentation, please visit the official CipherLab website or contact their customer support directly. You may need your product model number (33-A1500PCBKU001) and serial number for support inquiries.
CipherLab Official Webstrona: www.cipherlab.com