
AIBOO YK-300000197
User Manual: AIBOO RF Mini Remote Control for Single Color LED Lights
Model: YK-300000197
Wstęp
This manual provides comprehensive instructions for the AIBOO RF Mini Remote Control, designed for single color LED strip lights, 12V DC LED ribbons, LED neon signs, and dimmable 3528/5050 under cabinet puck lights. This wireless remote control system offers convenient dimming and timing functions for your LED lighting setups.
Zawartość opakowania
Sprawdź, czy w przesyłce znajdują się wszystkie elementy wymienione poniżej:
- 1 x RF Mini Remote Control
- 1 x LED Controller (Receiver)
- 1 x Remote Bracket
- 1 x Two-Sided Sticker (for bracket installation)

Specyfikacje
| Funkcja | Opis |
|---|---|
| Wymiary produktu | 5 x 0.35 x 0.2 cala |
| Waga przedmiotu | 0.3 uncji |
| Numer modelu przedmiotu | YK-300000197 |
| Baterie | Wymagana 1 bateria CR2 (w zestawie) |
| Producent | AIBOO |
| Funkcja specjalna | Sterowanie bezprzewodowe |
| Kolor | Biały |
| Maksymalna liczba obsługiwanych urządzeń | 1 (na kontroler) |
| Kompatybilne urządzenia | LED strip lights, LED under cabinet puck lights, LED neon signs |
| Odległość zdalna | 15M at open area |
| Poziomy jasności | 10 levels, 1-100% dimmable |
| Funkcje czasowe | 4 choices (1H, 2H, 4H, 8H) |

Konfiguracja i instalacja
1. Connecting the LED Controller
The LED controller acts as the receiver for the remote control signals. It should be connected between your 12V DC power supply and the LED lights.
- Connect the output of your 12V DC power supply to the input port of the LED controller.
- Connect your single color LED strip lights, puck lights, or neon sign to the output port of the LED controller.
- Przed włączeniem zasilania upewnij się, że wszystkie połączenia są bezpieczne.

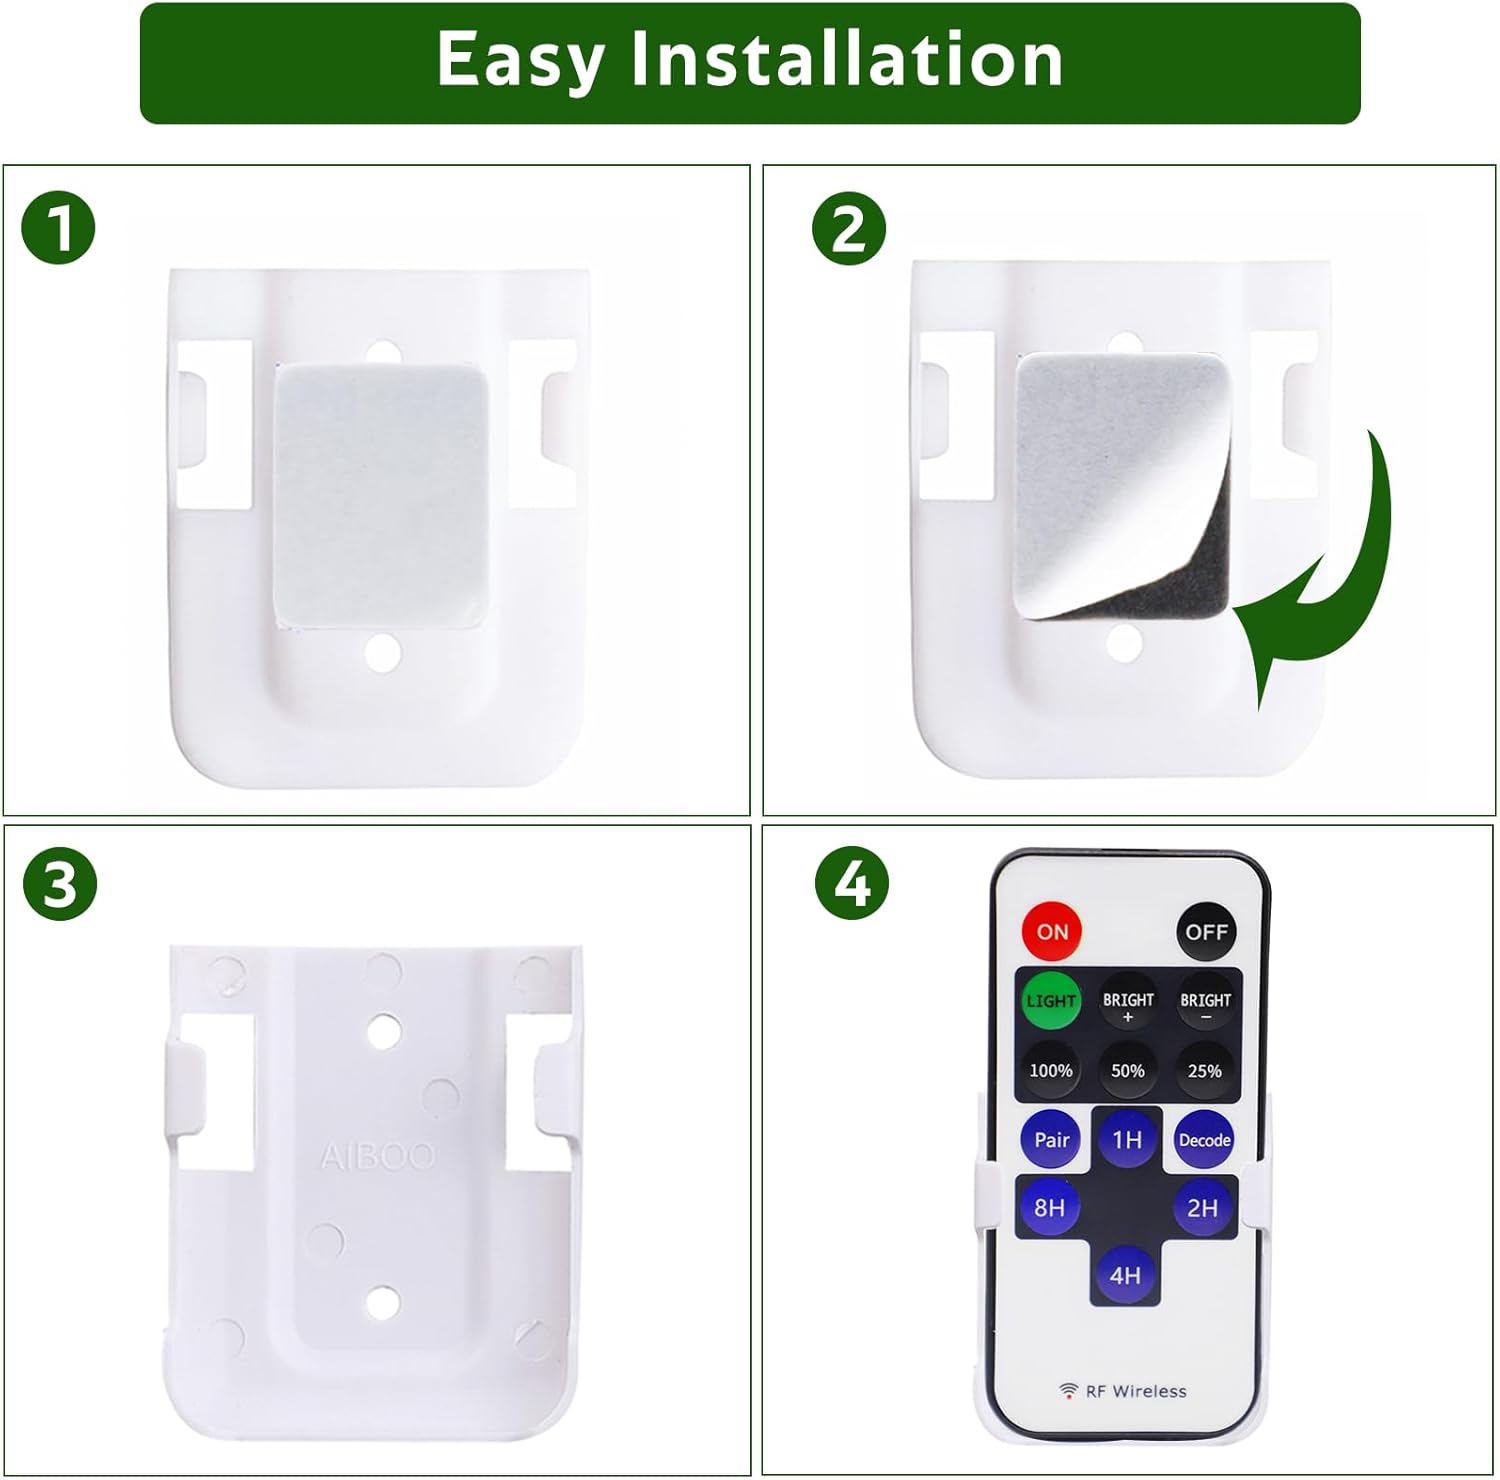
2. Installing the Remote Bracket
The included remote bracket allows for convenient storage and access to your RF Mini Remote Control.
- Clean the surface where you intend to mount the bracket.
- Peel off the protective film from one side of the two-sided sticker and apply it firmly to the back of the remote bracket.
- Peel off the protective film from the other side of the sticker.
- Press the bracket onto the desired wall or surface and hold firmly for a few seconds to ensure adhesion.
- Insert the RF Mini Remote Control into the mounted bracket.
3. Remote Pairing Instructions
The remote control uses RF (Radio Frequency) technology, allowing it to operate without direct line-of-sight to the controller. It supports both 1-to-1 and 1-to-many pairing.

1-to-1 Pairing (Pairing one remote to one controller):
- Ensure only the specific LED controller you wish to pair is powered on. Disconnect power from any other controllers nearby.
- With the controller powered on, press the "Para" przycisk na pilocie.
- The connected LED lights will flash to indicate successful pairing.
1-to-Many Pairing (Pairing one remote to multiple controllers):
- Ensure all LED controllers you wish to control with a single remote are powered on.
- Naciśnij „Rozszyfrować" przycisk na pilocie.
- All connected LED lights will flash to indicate successful pairing. This remote will now control all decoded controllers synchronously.
Video: Pairing Instructions
Watch this video for a visual guide on how to pair your remote control with single or multiple LED light sets.
Instrukcja obsługi
Funkcje pilota zdalnego sterowania:
- WŁ. / WYŁ .: Press the red "ON" button to turn the lights on, and the black "OFF" button to turn them off.
- Regulacja jasności: Use the "BRIGHT +" and "BRIGHT -" buttons to gradually increase or decrease the brightness. There are 10 brightness levels available.
- Ustawiona jasność: Quickly set brightness to 100%, 50%, or 25% using the dedicated buttons.
- Funkcja pomiaru czasu: The remote features 4 timing choices: 1H (1 hour), 2H (2 hours), 4H (4 hours), and 8H (8 hours). Press the corresponding button to set the lights to automatically turn off after the selected duration.

The controller has an auto-save function, remembering your last light mode setting when you switch the lights on again.
Konserwacja
- Keep the remote control and LED controller dry. Moisture can damage electronic components.
- Czyść urządzenia miękką, suchą ściereczką. Nie używaj środków czyszczących o właściwościach ściernych ani rozpuszczalników.
- Unikaj wystawiania urządzeń na działanie ekstremalnych temperatur lub bezpośredniego światła słonecznego przez dłuższy czas.
- Wymień baterię CR2 w pilocie, gdy jego wydajność spadnie.
Rozwiązywanie problemów
- Problem: Lights do not respond to the remote control.
- Ensure the LED controller is properly connected to the power supply and LED lights.
- Sprawdź, czy bateria w pilocie (CR2) wymaga wymiany.
- Re-pair the remote control with the LED controller following the "1-to-1 Pairing" instructions. Ensure only the target controller is powered during pairing.
- Problem: Lights are flickering or not dimming properly.
- Verify that your power supply is sufficient for the connected LED lights. An undersized power supply can cause flickering.
- Ensure all connections are secure and free from loose wires.
- If the issue persists, try re-pairing the remote.
- Problem: Remote controls multiple light sets unintentionally.
- This indicates the remote was likely paired using the "1-to-Many Pairing" (Decode) function.
- To control sets separately, you must re-pair each remote to its specific controller using the "1-to-1 Pairing" method. Remember to only power on the controller you are currently pairing.
Obsługa klienta
For further assistance or inquiries, please contact AIBOO Lighting customer support. We are committed to providing reliable service.
- U.S. Live Customer Support: Monday - Friday, 9 AM - 5 PM (EST)
- Visit the AIBOO Store for more products and information: AIBOO Store

Ask a question about this manual
Ask about setup, troubleshooting, compatibility, parts, safety, or missing instructions. Manuals+ will review the question and use this page’s manual context to help answer it.