
1. Wprowadzenie
Dziękujemy za zakupasing the Syma X5HW RC Quadcopter Drone. This manual provides essential information for the safe operation, setup, and maintenance of your drone. Please read it thoroughly before first use to ensure proper function and to avoid damage.
The Syma X5HW is a 2.4G 4-channel RC quadcopter featuring a 0.3MP HD camera for FPV real-time transmission, high-hold mode, 360° 3D flips, headless mode, and a built-in 6-axis gyro for stable flight. It is designed for both beginners and experienced users.
2. Środki ostrożności
- Środowisko lotu: Lataj na otwartej przestrzeni, z dala od ludzi, zwierząt, budynków i linii energetycznych. Unikaj latania przy silnym wietrze lub niekorzystnych warunkach pogodowych.
- Zalecany wiek: Produkt jest zalecany dla użytkowników w wieku 14 lat i starszych. W przypadku młodszych użytkowników zalecany jest nadzór osoby dorosłej.
- Bezpieczeństwo baterii: Use only the provided charger and battery. Do not overcharge or short-circuit the battery. Disconnect the battery after use and during charging. Do not expose batteries to extreme temperatures or direct sunlight.
- Bezpieczeństwo śmigła: Keep hands, face, and loose clothing away from rotating propellers. Always ensure propellers are securely attached before flight.
- Narażenie na działanie wody: Dron nie jest wodoodporny. Unikaj kontaktu z wodą i wilgocią.
- Linia widzenia wizualnego: Podczas lotu zawsze utrzymuj drona w zasięgu wzroku.
- Szanuj prywatność: When using the camera, respect the privacy of others.
3. Zawartość opakowania
Sprawdź, czy w opakowaniu znajdują się wszystkie elementy:
- Syma X5HW RC Quadcopter Drone
- Pilot zdalnego sterowania
- Kabel ładujący USB
- Main Blades (Propellers)
- Osłony śmigła
- Podwozie
- HD Camera (0.3MP)
- Śrubokręt
- Instrukcja obsługi (ten dokument)
- Akumulator LiPo 3.7 V 600 mAh

Image: Syma X5HW package contents, showing the drone, remote, and various accessories.
4. Identyfikacja komponentów
4.1 Komponenty drona

Obraz: Góra view of the Syma X5HW drone.
- Śmigła: Four main blades for lift and propulsion.
- Osłony śmigieł: Ramki ochronne wokół śmigieł.
- Silniki: Napędzaj śmigła.
- Światła LED: Indicate drone orientation and status (front: red, rear: green).
- Komora baterii: Znajduje się na spodzie drona.
- Kamera: Attaches to the bottom for photo and video capture.
- Podwozie: Provides stable landing and protects the camera.
4.2 Elementy pilota
Image: Syma X5HW remote controller (part of the package contents image).
- Lewy joystick (przepustnica/odchylenie): Kontroluje wysokość (w górę/w dół) i obrót (w lewo/w prawo).
- Prawy joystick (kierunek): Kontroluje ruch do przodu/do tyłu oraz w lewo/w prawo.
- Przycisk zasilania: Włącza/wyłącza kontroler.
- Przyciski przycinania: Adjust drone stability (forward/backward, left/right, yaw).
- Przycisk trybu prędkości: Toggles between low and high speed.
- Przycisk 3D Flip: Initiates 360° flips.
- Przycisk trybu bezgłowego: Włącza/wyłącza tryb bezgłowy.
- Przycisk zdjęcia/wideo: Robienie zdjęć lub rozpoczynanie/zatrzymywanie nagrywania wideo.
- Uchwyt na telefon: For mounting a smartphone to view Zasilanie FPV.
5. Konfiguracja
5.1 Ładowanie akumulatora drona
- Podłącz akumulator drona do kabla ładującego USB.
- Podłącz kabel USB do źródła zasilania USB (np. portu USB komputera, zasilacza ściennego USB).
- Podczas ładowania na kablu USB zaświeci się kontrolka, która zgaśnie po pełnym naładowaniu.
- Charging time is approximately 90 minutes. Do not leave unattended during charging.
5.2 Instalacja baterii pilota zdalnego sterowania
- Otwórz komorę baterii z tyłu pilota.
- Insert 4x AA batteries (not included) according to the polarity markings.
- Dokładnie zamknij komorę baterii.
5.3 Instalacja śmigła
Ensure propellers are installed correctly. Each propeller is marked with 'A' or 'B'. Match them to the corresponding motor shafts marked 'A' or 'B'.
- Attach propeller 'A' to motor shafts 'A'.
- Attach propeller 'B' to motor shafts 'B'.
- Press down firmly until they are seated.
5.4 Montaż osłony śmigła
Attach the propeller guards to the drone's arms using the provided screws and screwdriver for added protection.
5.5 Montaż podwozia
Slide the landing gear into the designated slots on the underside of the drone until they click into place.
5.6 Instalacja kamery
- Connect the camera's cable to the port on the underside of the drone.
- Secure the camera module into its slot.
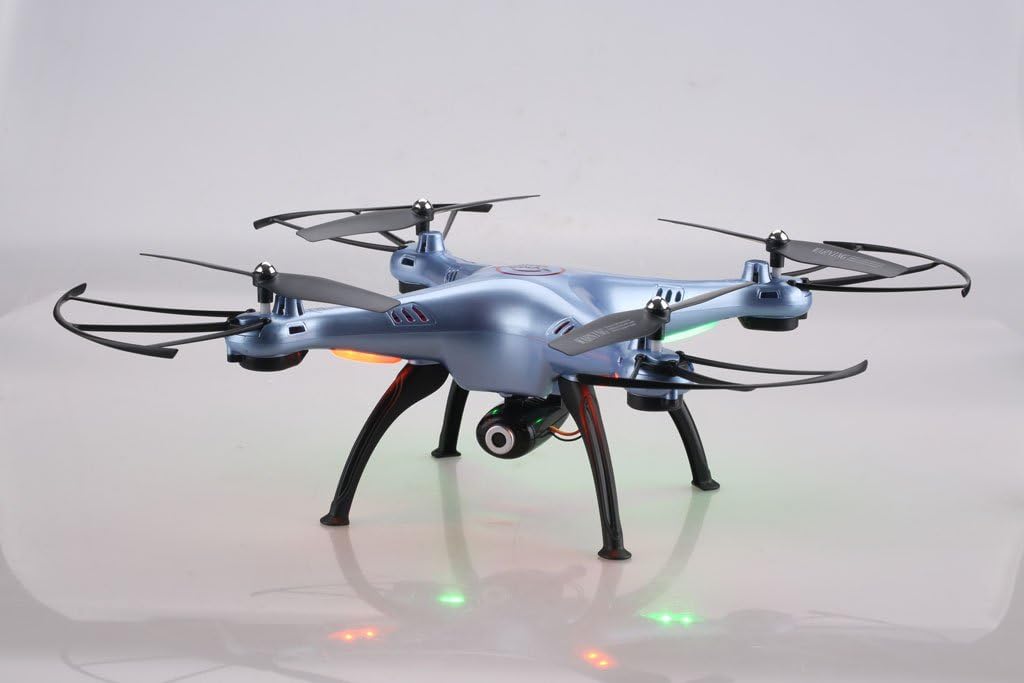
Image: Syma X5HW drone with camera and landing gear attached.
6. Instrukcja obsługi
6.1 Parowanie drona i pilota zdalnego sterowania
- Umieść drona na płaskiej, poziomej powierzchni.
- Insert the charged battery into the drone and connect it. The drone's LED lights will flash.
- Włącz pilota. Kontrolka na pilocie zacznie migać.
- Przesuń lewy joystick (przepustnicę) do końca w górę, a następnie do końca w dół.
- The drone's LED lights and the remote's indicator light will become solid, indicating successful pairing.
6.2 Calibration (Gyroscope Reset)
If the drone drifts during flight, perform a gyroscope calibration:
- After pairing, place the drone on a flat, level surface.
- Push both joysticks to the bottom-right corner simultaneously for 2-3 seconds.
- The drone's LED lights will flash rapidly and then become solid, indicating successful calibration.
6.3 Podstawowe sterowanie lotem
- Startować: After pairing and calibration, gently push the left joystick (throttle) up. The propellers will start spinning, and the drone will ascend.
- Lądowanie: Gently pull the left joystick (throttle) down. The drone will descend and land.
- Kontrola wysokości: Left joystick up/down.
- Obrót (odchylenie): Left joystick left/right.
- Naprzód wstecz: Right joystick up/down.
- Lot bokiem w lewo/prawo: Right joystick left/right.
6.4 Zaawansowane funkcje lotu
- Tryb prędkości: Press the Speed Mode button to switch between low and high speed. Low speed is recommended for beginners.
- Tryb bezgłowy: Press the Headless Mode button. The drone will orient itself relative to the pilot, regardless of its actual front direction. Press again to exit.
- High-Hold Mode (Altitude Hold): The drone automatically maintains its altitude using an integrated air pressure sensor. After taking off, release the left joystick, and the drone will hover at its current height. Adjust altitude by pushing the left joystick up or down.
- Flipy 3D: Fly the drone to a height of at least 3 meters. Press the 3D Flip button, then quickly push the right joystick in any direction (forward, backward, left, or right). The drone will perform a 360° flip in that direction.
6.5 FPV and Camera Operation
The Syma X5HW features a 0.3MP HD camera for real-time FPV transmission via Wi-Fi.
- Pobierz aplikację: Download the free "SYMA FPV" app from the App Store (iOS) or Google Play Store (Android) to your smartphone.
- Połącz się z Wi-Fi: Turn on the drone. On your smartphone, go to Wi-Fi settings and connect to the Wi-Fi network named "SYMA-X5HW" (or similar).
- Uruchom aplikację: Open the SYMA FPV app. You should see the live video feed from the drone's camera.
- Robić zdjęcia: Press the Photo/Video button on the remote controller once to take a photo. Photos are saved to your smartphone.
- Nagraj wideo: Press and hold the Photo/Video button on the remote controller to start video recording. Press and hold again to stop. Videos are saved to your smartphone.
7. Konserwacja
- Czyszczenie: Use a soft, dry cloth to clean the drone and remote controller. Do not use solvents or harsh chemicals.
- Kontrola śmigła: Regularly check propellers for damage (cracks, bends). Replace damaged propellers immediately.
- Pielęgnacja silnika: Utrzymuj silniki w czystości, bez kurzu i zanieczyszczeń.
- Przechowywanie baterii: Jeśli dron będzie przechowywany przez dłuższy czas, naładuj akumulator do około 50% i wyjmij go z drona. Przechowuj w chłodnym, suchym miejscu.
- Przechowywanie ogólne: Store the drone and remote in a cool, dry environment, away from direct sunlight and extreme temperatures.
8. Rozwiązywanie Problemów
| Problem | Możliwa przyczyna | Rozwiązanie |
|---|---|---|
| Dron nie reaguje na pilota. | Nie sparowano; słaba bateria (dron lub pilot). | Ensure drone and remote are powered on and paired correctly. Charge drone battery. Replace remote batteries. |
| Dron dryfuje w czasie lotu. | Gyroscope not calibrated; uneven surface during startup; wind interference. | Perform gyroscope calibration on a flat surface. Fly in calm conditions. Use trim buttons to fine-tune. |
| Śmigła się nie kręcą. | Propellers jammed; motor issue; low battery. | Check for obstructions. Ensure battery is charged and connected. |
| Brak transmisji wideo FPV. | Wi-Fi not connected; app not open; camera not connected. | Ensure smartphone is connected to drone's Wi-Fi. Open SYMA FPV app. Check camera connection to drone. |
| Krótki czas lotu. | Akumulator nie jest w pełni naładowany; akumulator jest stary; latanie jest agresywne. | Upewnij się, że bateria jest w pełni naładowana. Rozważ wymianę starych baterii. Lataj bardziej delikatnie. |
9. Specyfikacje
- Model: Syma X5HW
- Częstotliwość: 2.4 GHz
- Kanały: 4-kanałowy
- Żyroskop: Żyroskop osi 6
- Kamera: 0.3MP HD Camera (720p video resolution)
- FPV: Wi-Fi Real-time Transmission
- Tryby lotu: High-Hold Mode, Headless Mode, 3D Flips
- Bateria: 3.7V 600mAh LiPo
- Czas ładowania: Około 90 minut
- Czas lotu: Około 10 minut
- Zakres sterowania: Do 100 metrów
- Tworzywo: Plastikowy
- Zalecany wiek: 14+
10. Gwarancja i wsparcie
Syma products are manufactured to high quality standards. For warranty information or technical support, please refer to the contact details provided with your purchase documentation or visit the official Syma webZachowaj dowód zakupu na wypadek roszczeń gwarancyjnych.