RAYSON PD-1501
User Manual: Rayson PD-1501 Coil Binding Machine
Model: PD-1501 | Brand: RAYSON
1. Wprowadzenie
The Rayson PD-1501 is a robust coil binding machine designed for professional document binding. It features a manual punch operation combined with an electric coil inserter, making it suitable for frequent use in small to medium office environments. This machine is compatible with 4:1 pitch spiral binding coils and can punch 46 round holes, accommodating letter size, A4, or A5 papers. Its durable metal construction ensures long-lasting performance.

Image: The Rayson PD-1501 Coil Binding Machine, shown with included pliers and a selection of binding coils.
2. Instrukcje bezpieczeństwa
- Przed uruchomieniem maszyny należy przeczytać wszystkie instrukcje.
- Keep hands and loose clothing away from moving parts, especially the punching mechanism and electric coil inserter.
- Upewnij się, że urządzenie jest umieszczone na stabilnej, płaskiej powierzchni.
- Do not overload the punch capacity (maximum 15 sheets of 80gsm/20lb paper). Overloading can damage the machine.
- Przed czyszczeniem lub jakąkolwiek konserwacją należy odłączyć urządzenie od gniazdka elektrycznego.
- Przechowywać w miejscu niedostępnym dla dzieci.
- Use only the specified power adapter (DC 12V).
3. Zawartość opakowania
Proszę sprawdzić, czy w paczce znajdują się następujące elementy:
- Rayson PD-1501 Coil Binding Machine
- Zasilacz (prąd stały 12 V)
- Pliers (for coil crimping)
- Sample Binding Coils (quantity may vary)
- Instrukcja obsługi (ten dokument)
4. Konfiguracja
- Rozpakuj maszynę: Carefully remove the binding machine and all accessories from the packaging. Retain packaging for future storage or transport.
- Umieszczenie: Place the machine on a sturdy, level desk or table. Ensure there is enough space around the machine for operation and for the paper to pass through.
- Podłącz zasilanie: Locate the DC 12V power input port on the machine and connect the provided power adapter. Plug the adapter into a suitable electrical outlet.
- Kontrola wstępna: Ensure the waste tray is properly inserted and empty before first use.

Image: The Rayson PD-1501 binding machine, showing the power adapter and pliers, essential for setup and operation.
5. Instrukcja obsługi
5.1 Punching Documents
- Adjust Margin: The machine features an adjustable margin control. Pull and push the margin adjustment lever to select the desired margin depth (0.12 inch / 3mm, 0.19 inch / 5mm, or 0.27 inch / 7mm). The color indicator on the lever does not directly correspond to the margin distance, so refer to the markings on the machine or test punches.
- Set Paper Stopper: Adjust the paper stopper to align your documents for consistent punching. The machine supports A4, A5, and A6 paper sizes, clearly marked on the machine's surface.
- Włóż papier: Insert up to 15 sheets of 80gsm (20lb) paper into the punching slot. Ensure the paper is flush against the paper stopper.
- Dziurkacz: Pull the punching handle down firmly and completely to punch the holes. Release the handle to return it to its original position.
- Powtarzać: Repeat the punching process for all pages of your document.

Image: Close-up details of the Rayson PD-1501, highlighting clearly marked paper sizes, the electric spiral inserter, and the adjustable margin control with its waste tray.
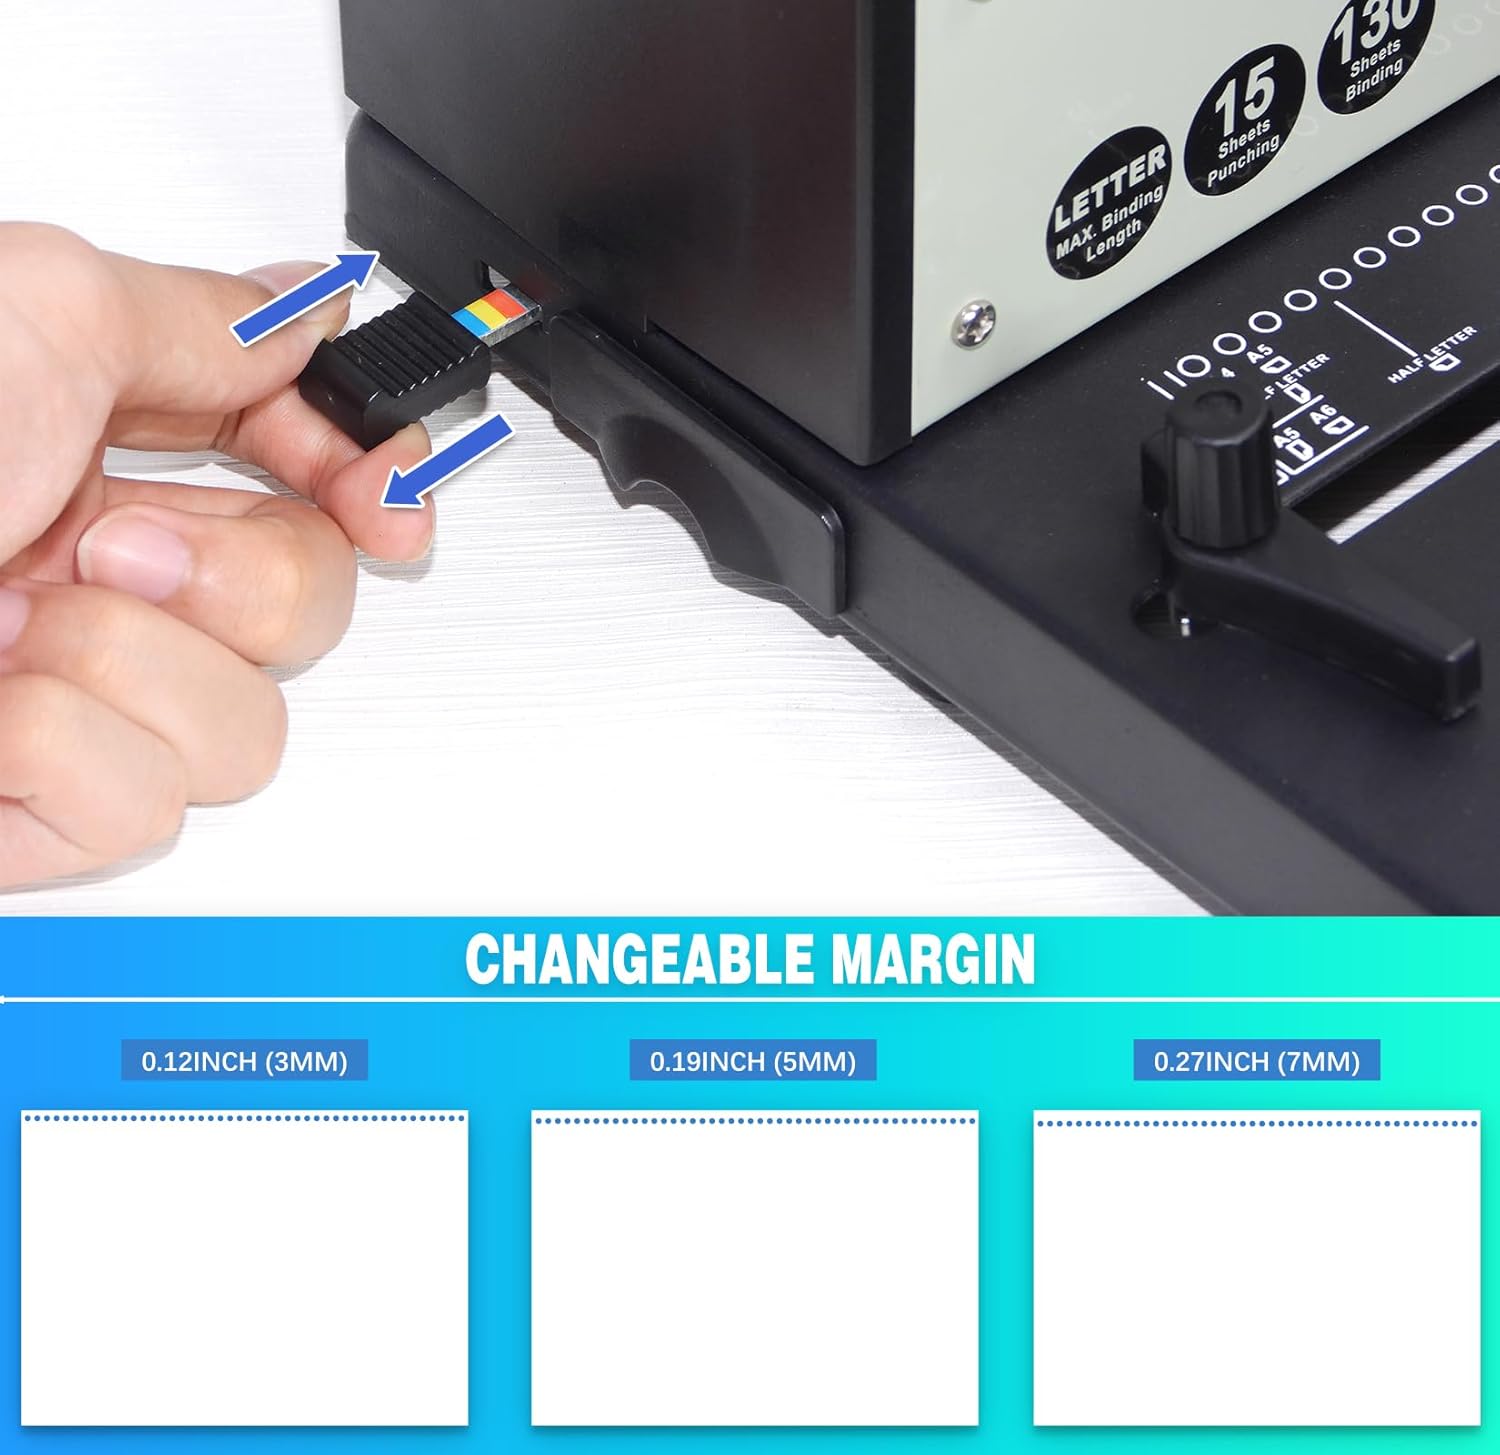
Image: A hand demonstrating the adjustment of the changeable margin on the Rayson PD-1501, showing options for 0.12 inch (3mm), 0.19 inch (5mm), and 0.27 inch (7mm) margins.
Video: Adjusting Margin Distance
Video: This video demonstrates how to adjust the margin distance on the Rayson PD-1501 binding machine, showing the different settings and their effects on the punched holes.
5.2 Binding Documents with Electric Coil Inserter
- Select Coil: Choose a spiral binding coil appropriate for the thickness of your document. The machine is compatible with 4:1 pitch coils.
- Align Pages: Gather your punched pages and align them.
- Start Coil Insertion: Place the first few holes of your document onto the electric coil inserter roller. Turn on the electric inserter switch.
- Roll Coil: Gently roll the document against the electric coil inserter. The coil will automatically feed through the punched holes. Guide the coil as it progresses.
- Secure Coil Ends: Once the coil is fully inserted, use the provided pliers to crimp the ends of the coil. This prevents the coil from unraveling and secures your document.

Image: A hand demonstrating the process of inserting a spiral coil into a document using the electric coil inserter feature of the Rayson PD-1501.

Obraz: Zbliżenie view showing a black spiral coil being threaded through the precisely punched holes of a document, illustrating the binding process.
6. Konserwacja
- Empty Waste Tray: Regularly empty the waste tray located at the bottom of the machine. A full waste tray can cause paper jams or damage the punching mechanism.
- Czyste ostrza: Periodically clean the punching blades with a soft, dry cloth to remove any paper dust or debris. Do not use abrasive cleaners or solvents.
- Ogólne sprzątanie: Wytrzyj zewnętrzną część urządzenia za pomocąamp cloth. Ensure the machine is unplugged before cleaning.
Image: The waste tray, part of the adjustable margin control, is visible on the Rayson PD-1501, indicating where punched paper scraps collect.
7. Rozwiązywanie Problemów
| Problem | Możliwa przyczyna | Rozwiązanie |
|---|---|---|
| Paper not punching cleanly. | Overloaded punch capacity; dull blades; paper not inserted correctly. | Reduce the number of sheets per punch. Ensure paper is fully inserted and aligned. If blades are dull, contact customer support. |
| Zacięcie papieru. | Overloaded punch; waste tray is full. | Do not force the handle. Carefully remove jammed paper. Empty the waste tray. |
| Electric coil inserter not working. | Machine not plugged in; power switch off; motor malfunction. | Check power connection. Ensure the electric inserter switch is ON. If problem persists, contact customer support. |
| Coil not feeding smoothly. | Incorrect coil size; misaligned holes; coil ends not properly started. | Ensure coil size matches document thickness. Verify holes are punched cleanly and aligned. Guide the coil carefully onto the roller. |
8. Specyfikacje
| Funkcja | Szczegół |
|---|---|
| Model | PD-1501 |
| Punching Method | Podręcznik |
| Metoda wiązania | Electric Coil Inserter |
| Wydajność dziurkowania | 15 sheets (80gsm / 20lb paper) |
| Pojemność wiązania | Unlimited (Max. spiral binding ring size: Unlimited) |
| Poziom | 4:1 |
| Ilość otworów | 46 Round Holes |
| Rozmiar otworu | Φ 0.14" (3.5mm) |
| Obsługiwane rozmiary papieru | Letter, A4, A5 (open-throat design for larger paper) |
| Adjustable Margin | 0.12 inch (3mm), 0.19 inch (5mm), 0.27 inch (7mm) |
| Tworzywo | Budownictwo metalowe |
| Wymiary produktu | 18.31 x 10.24 x 14.17 cala |
| Waga przedmiotu | 15.2 funta |

Image: A diagram illustrating the technical specifications of the punching pattern, including 4:1 pitch, 46 holes, and a hole size of 0.14 inches (3.5mm).
9. Gwarancja i wsparcie
For warranty information and technical support, please refer to the documentation included with your purchase or contact RAYSON customer service directly. Details regarding specific warranty periods and service procedures are typically provided by the manufacturer or authorized seller at the time of purchase.
You may also visit the official RAYSON store on Amazon for additional product information and support resources: RAYSON Store
Powiązane dokumenty - PD-1501
 |
Rayson SD-220B Comb Binding Machine: User Manual and Operation Guide User manual for the Rayson SD-220B comb binding machine, providing specifications, assembly instructions, safety precautions, and step-by-step operation guide for binding documents. |
 |
Instrukcja obsługi maszyny do wiązania drutem TD-1500B34 / TD-1500B34R Kompleksowa instrukcja obsługi maszyn do oprawy drutowej Rayson TD-1500B34 i TD-1500B34R, zawierająca szczegółowe informacje na temat wyboru drutu, pokrętła perforującego, obsługi i wytycznych dotyczących bezpieczeństwa. |
 |
Instrukcja obsługi Rayson BLE DK (wersja nordycka) User's guide for the Rayson BLE DK (Nordic version) development kit, detailing its introduction, block diagram, board layout, power supply, pin maps, function pin groups, programming interface, reset button, and UART interface for Nordic nRF54L15 development. |
 |
Karta katalogowa modułu Bluetooth stereo Rayson BC05-MM klasy 2 BTM-720 Karta katalogowa modułu stereo Bluetooth Rayson BC05-MM klasy 2 (BTM-720) zawierająca szczegółowe informacje na temat jego funkcji, zastosowań, specyfikacji elektrycznych, poboru mocy, schematu blokowego, specyfikacji RF, funkcji pinów i wymiarów. |
 |
Karta katalogowa modułu Bluetooth stereo klasy 2 Rayson BTM-720 BC05-MM Karta katalogowa modułu Rayson BTM-720, stereofonicznego modułu Bluetooth klasy 2. Szczegóły dotyczące funkcji, parametrów elektrycznych, poboru mocy, wydajności RF, funkcji pinów, interfejsu audio, wymiarów i lutowania rozpływowego.file. |