1. Wprowadzenie
This instruction manual provides essential information for the proper use, maintenance, and care of your Insize 3232-25A Blade Micrometer. This precision measuring instrument is specifically designed for accurate measurement of groove diameters on shafts, keyways, and other areas where standard micrometers cannot reach due to their limited access. Please read this manual thoroughly before operating the device to ensure accurate measurements and prolong the life of the instrument.
2. Koniec produktuview
The Insize 3232-25A Blade Micrometer features a unique design with blade-shaped measuring faces on both the anvil and the spindle.
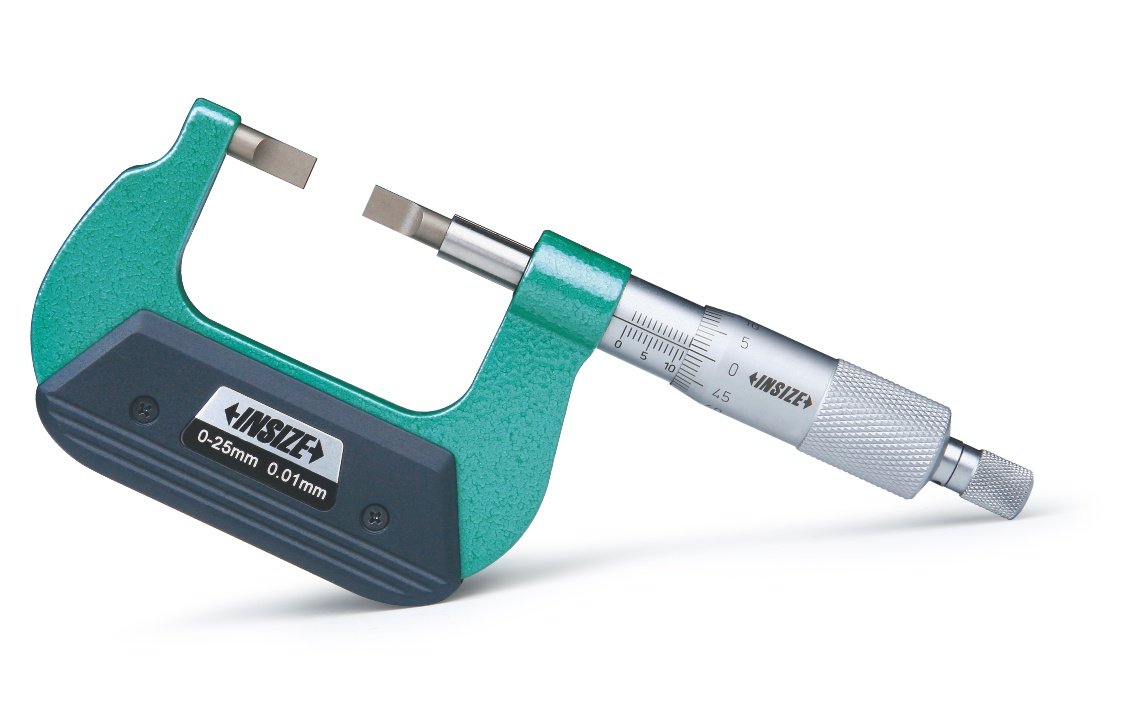
Rysunek 1: Insize 3232-25A Blade Micrometer. This image shows the micrometer with its distinctive blade-shaped anvil and spindle, designed for measuring in confined spaces.
Główne cechy:
- Blade-shaped Anvil and Spindle: Specifically designed to measure the groove diameter of shafts and keyways.
- Podziałka: 0.01 mm for precise readings.
- Non-rotating Spindle: Ensures consistent contact and prevents twisting of the workpiece during measurement.
- Zatrzymanie zapadkowe: Provides constant measuring force, reducing operator error and ensuring repeatable results.
- Ustanawianie standardów: Supplied with setting standards (except for the 0-25mm range) for calibration.
3. Konfiguracja
- Rozpakowywanie: Carefully remove the micrometer from its packaging. Inspect for any visible damage that may have occurred during transit.
- Czyszczenie: Before first use, gently wipe all measuring surfaces with a clean, lint-free cloth. If necessary, use a small amount of instrument cleaning fluid.
- Warunki środowiskowe: Use the micrometer in a stable environment, free from excessive dust, humidity, and temperature fluctuations, which can affect accuracy.
- Zero Point Adjustment:
- For 0-25mm models, close the measuring faces gently using the ratchet stop until they meet. Check if the '0' mark on the thimble aligns perfectly with the datum line on the sleeve.
- For models with setting standards, use the provided standard to set the zero point.
- If adjustment is needed, use the supplied wrench to rotate the sleeve until the '0' mark aligns. Do not overtighten.
4. Instrukcja obsługi
Follow these steps for accurate measurement using your blade micrometer:
- Przygotuj przedmiot obrabiany: Ensure the workpiece is clean and free from burrs or debris that could affect the measurement.
- Position the Micrometer: Open the micrometer jaws slightly wider than the feature to be measured. Carefully position the blade-shaped anvil and spindle into the groove or keyway.
- Advance the Spindle: Rotate the thimble or the ratchet stop to slowly close the measuring faces onto the workpiece.
- Apply Constant Force: Continue rotating the ratchet stop until it clicks 2-3 times. This ensures a consistent and repeatable measuring force, preventing over-tightening and deformation of the workpiece or micrometer.
- Przeczytaj pomiar:
- Sleeve Scale: Read the main millimeter (mm) value from the edge of the thimble on the sleeve scale. Note the last visible full millimeter mark and any half-millimeter mark (0.5 mm) if visible.
- Thimble Scale: Read the hundredths of a millimeter (0.01 mm) value from the thimble scale, where its mark aligns with the datum line on the sleeve.
- Łącznie przeczytano: Add the sleeve reading and the thimble reading to get the total measurement.
- Remove the Micrometer: Gently open the micrometer jaws and remove it from the workpiece.
Ważny: Always use the ratchet stop to apply measuring force. Avoid forcing the spindle by rotating the thimble directly during the final stages of measurement, as this can lead to inaccurate readings and potential damage.
5. Konserwacja
- Czyszczenie: After each use, wipe the micrometer clean with a soft, lint-free cloth. Remove any dust, oil, or fingerprints from the measuring faces and body.
- Smarowanie: Periodically apply a thin film of rust-preventative oil to the unpainted metal surfaces, especially the spindle, to prevent corrosion. Avoid excessive oil, which can attract dust.
- Składowanie: Store the micrometer in its protective case when not in use. Keep it in a dry, clean environment at a stable temperature. Avoid storing it with other tools that could cause damage.
- Kontrola kalibracji: Regularly check the zero point of the micrometer. For models with setting standards, use them to verify accuracy. If consistent inaccuracies are observed, professional calibration may be required.
- Obsługiwanie: Handle the micrometer with care. Avoid dropping it or subjecting it to impacts, as this can affect its precision.
6. Rozwiązywanie Problemów
| Problem | Możliwa przyczyna | Rozwiązanie |
|---|---|---|
| Niedokładne odczyty |
|
|
| Spindle movement is stiff or rough |
|
|
| Ratchet stop not clicking consistently |
|
|
7. Specyfikacje
| Funkcja | Szczegół |
|---|---|
| Numer modelu | 3232-25A |
| Marka | Insize |
| Measuring Range (Operating Distance) | 0-25 mm |
| Podziałka | 0.01 mm |
| Typ wrzeciona | Non-rotating |
| Measuring Force Mechanism | Zapadka |
| Waga przedmiotu | 0.28 gramów |
| Wymiary opakowania | Wymiary 19.8 x 11.2 x 3.4 cm |
| Kraj pochodzenia | Indie |
8. Gwarancja i wsparcie
Insize products are manufactured to international standards and come with a guarantee. For specific warranty terms and conditions, please refer to the documentation provided with your purchase or contact your local Insize distributor.
For technical assistance, spare parts, or service inquiries, please contact Insize customer support or your authorized Insize dealer. When contacting support, please have your model number (3232-25A) and purchase details readily available.