1. Koniec produktuview
The InSize 2866-10 Thickness Gauge is a precision instrument designed for accurate measurement of material thickness. It operates on an ultrasonic measuring principle and is controlled by a microprocessor, ensuring quick response and high accuracy. This gauge is built to international standards, offering optimum performance and long-lasting nature.
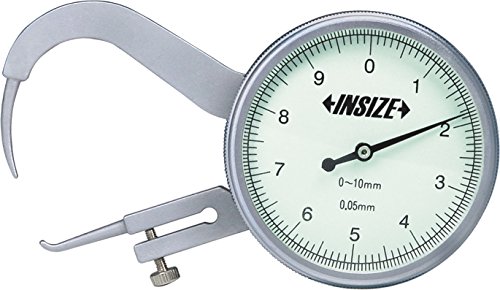
Figure 1: InSize 2866-10 Thickness Gauge. This image displays the silver-colored gauge featuring a large circular dial with a black needle, indicating measurements. The gauge has two pointed tips, one fixed and one movable, designed to measure the thickness of various materials. The dial shows markings from 0 to 9, with a stated measurement range of 0-10mm and an accuracy of 0.05mm. The 'INSIZE' brand logo is prominently displayed on the dial.
2. Konfiguracja
- Rozpakowywanie: Carefully remove the thickness gauge from its packaging. Inspect for any signs of damage during transit.
- Kontrola komponentów: Ensure all parts, including the main gauge body, pointed tips, and the dial indicator, are intact and free from obstructions.
- Zapoznanie się: Before use, familiarize yourself with the gauge's components: the fixed anvil (upper pointed tip), the movable spindle (lower pointed tip), the dial indicator, and the locking screw (if present, for the movable tip).
- Czyszczenie: Gently wipe the gauge with a soft, lint-free cloth to remove any dust or debris. Avoid using harsh chemicals.
3. Instrukcja obsługi
Follow these steps for accurate thickness measurements:
- Zerowanie wskaźnika: Before taking a measurement, ensure the gauge reads zero when the two pointed tips are brought together without any object in between. If it does not read zero, gently adjust the outer bezel of the dial until the needle aligns with the '0' mark.
- Positioning the Object: Carefully place the material or object whose thickness you wish to measure between the fixed and movable pointed tips of the gauge.
- Wywieranie nacisku: Gently release the movable tip so it makes firm contact with the object. Do not apply excessive force, as this can lead to inaccurate readings or damage the gauge.
- Odczyt pomiaru: Read the measurement directly from the dial indicator. The gauge has a measurement range of 0 to 10mm and an accuracy of 0.05mm. The large needle indicates the measurement in millimeters.
- Removing the Object: Once the reading is taken, carefully open the tips and remove the object.
4. Konserwacja
Proper maintenance ensures the longevity and accuracy of your InSize Thickness Gauge:
- Czyszczenie: After each use, wipe the gauge clean with a soft, dry, lint-free cloth. For stubborn dirt, a cloth lightly dampMożna stosować płyny nasączone alkoholem izopropylowym, należy jednak uważać, aby do mechanizmu pokrętła nie dostała się żadna ciecz.
- Składowanie: Store the gauge in its original protective case or a similar padded container when not in use. Keep it in a dry environment, away from direct sunlight, extreme temperatures, and corrosive substances.
- Obsługiwanie: Avoid dropping or subjecting the gauge to impact, as this can affect its calibration and internal mechanisms.
- Smarowanie: Do not attempt to lubricate any internal parts unless specifically instructed by the manufacturer.
- Kontrola kalibracji: Periodically check the gauge's zero point. If consistent inaccuracies are observed, professional calibration may be required.
5. Rozwiązywanie Problemów
If you encounter issues with your thickness gauge, refer to the following common problems and solutions:
| Problem | Możliwa przyczyna | Rozwiązanie |
|---|---|---|
| Niedokładne odczyty | Gauge not zeroed; Dirt/debris on tips; Damaged tips; Internal mechanism issue. | Re-zero the gauge; Clean tips thoroughly; Inspect tips for damage (replace if necessary); Contact support for repair. |
| Needle Sticking/Jumping | Dust/dirt inside mechanism; Bent spindle; Lack of proper storage. | Gently tap the gauge to dislodge dust (if minor); Avoid self-repair, contact support; Store in a clean, dry place. |
| Tips Not Closing Fully | Obstruction between tips; Bent tips. | Remove any obstruction; Inspect tips for alignment and damage. |
6. Specyfikacje techniczne
| Funkcja | Szczegół |
|---|---|
| Marka | Insize |
| Producent | InSize |
| Numer modelu | 2866-10 |
| Waga przedmiotu | 220 gramów |
| Wymiary opakowania | Wymiary 15.8 x 10 x 4.4 cm |
| Zakres pomiaru | 0 - 10 mm |
| Dokładność | 0.05 mm |
| Kraj pochodzenia | Indie |
| Data pierwszej dostępności | 28 czerwca 2016 |
7. Gwarancja i wsparcie
Insize products are manufactured to international standards and come with a full guarantee. For any inquiries regarding warranty, service, or technical support, please contact your authorized Insize dealer or the manufacturer directly. Ensure you have your product model number (2866-10) and purchase details available when seeking support.
Insize is committed to providing high-performance products and ensuring trouble-free use through dedicated service and support.