Rozmiar wewnętrzny 2862-102
Instrukcja obsługi grubościomierza InSize 2862-102
Model: 2862-102 | Marka: Insize
1. Wprowadzenie
This manual provides essential information for the proper use, maintenance, and care of your InSize 2862-102 Thickness Gauge. Please read this manual thoroughly before operating the device to ensure accurate measurements and prolong its lifespan. The InSize 2862-102 is designed for precise measurement of material thickness, featuring a quick response and high accuracy.
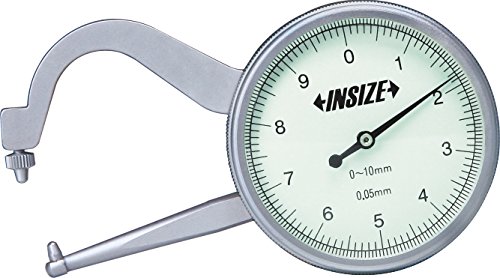
Figure 1: The InSize 2862-102 Thickness Gauge. This image displays the gauge with its C-shaped frame, the dial indicator showing measurements from 0 to 10mm with 0.05mm resolution, and the two measuring jaws, one fixed and one movable, used to grip the material being measured.
2. Konfiguracja i wstępna inspekcja
Upon receiving your InSize 2862-102 Thickness Gauge, perform the following steps:
- Rozpakowywanie: Carefully remove the gauge from its packaging. Retain the original packaging for future storage or transport.
- Kontrola wizualna: Inspect the gauge for any signs of damage during transit. Check the dial, measuring jaws, and frame for bends, cracks, or other deformities.
- Czyszczenie: Gently wipe the measuring surfaces and the dial face with a clean, soft, lint-free cloth. Avoid using abrasive materials or harsh chemicals.
- Kontrola zera: Close the measuring jaws completely. The dial indicator should point to '0'. If it does not, gently rotate the outer bezel of the dial until the '0' aligns with the needle.
3. Instrukcja obsługi
Follow these steps to accurately measure the thickness of a material:
- Przygotowanie: Ensure the material to be measured is clean and free from dust, oil, or burrs that could affect accuracy.
- Zerowanie: Before each measurement session, or if the gauge has been handled roughly, perform a zero check as described in Section 2.4.
- Pozycjonowanie: Gently open the measuring jaws by pressing the lever. Insert the material between the two measuring jaws.
- Pomiar: Release the lever slowly, allowing the jaws to close gently onto the material. Avoid forcing the jaws shut, as this can damage the gauge or yield inaccurate readings.
- Odczyt tarczy: Read the measurement directly from the dial indicator. The large numbers indicate millimeters, and the smaller graduations represent fractions of a millimeter (0.05mm per mark).
- Powtarzalność: For critical measurements, take several readings at different points on the material to ensure consistency and account for any material variations.
Notatka: The gauge has a measuring range of 0-10mm and a resolution of 0.05mm.
4. Konserwacja i pielęgnacja
Proper maintenance ensures the longevity and accuracy of your thickness gauge:
- Czyszczenie: Po każdym użyciu wytrzyj miernik miękką, suchą i niepozostawiającą włókien ściereczką. W razie potrzeby delikatnie przetrzyj ściereczką.ampMożna stosować płyny nasączone alkoholem izopropylowym, należy jednak uważać, aby do mechanizmu pokrętła nie dostała się żadna ciecz.
- Składowanie: Store the gauge in its protective case in a clean, dry environment, away from direct sunlight, extreme temperatures, and high humidity.
- Smarowanie: The internal mechanism is factory-lubricated. Do not attempt to lubricate the gauge yourself unless specifically instructed by Insize technical support.
- Obsługiwanie: Unikaj upuszczania miernika i narażania go na uderzenia, ponieważ może to spowodować uszkodzenie delikatnego mechanizmu wewnętrznego i wpłynąć na dokładność pomiaru.
- Kalibrowanie: Regular calibration checks with known standards are recommended to ensure continued accuracy, especially in professional or critical applications.
5. Rozwiązywanie Problemów
Jeśli napotkasz problemy z grubościomierzem InSize 2862-102, zapoznaj się z poniższymi typowymi problemami i rozwiązaniami:
| Problem | Możliwa przyczyna | Rozwiązanie |
|---|---|---|
| Niedokładne odczyty |
|
|
| Igła nie wraca do zera |
|
|
| Stiff or sticky movement of jaws |
|
|
If the problem persists after attempting these solutions, please contact Insize customer support.
6. Specyfikacje techniczne
| Numer modelu | 2862-102 |
| Marka | Insize |
| Producent | InSize |
| Zakres pomiarowy | 0 - 10 mm |
| Rezolucja | 0.05 mm |
| Długość szczęki | 60 mm |
| Waga przedmiotu | 240 gramów |
| Wymiary opakowania | Wymiary 16 x 10.2 x 4.4 cm |
| Data pierwszej dostępności | 28 czerwca 2016 |
7. Informacje o gwarancji
Insize products are manufactured to high quality standards. For specific warranty terms and conditions applicable to your InSize 2862-102 Thickness Gauge, please refer to the warranty card included with your product or visit the official Insize website. Typically, warranty covers manufacturing defects under normal use. Damage resulting from misuse, neglect, or unauthorized repairs is generally not covered.
8. Obsługa klienta
For technical assistance, service, or inquiries regarding your InSize 2862-102 Thickness Gauge, please contact Insize customer support through their official channels. Contact information can usually be found on the product packaging, the Insize website, or by searching for "Insize customer support" online.
When contacting support, please have your model number (2862-102) and a detailed description of the issue ready.
Ask a question about this manual
Ask about setup, troubleshooting, compatibility, parts, safety, or missing instructions. Manuals+ will review the question and use this page’s manual context to help answer it.