
Wstęp
This manual provides detailed instructions for the installation, operation, and maintenance of your Venstar T1900 Residential Slimline Platinum Thermostat. Please read this manual thoroughly before attempting to install or operate the thermostat to ensure proper function and to avoid potential damage.
Ważne informacje dotyczące bezpieczeństwa
- Przed przystąpieniem do montażu lub serwisowania termostatu należy zawsze wyłączyć zasilanie układu ogrzewania/chłodzenia za pomocą głównego wyłącznika lub skrzynki bezpiecznikowej.
- Ten termostat działa przy napięciu 24 V prądu przemiennego. Nie podłączać do napięcia sieciowego.tage (120 V lub 240 V).
- Jeśli nie masz doświadczenia w instalacjach elektrycznych, instalację powinien wykonać wykwalifikowany technik.
- Do not short circuit the terminals on the gas valve or at the system control to test the thermostat. This will damage the thermostat and void the warranty.
- Aby zapobiec zwarciom, należy upewnić się, że wszystkie połączenia przewodów są solidne i zaizolowane.
Zawartość opakowania
Sprawdź, czy w przesyłce znajdują się następujące elementy:
- Venstar T1900 Thermostat Unit
- Sprzęt montażowy (śruby i kotwy ścienne)
- Instrukcja obsługi (ten dokument)
Produkt ponadview
The Venstar T1900 is a 7-day programmable digital thermostat designed for residential use. It offers precise temperature control and energy-saving scheduling capabilities. This thermostat is compatible with heat/cool, heat pump, and dual-fuel systems, controlling up to three heat stages i dwa fajne stagt.j.
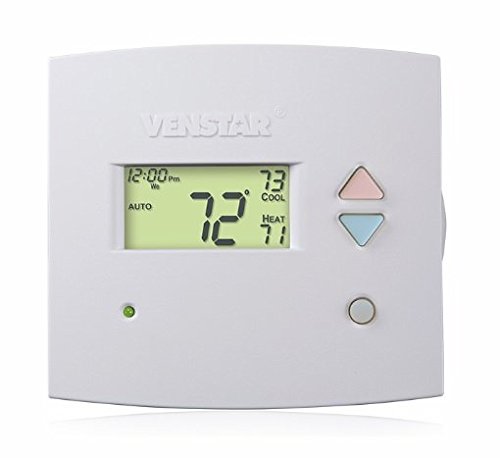
Rysunek 1: Przód view of the Venstar T1900 Thermostat. This image displays the thermostat's LCD screen and control buttons, indicating its slimline design.
Główne cechy:
- Programowalność 7-dniowa: Allows for customized heating and cooling schedules for each day of the week.
- Zgodność systemu: Works with heat/cool, dual-fuel, and heat pump systems.
- Multi-Stage Sterowanie: Manages up to three heat stages i dwa fajne stagt.j.
- Możliwość zdalnego sterowania: Controllable by phone using an optional add-on (sold separately).
- Automatic or Manual Operation: Provides flexibility for scheduled or on-demand temperature adjustments.
Instrukcja instalacji
Wymagane narzędzia:
- Śrubokręt (krzyżakowy i/lub płaski)
- Drill with appropriate drill bit (if installing new wall anchors)
- Szczypce boczne
- Ołówek
- Poziom (opcjonalnie)
1. Wyłącz zasilanie
Locate the circuit breaker or fuse box that controls your heating and cooling system. Turn off the power completely before proceeding with any wiring.
2. Remove Old Thermostat (if applicable)
- Ostrożnie zdejmij osłonę starego termostatu.
- Take a picture of the existing wiring connections for reference.
- Label each wire with the terminal designation it was connected to (e.g., R, G, Y, W).
- Disconnect the wires and remove the old thermostat's mounting plate from the wall.
3. Zamontuj nową podstawę termostatu
- Separate the front cover of the T1900 thermostat from its base plate.
- Position the base plate on the wall where you want to install the thermostat. Ensure it is level.
- Otwory montażowe zaznaczyć ołówkiem.
- W razie potrzeby wywierć otwory wstępne i włóż kotwy ścienne.
- Przymocuj płytę bazową termostatu do ściany za pomocą dołączonych śrub.
4. Okablowanie
Connect the wires from your HVAC system to the corresponding terminals on the T1900 thermostat base. Refer to the wiring diagram provided with your specific HVAC system for precise connections. Ensure wires are stripped approximately 3/8 inch and securely fastened under the terminal screws.
Typowe oznaczenia zacisków:
- R/Rc/Rh: 24V Power (Heating/Cooling)
- C: Common (24V return)
- G: Wentylator
- Y/Y1: Sprężarka Stage 1 (Chłodzenie)
- 2: Sprężarka Stage 2 (Chłodzenie)
- W/W1: Ciepło Stage 1 (ogrzewanie)
- W2: Ciepło Stage 2 (ogrzewanie)
- O / B: Reversing Valve (Heat Pumps)
Note: The T1900 supports various system types. Consult the detailed wiring diagrams in the full installation manual for specific configurations (e.g., heat pump with auxiliary heat, conventional multi-stag(systemy elektroniczne).
5. Zamontuj termostat do podstawy
Once wiring is complete and verified, carefully align the thermostat front cover with the mounted base plate and snap it into place.
6. Przywróć zasilanie
Return to your circuit breaker or fuse box and restore power to your heating and cooling system.
Konfiguracja początkowa
Upon initial power-up, the thermostat may prompt you to configure basic settings. Follow the on-screen instructions to set the current date, time, and system type (e.g., Conventional, Heat Pump).
System Type Configuration:
It is crucial to correctly configure the thermostat for your specific HVAC system. Incorrect settings can lead to improper operation or damage. Access the installer settings menu (refer to the full installation guide for specific button sequences) to select:
- Typ systemu: Heat/Cool, Heat Pump, Dual Fuel
- Liczba ciepła Stages
- Liczba fajnych Stages
- Reversing Valve Operation: O (chłodzenie) lub B (ogrzewanie)
Instrukcja obsługi
Zrozumienie wyświetlacza:
The LCD screen displays the current temperature, set temperature, system mode, fan mode, time, and programming status. Refer to the icons and indicators on the screen for current operational status.
Setting System Mode:
Naciśnij TRYB przycisk umożliwiający przełączanie dostępnych trybów systemu:
- CIEPŁO: The system will operate to maintain the heating setpoint.
- FAJNE: The system will operate to maintain the cooling setpoint.
- AUTOMATYCZNY: Termostat automatycznie przełącza się między ogrzewaniem i chłodzeniem, aby utrzymać ustawiony zakres temperatur.
- OFF: System ogrzewania i chłodzenia jest wyłączony.
Setting Fan Mode:
Naciśnij FAN przycisk umożliwiający przełączanie trybów wentylatora:
- AUTOMATYCZNY: Wentylator pracuje wyłącznie wtedy, gdy aktywnie działa układ ogrzewania lub chłodzenia.
- NA: Wentylator pracuje nieprzerwanie, niezależnie od zapotrzebowania na ogrzewanie lub chłodzenie.
Regulacja temperatury:
Użyj UP I W DÓŁ arrow buttons to adjust the desired temperature setpoint. In programmable modes, this will temporarily override the schedule until the next scheduled change.
Harmonogramy programów (7-dniowe):
The T1900 allows for 7-day programming, enabling different schedules for each day of the week. This feature helps save energy by adjusting temperatures when you are away or asleep.
- Naciśnij PROGRAM przycisk, aby wejść w tryb programowania.
- Użyj DZIEŃ button to select the day or group of days you wish to program (e.g., Mon-Fri, Sat-Sun, or individual days).
- Użyj CZAS button to cycle through the four available periods: Wake, Leave, Return, Sleep.
- Użyj UP I W DÓŁ arrow buttons to set the desired temperature for each period.
- Użyj TRZYMAĆ button to exit programming mode or save changes.
Refer to the detailed programming section in the full user guide for advanced options and specific button sequences.
Remote Control (Optional Add-on):
The Venstar T1900 thermostat can be controlled remotely via a phone using an optional add-on module (sold separately). This module connects to the thermostat and allows for remote access and control through a dedicated application. Installation and setup instructions for the remote control module are provided with the module itself.
Konserwacja
Czyszczenie termostatu:
To maintain the appearance and functionality of your thermostat, periodically wipe the exterior with a soft, damp ściereczką. Nie używaj środków czyszczących o działaniu ściernym, rozpuszczalników ani środków chemicznych w sprayu, ponieważ mogą one uszkodzić elementy plastikowe i elektroniczne.
Wymiana baterii:
The Venstar T1900 thermostat does not require batteries for operation as it is powered by the 24V AC system.
Rozwiązywanie problemów
If you experience issues with your Venstar T1900 thermostat, consult the following common problems and solutions:
| Problem | Możliwa przyczyna | Rozwiązanie |
|---|---|---|
| Wyświetlacz termostatu jest pusty | Brak zasilania termostatu. | Check the circuit breaker for your HVAC system. Ensure all wiring connections are secure. |
| Heating/Cooling system does not respond | Incorrect system mode selected; wiring issue; system lockout. | Verify the system mode (HEAT/COOL/AUTO). Check wiring connections. Wait 5 minutes for system lockout to reset. |
| Odczyt temperatury wydaje się niedokładny | Lokalizacja termostatu; przesłonięcie czujnika. | Ensure the thermostat is not exposed to direct sunlight, drafts, or heat sources. Clean any dust from the thermostat vents. |
| Programming schedule is not working | Program not saved; temporary override active; incorrect time/day setting. | Ensure programs are saved. Check if a temporary override is active and cancel it. Verify current time and day settings. |
| W trybie AUTO wentylator pracuje w sposób ciągły | Fan mode set to ON; wiring issue. | Press the FAN button to ensure it is set to AUTO. Check fan wiring. |
If these solutions do not resolve the issue, please contact customer support or a qualified HVAC technician.
Specyfikacje
| Funkcja | Specyfikacja |
|---|---|
| Marka | Venstar |
| Nazwa modelu | Venstara T1900 |
| Typ kontrolera | Naciśnij przycisk |
| Funkcja specjalna | Programowalny |
| Kolor | Biały |
| Konkretne zastosowania produktu | Heat Pump, Heater |
| Rodzaj kontroli temperatury | Programmable, Smart/Remote (with add-on) |
| Tomtage | 24 V AC |
| Typ wyświetlacza | LCD lub LED |
| Metoda kontroli | Remote (with add-on) |
| Podświetlenie | Tak |
| Wymiary produktu | 5.3 x 2 x 2 cala |
| Waga przedmiotu | 0.01 uncji |
| Czy potrzebne są baterie? | NIE |
Informacje o gwarancji
Venstar products are manufactured to high-quality standards. This product is covered by a limited warranty against defects in materials and workmanship. The specific terms and duration of the warranty may vary. Please refer to the warranty card included with your product or visit the official Venstar webstrona zawierająca szczegółowe informacje na temat gwarancji i procedur rejestracyjnych.
Obsługa klienta
For technical assistance, troubleshooting, or warranty inquiries, please contact Venstar customer support. You can typically find contact information, including phone numbers and email addresses, on the official Venstar webStrona (www.venstar.com) lub na opakowaniu produktu.
When contacting support, please have your thermostat model number (T1900) and any relevant purchase information ready.


