
Bios BBYCA10300783
BIOS Weather Indoor/Outdoor Wireless Thermometer & Hygrometer
Model: 312BC (BBYCA10300783)
Brand: Bios
Wstęp
This manual provides detailed instructions for the setup, operation, and maintenance of your BIOS Weather Indoor/Outdoor Wireless Thermometer & Hygrometer. Please read this manual thoroughly before using the device to ensure proper function and longevity.
The BIOS Weather Indoor/Outdoor Wireless Thermometer & Hygrometer is designed to provide accurate readings of indoor temperature and humidity, as well as outdoor temperature. It features wireless connectivity for the outdoor sensor, a moon phase display, and the capability to connect with up to three sensors (additional sensors sold separately).
- Wireless range up to 30 meters (100 feet) from the outdoor sensor.
- Indoor monitor includes a hygrometer sensor for RH percentage readings (20% to 95%).
- Displays temperature from up to 3 sensors (Model No. 312TX, sold separately).
- Tracks relative indoor humidity and moon phase.
Zawartość opakowania
Po otwarciu opakowania należy sprawdzić, czy wszystkie elementy są obecne i w dobrym stanie:
- 1 x Main Display Unit (Indoor Monitor)
- 1 x bezprzewodowy czujnik zewnętrzny
- 1 x Instrukcja obsługi (ten dokument)

Image: The main display unit (left) and the wireless outdoor sensor (right). The main unit shows indoor temperature, humidity, moon phase, time, and outdoor temperature. The outdoor sensor displays its current temperature.
Przewodnik po konfiguracji
1. Instalacja baterii
Both the main display unit and the wireless outdoor sensor require batteries (not included).
- Open the battery compartment on the back of both the main display unit and the outdoor sensor.
- Insert the required batteries (e.g., AA or AAA, refer to the battery compartment markings for correct type and polarity).
- Dokładnie zamknij komory baterii.
Notatka:
- It is recommended to insert batteries into the outdoor sensor first, then the main display unit, to facilitate immediate pairing.
- Use high-quality alkaline batteries for optimal performance, especially in cold weather for the outdoor sensor.
2. Umieszczenie czujnika
Proper placement of both units is crucial for accurate readings and reliable wireless communication.
- Główny wyświetlacz: Place indoors, away from direct sunlight, heat sources, or drafts that could affect temperature and humidity readings. Ensure it is within 30 meters (100 feet) of the outdoor sensor.
- Bezprzewodowy czujnik zewnętrzny:
- Mount in a shaded area to avoid direct sunlight, which can cause artificially high temperature readings.
- Protect from direct rain and snow. An overhang or a weather-resistant enclosure is ideal.
- Avoid placing near large metal objects, electrical appliances, or thick walls that could interfere with the wireless signal.
- Ensure it is within the 30-meter (100-foot) wireless range of the main unit.
3. Parowanie początkowe
The main display unit and outdoor sensor should automatically pair upon battery installation. If pairing does not occur:
- Upewnij się, że oba urządzenia mają nowe baterie.
- Bring the outdoor sensor closer to the main display unit.
- Press the "CH" (Channel) button on the main display unit to cycle through channels or initiate a search for the sensor.
- If issues persist, remove batteries from both units, wait a few minutes, and reinsert them, starting with the outdoor sensor.
Instrukcja obsługi
1. Wyświetlanieview
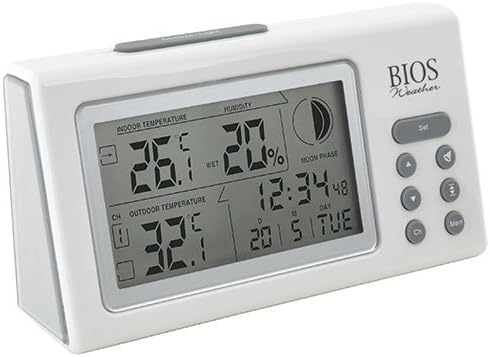
Obraz: kątowy view of the main display unit, highlighting the various segments for indoor temperature, humidity, moon phase, time, and outdoor temperature.
The main display unit provides the following information:
- Temperatura wewnętrzna: Displays the current temperature inside the room where the main unit is located.
- Wilgotność: Shows the relative indoor humidity percentage.
- Temperatura na zewnątrz: Displays the temperature from the connected wireless outdoor sensor.
- Czas i data: Aktualny czas i data.
- Faza Księżyca: An icon indicating the current moon phase.
- Wskaźnik kanału: Shows which outdoor sensor channel is currently displayed (if multiple sensors are used).
2. Funkcje przycisków
The main display unit features several buttons for configuration and viewdane wejściowe:
| Przycisk | Funkcjonować |
|---|---|
| USTAWIĆ | Enters setup mode for time, date, and other settings. Press to confirm settings. |
| ▲ / ▼ (Up/Down) | Adjusts values during setup. Cycles through channels for outdoor sensors. |
| CH (kanał) | Switches between outdoor sensor channels (1, 2, 3) or initiates a search for sensors. |
| PEM (pamięć) | Displays maximum and minimum temperature/humidity readings. Press again to clear. |
3. Ustawianie czasu i daty
- Naciśnij i przytrzymaj USTAWIĆ Naciskaj przycisk, aż wyświetlacz czasu zacznie migać.
- Użyj ▲ or ▼ przyciski do regulacji godziny.
- Naciskać USTAWIĆ to confirm and move to the next setting (minutes, year, month, day).
- Powtarzaj kroki 2 i 3, aż wszystkie ustawienia zostaną skonfigurowane.
- Naciskać USTAWIĆ one last time to exit setup mode.
4. Viewodczyty maks./min.
Naciśnij MEM przycisk do view the maximum recorded indoor temperature, humidity, and outdoor temperature. Press MEM znowu do view the minimum readings. To clear the memory, press and hold the MEM button while the max/min readings are displayed.
Konserwacja
1. Czyszczenie
To clean the display unit and outdoor sensor, use a soft, damp cloth. Do not use abrasive cleaners, solvents, or harsh chemicals, as these may damage the plastic casing lub podzespołów elektronicznych.
2. Wymiana baterii
When the battery indicator appears on the display, it is time to replace the batteries in the respective unit (main unit or outdoor sensor). Always replace all batteries in a unit at the same time with new, high-quality batteries of the correct type.
Ważny:
- Stare baterie należy utylizować w sposób odpowiedzialny, zgodnie z lokalnymi przepisami.
- Jeśli urządzenie nie będzie używane przez dłuższy czas, należy wyjąć baterie, aby zapobiec wyciekowi i uszkodzeniom.
Rozwiązywanie problemów
If you experience issues with your BIOS Weather Thermometer & Hygrometer, please refer to the following common problems and solutions:
| Problem | Możliwa przyczyna / rozwiązanie |
|---|---|
| Brak odczytu temperatury zewnętrznej lub wyświetlenie komunikatu "---". |
|
| Niedokładne odczyty temperatury/wilgotności. |
|
| Wyświetlacz jest ciemny lub pusty. |
|
| Nieprawidłowa godzina/data. |
|
Specyfikacja produktu

Image: The main display unit with indicated dimensions: 21.59 cm (length), 7.62 cm (width), and 19.05 cm (height).
| Funkcja | Szczegół |
|---|---|
| Numer modelu | BBYCA10300783 (312BC) |
| Typ | Indoor/Outdoor Thermometer and Hygrometer |
| Tworzywo | Plastikowy |
| Kolor | Biały |
| Wymiary (jednostka główna) | Wysokość: 19.05 cm, Szerokość: 7.62 cm, Głębokość: 21.59 cm |
| Waga | 0.30 kilogramów |
| Zasięg bezprzewodowej | Do 30 metrów (100 stóp) |
| Zakres wilgotności w pomieszczeniu | Wilgotność względna od 20% do 95% |
| Sensor Capability | Supports up to 3 outdoor sensors (additional sensors Model No. 312TX, sold separately) |
| Cechy specjalne | Wireless connectivity, Multi-Sensor support, Humidity Tracking, Moon Phase Display |
| Źródło zasilania | Zasilany bateryjnie |
Informacje o gwarancji
This BIOS Weather product comes with a 1-letnia gwarancja na części from the date of purchase. This warranty covers defects in materials and workmanship under normal use. It does not cover damage resulting from misuse, accident, unauthorized modification, or improper installation.
Proszę zachować dowód zakupu na potrzeby roszczeń gwarancyjnych.
Obsługa klienta
If you have any questions, require technical assistance, or need to make a warranty claim, please contact Bios customer support. For more information and resources, you may also visit the official Bios store on Amazon:
Visit the Bios Store on Amazon
Please have your product model number (BBYCA10300783) and purchase date ready when contacting support.
Ask a question about this manual
Ask about setup, troubleshooting, compatibility, parts, safety, or missing instructions. Manuals+ will review the question and use this page’s manual context to help answer it.