
KitchenAid 5KMT223GOB
KitchenAid 5KMT223GOB 2-Slot Automatic Toaster
Instrukcja obsługi
Ważne zabezpieczenia
Podczas korzystania z urządzeń elektrycznych należy zawsze przestrzegać podstawowych zasad bezpieczeństwa, w tym:
- Przed użyciem tostera należy przeczytać wszystkie instrukcje.
- Nie dotykaj gorących powierzchni. Używaj uchwytów lub gałek.
- Aby uniknąć porażenia prądem elektrycznym, nie zanurzaj przewodu zasilającego, wtyczek ani tostera w wodzie ani innym płynie.
- Należy zachować ścisły nadzór, jeżeli z urządzenia korzystają dzieci lub w ich pobliżu.
- Odłącz od gniazdka, gdy nie jest używany i przed czyszczeniem. Pozostaw do ostygnięcia przed założeniem lub zdjęciem części.
- Nie używaj żadnego urządzenia z uszkodzonym przewodem lub wtyczką lub gdy urządzenie działa nieprawidłowo lub zostało w jakikolwiek sposób uszkodzone. Zwróć urządzenie do najbliższego autoryzowanego serwisu w celu sprawdzenia, naprawy lub regulacji.
- Stosowanie akcesoriów niezalecanych przez producenta urządzenia może spowodować obrażenia.
- Nie stosować na zewnątrz.
- Nie pozwól, aby przewód zwisał z krawędzi stołu lub blatu i dotykał gorących powierzchni.
- Nie umieszczać na gorącym palniku gazowym lub elektrycznym ani w jego pobliżu, a także w nagrzanym piekarniku.
- Zawsze najpierw podłącz wtyczkę do urządzenia, a następnie podłącz przewód do gniazdka ściennego. Aby odłączyć, wyłącz dowolny element sterujący, a następnie wyjmij wtyczkę z gniazdka ściennego.
- Nie używaj urządzenia niezgodnie z jego przeznaczeniem.
- Do tostera nie należy wkładać żywności o dużych rozmiarach, opakowań z folii aluminiowej ani naczyń, ponieważ może to wiązać się z ryzykiem pożaru lub porażenia prądem.
- Może dojść do pożaru, jeśli toster jest przykryty lub dotyka łatwopalnego materiału, np. zasłon, firanek, ścian itp., podczas pracy.
- Nie próbuj wyjmować jedzenia z tostera, gdy jest on podłączony do gniazdka.
- Nie używać bez nadzoru.
Części i funkcje
Familiarize yourself with the components of your KitchenAid 2-Slot Automatic Toaster for optimal use.
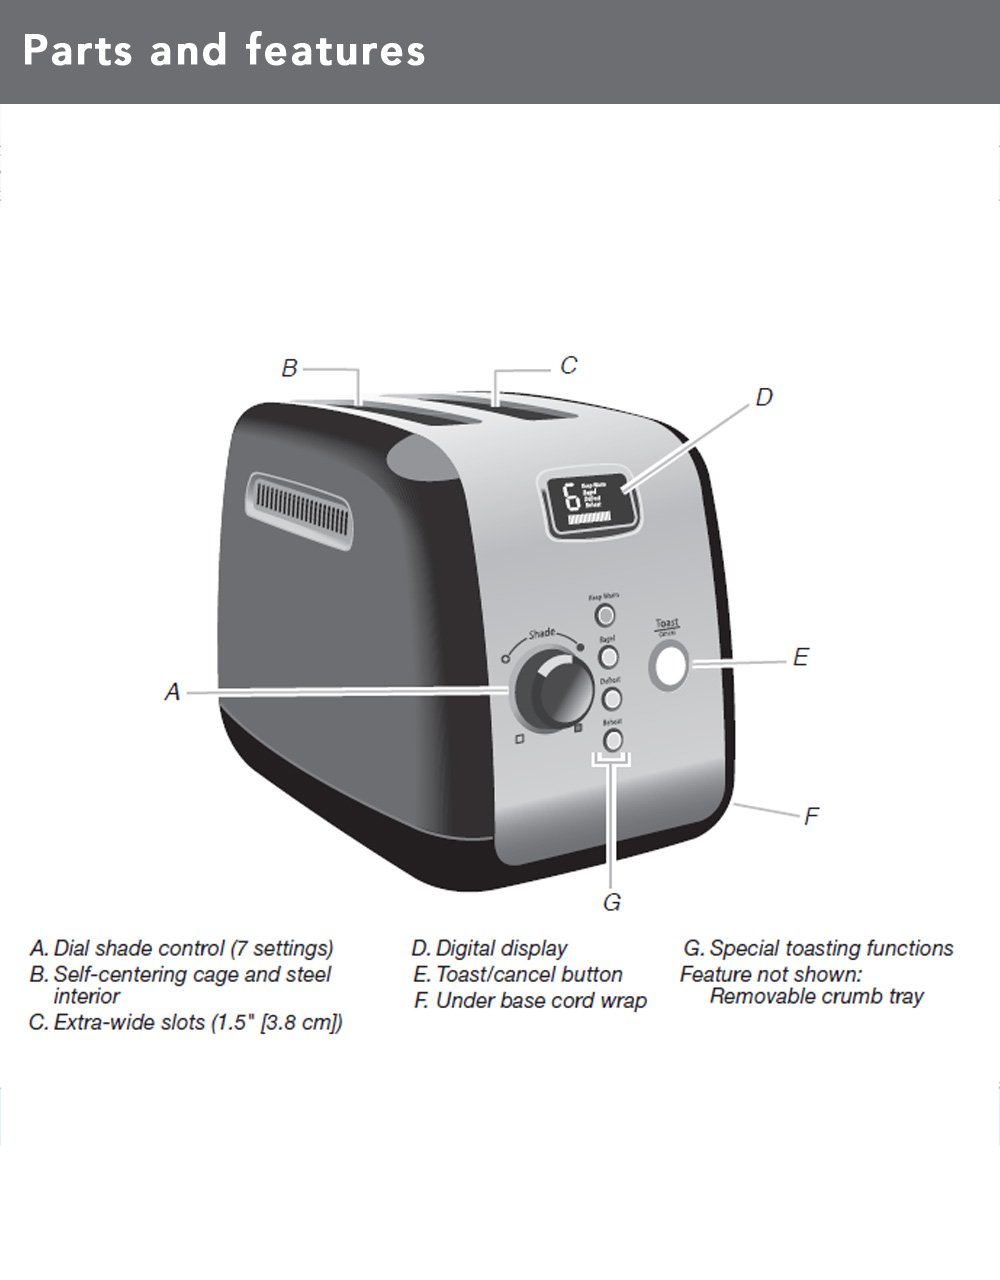
Obraz: Labeled diagram of the KitchenAid 2-Slot Automatic Toaster, highlighting its various parts.
- A. Dial Shade Control (7 settings): Adjusts the browning level of your toast.
- B. Self-Centering Cage and Steel Interior: Ensures even toasting for various bread thicknesses.
- C. Extra-Wide Slots (1.5" / 3.8 cm): Accommodates thick crumpets, breads, or pastries.
- D. Wyświetlacz cyfrowy: Shows selected shade setting and a countdown timer for toasting progress.
- E. Toast/Cancel Button: Initiates or stops the toasting cycle at any point.
- F. Under Base Cord Wrap: Provides convenient cord storage.
- G. Special Toasting Functions: Includes Keep Warm, Bagel, Defrost, and Reheat buttons.
- Feature not shown: Removable Crumb Tray for easy cleaning.

Obraz: Ponadview of the KitchenAid 2-Slot Automatic Toaster, detailing its key features such as extra-wide slots, shade control dial, Keep Warm feature, and Toast/Cancel button.
Organizować coś
Rozpakowywanie i umieszczanie
- Carefully remove the toaster and all packaging materials.
- Place the toaster on a dry, flat, stable surface, away from the edge of the counter.
- Ensure there is adequate clearance around the toaster for proper ventilation, especially from flammable materials like curtains.
- Unwind the power cord and plug it into a grounded 240-volt electrical outlet.
Pierwsze użycie
Before toasting food for the first time, operate the toaster without bread for one cycle at the highest shade setting. This will burn off any manufacturing residues and eliminate any odors. A slight odor or smoke is normal during this initial use.
Instrukcja obsługi
Tostowanie chleba

Obraz: The KitchenAid 2-Slot Automatic Toaster actively toasting two slices of bread, demonstrating its function.
- Insert up to two slices of bread or other items into the toasting slots. The self-centering racks will automatically adjust to hold the bread.
- Wybierz pożądany poziom zrumienienia za pomocą Pokrętło regulacji cienia. Settings range from 1 (lightest) to 7 (darkest). The digital display will show the selected shade.
- Naciśnij Toast/Cancel button. The motorized lift will automatically lower the bread into the toasting slots, and the toasting cycle will begin. The digital display will show a countdown timer.
- Once the toasting cycle is complete, the bread will automatically be raised.
- Aby w dowolnym momencie zatrzymać cykl opiekania, naciśnij przycisk Toast/Cancel button again. The bread will automatically raise.
Funkcje specjalne
Your toaster includes several specialized functions for different toasting needs:
- UTRZYMAJ SIĘ CIEPŁO: Press this button after a toasting cycle to keep toasted foods warm for up to one minute without additional browning. The motorized lift will lower the toast and keep it warm.
- BAJGIEL: This function toasts the cut-side of a bagel while gently warming the outer surfaces. Insert bagels with the cut side facing inwards. Select your shade and press the Bagel button, then the Toast/Cancel button.
- ROZMRAŻAĆ: Defrosts and toasts frozen food. Insert frozen bread, select your shade, and press the Defrost button, then the Toast/Cancel button. The toaster will automatically adjust the toasting time.
- ODGRZAĆ: Quickly reheats previously toasted food without further browning. Insert the toasted item, and press the Reheat button, then the Toast/Cancel button.
Pielęgnacja i czyszczenie
Regular cleaning ensures the longevity and optimal performance of your toaster.
Czyszczenie tacki na okruchy
- Upewnij się, że toster jest odłączony od zasilania i całkowicie ostygł.
- Znajdź wyjmowalną tackę na okruchy na spodzie tostera.
- Pull out the crumb tray to remove accumulated crumbs.
- Empty the crumbs into a waste bin. The crumb tray can be washed in the top rack of a dishwasher or by hand with warm, soapy water. Rinse thoroughly and dry completely before reinserting.
- Wsuń tackę na okruchy z powrotem na jej miejsce, aż zatrzaśnie się pewnie.
Czyszczenie Zewnętrza
- Odłącz toster od zasilania i pozwól mu całkowicie ostygnąć.
- Przetrzyj zewnętrzną część tostera miękką ściereczką.amp ściereczką. Nie używaj środków czyszczących o właściwościach ściernych ani gąbek, ponieważ mogą porysować powierzchnię.
- Ensure no moisture enters the toasting slots or electrical components.
- Dokładnie osuszyć miękką ściereczką.
Rozwiązywanie problemów
If you experience issues with your toaster, refer to the following common problems and solutions:
| Problem | Możliwa przyczyna | Rozwiązanie |
|---|---|---|
| Toster się nie włącza. | Niepodłączony; zasilanie wyłączonetage; zadziałał wyłącznik automatyczny. | Ensure the toaster is securely plugged into a working outlet. Check your home's circuit breaker. |
| Bread does not lower or raise. | Motorized lift malfunction; Toast/Cancel button not pressed. | Ensure the toaster is plugged in and the Toast/Cancel button is pressed firmly. If the issue persists, contact customer service. |
| Nierównomierne opiekanie. | Bread not centered; crumb tray full; internal element issue. | The self-centering racks should position bread correctly. Empty and clean the crumb tray. If unevenness persists, contact customer service. |
| Zapach dymu lub spalenizny. | Crumbs in toaster; food stuck; first use residue. | Immediately press the Cancel button and unplug the toaster. Allow to cool. Clean the crumb tray. Remove any stuck food carefully (only when unplugged and cool). Initial use may produce some smoke/odor. |
If the problem persists after attempting these solutions, please contact KitchenAid Customer Service.
Specyfikacje
- Marka: Kuchenka Aid
- Model: 5KMT223GOB
- Moc: 1100 watów
- Tomtage: 240 wolty
- Liczba plasterków: 2
- Slot Count: 2
- Slot Width: 3.8 cm (Extra-wide)
- Ustawienia cienia: 7
- Cechy szczególne: Cancel Function, Touchscreen (Digital Display), Motorized Lift, Keep Warm, Bagel, Defrost, Reheat functions.
- Waga przedmiotu: 5.64 funtów
- Budowa: All metal (stainless steel housing and steel interior)
Gwarancja i serwis
Informacje o gwarancji
This KitchenAid 5KMT223GOB 2-Slot Automatic Toaster comes with a 2 lata gwarancji od daty zakupu. Zachowaj dowód zakupu na wypadek roszczeń gwarancyjnych.
The warranty covers defects in materials and workmanship under normal household use. It does not cover damage resulting from misuse, abuse, accidents, alterations, or commercial use.
Obsługa klienta
For technical assistance, service, or warranty claims, please contact KitchenAid Customer Service. Refer to the contact information provided in your product packaging or visit the official KitchenAid webwitryna dla Twojego regionu.
When contacting customer service, please have your product model number (5KMT223GOB) and serial number (if applicable) ready.
Ask a question about this manual
Ask about setup, troubleshooting, compatibility, parts, safety, or missing instructions. Manuals+ will review the question and use this page’s manual context to help answer it.