
1. Wprowadzenie
This manual provides essential information for the safe and efficient operation of your KitchenAid 5KMT223GER 2-Slot Automatic Toaster. Please read all instructions carefully before first use and retain for future reference.

Obraz 1.1: Przód view of the KitchenAid 5KMT223GER 2-Slot Automatic Toaster.
2. Ważne instrukcje bezpieczeństwa
Podczas korzystania z urządzeń elektrycznych należy zawsze przestrzegać podstawowych zasad bezpieczeństwa, w tym:
- Przeczytaj wszystkie instrukcje.
- Nie dotykaj gorących powierzchni. Używaj uchwytów lub gałek.
- Aby uniknąć porażenia prądem elektrycznym, nie zanurzaj przewodu zasilającego, wtyczek ani tostera w wodzie ani innym płynie.
- Należy zachować ścisły nadzór, jeżeli z urządzenia korzystają dzieci lub w ich pobliżu.
- Odłącz od gniazdka, gdy nie jest używany i przed czyszczeniem. Pozostaw do ostygnięcia przed założeniem lub zdjęciem części.
- Nie używaj urządzenia z uszkodzonym przewodem lub wtyczką, ani po awarii, upadku lub jakimkolwiek uszkodzeniu urządzenia. Zwróć urządzenie do najbliższego autoryzowanego serwisu w celu sprawdzenia, naprawy lub regulacji.
- Stosowanie akcesoriów niezalecanych przez producenta urządzenia może spowodować obrażenia.
- Nie stosować na zewnątrz.
- Nie pozwól, aby przewód zwisał z krawędzi stołu lub blatu i dotykał gorących powierzchni.
- Nie umieszczać na gorącym palniku gazowym lub elektrycznym ani w jego pobliżu, a także w nagrzanym piekarniku.
- Aby odłączyć urządzenie, ustaw dowolny element sterujący w pozycji „wyłączone”, a następnie wyjmij wtyczkę z gniazdka ściennego.
- Nie używaj urządzenia niezgodnie z jego przeznaczeniem.
- Do tostera nie należy wkładać żywności o dużych rozmiarach, opakowań z folii aluminiowej ani naczyń, ponieważ może to wiązać się z ryzykiem pożaru lub porażenia prądem.
- Może dojść do pożaru, jeśli toster jest przykryty lub dotyka łatwopalnego materiału, np. zasłon, firanek, ścian itp., podczas pracy.
- Nie próbuj wyjmować jedzenia z tostera, gdy jest on podłączony do gniazdka.
- Nie używać bez nadzoru.
- Always remove the crumb tray for cleaning. Do not operate the toaster without the crumb tray in place.
3. Części i funkcje
Familiarize yourself with the components of your KitchenAid 2-Slot Automatic Toaster:
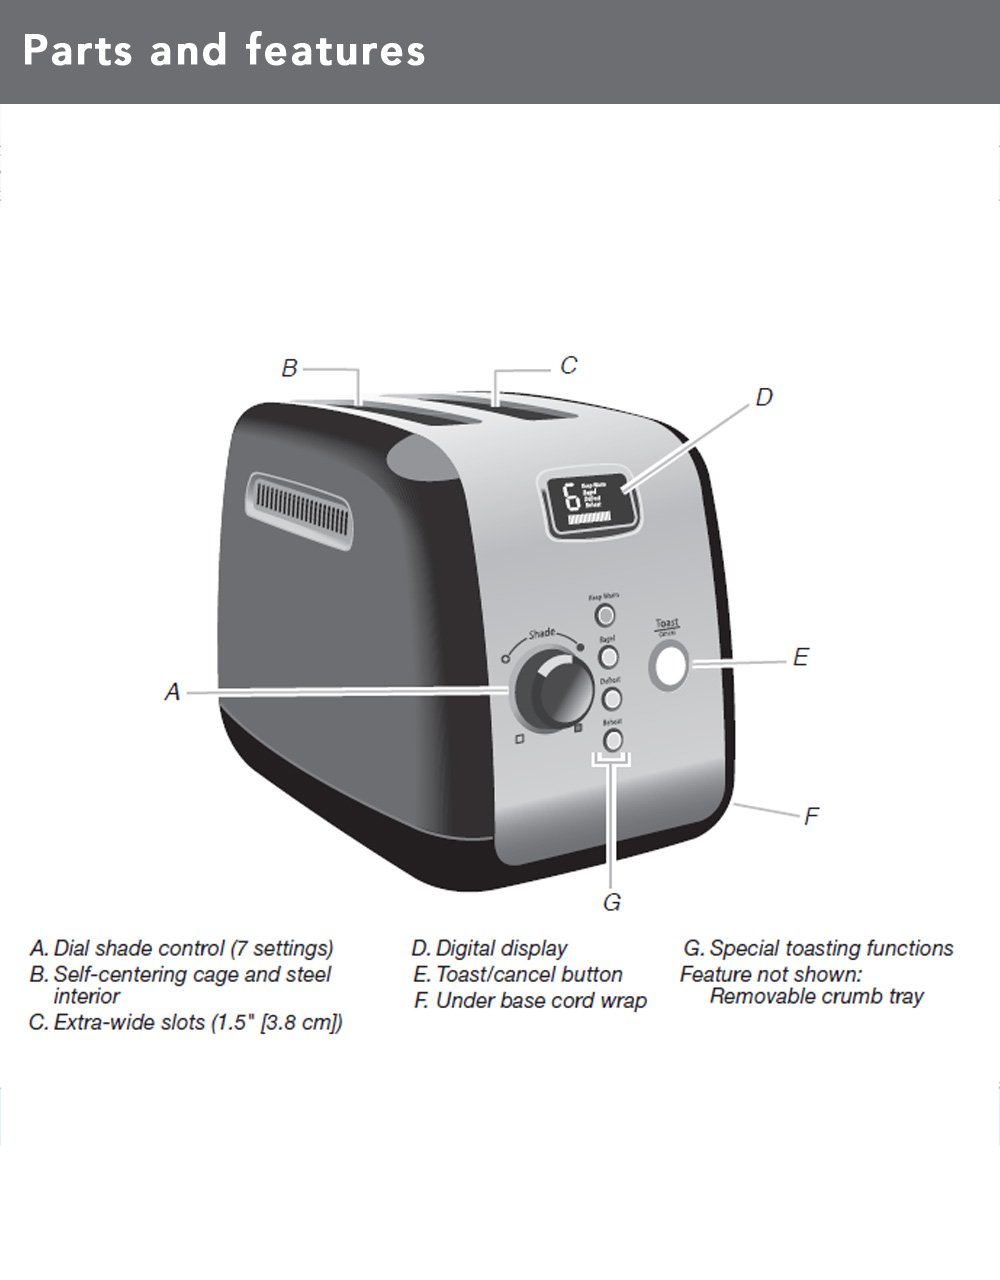
Image 3.1: Diagram illustrating the main parts and features of the toaster.
- Shade Control Dial (A): Adjusts the browning level with 7 settings.
- Self-Centering Bread Racks (B): Automatycznie centruje pieczywo, zapewniając równomierne opiekanie.
- Extra-Wide Slots (C): 3.8 cm (1.5 inches) wide slots accommodate various bread types.
- Digital Display (D): Shows selected shade setting and a countdown timer for toasting progress.
- Toast/Cancel Button (E): Initiates or cancels the toasting cycle. Features motorized lift.
- Under Base Cord Wrap (F): For convenient cord storage.
- Special Toasting Functions (G): Includes Keep Warm, Bagel, Defrost, and Reheat buttons.
- Wyjmowana tacka na okruchy: Located at the back for easy cleaning (not shown in diagram).
4. Konfiguracja
Before using your toaster for the first time:
- Rozpakuj toster i usuń wszystkie materiały opakowaniowe.
- Przetrzyj zewnętrzną część tostera miękką ściereczką.amp szmatką. Przed podłączeniem upewnij się, że jest całkowicie sucha.
- Place the toaster on a stable, flat, heat-resistant surface, away from flammable materials.
- Ensure the crumb tray is properly inserted at the back of the toaster.
- For the first use, operate the toaster without bread on the highest shade setting (7) to burn off any manufacturing residues. A slight odor or smoke may be present; this is normal. Allow the toaster to cool completely.
5. Instrukcja obsługi
Follow these steps to toast bread and use the special functions:

Image 5.1: Bread slices inserted into the toaster's extra-wide slots.
5.1 Podstawowe opiekanie
- Podłącz toster do uziemionego gniazdka elektrycznego.
- Place bread slices into the toasting slots. The self-centering racks will automatically adjust.
- Włącz Pokrętło regulacji cienia to select your desired browning level (1 for lightest, 7 for darkest). The digital display will show the selected shade.
- Naciśnij Toast/Cancel Button. The motorized lift will lower the bread into the slots, and the toasting cycle will begin. The digital display will show a countdown.
- Once the cycle is complete, the toaster will automatically raise the toasted bread.
- Aby w dowolnym momencie zatrzymać cykl opiekania, naciśnij przycisk Toast/Cancel Button. The bread will be raised.
5.2 Funkcje specjalne
Your toaster includes dedicated buttons for specialized toasting needs:
- UTRZYMAJ SIĘ CIEPŁO: Press this button after a toasting cycle to keep toasted food warm for up to one minute. The toaster will gently lower and raise the bread after the warming period.
- BAJGIEL: This function toasts the cut-side of a bagel while gently warming the outer surfaces. Insert bagels with the cut side facing inwards. Select your desired shade, then press the BAJGIEL przycisk, po którym następuje Toast/Cancel Button.
- ROZMRAŻAĆ: Use this function to defrost and toast frozen food. Select your desired shade, then press the ROZMRAŻAĆ przycisk, po którym następuje Toast/Cancel Button. The toaster will automatically adjust the toasting time.
- ODGRZAĆ: This function quickly reheats previously toasted food without further browning. Press the ODGRZAĆ przycisk, po którym następuje Toast/Cancel Button.
6. Czyszczenie i konserwacja
Regularne czyszczenie zapewnia optymalną wydajność i wydłuża żywotność tostera.
6.1 Taca na okruchy

Image 6.1: The removable crumb tray for easy cleaning.
- Przed czyszczeniem zawsze odłączaj toster od zasilania i pozwól mu całkowicie ostygnąć.
- Pull out the removable crumb tray located at the back of the toaster.
- Discard crumbs. The crumb tray can be washed in the top rack of a dishwasher or by hand with warm, soapy water. Rinse thoroughly and dry completely before reinserting.
- Nigdy nie uruchamiaj tostera, jeśli tacka na okruchy nie jest prawidłowo włożona.
6.2 Zewnętrzne
- Przetrzyj zewnętrzną część tostera miękką ściereczką.amp ściereczką i dokładnie osuszyć.
- Nie należy używać środków czyszczących o właściwościach ściernych ani gąbek, gdyż mogą zarysować powierzchnię.
- Nigdy nie zanurzaj tostera w wodzie ani innym płynie.
7. Rozwiązywanie Problemów
If you experience issues with your toaster, refer to the following table for common problems and solutions:
| Problem | Możliwa przyczyna | Rozwiązanie |
|---|---|---|
| Toster się nie włącza. | Niepodłączony; zasilanie wyłączonetage; zadziałał wyłącznik automatyczny. | Upewnij się, że toster jest prawidłowo podłączony do sprawnego gniazdka. Sprawdź wyłącznik automatyczny w domu. |
| Bread does not lower or raise. | Toaster not powered; Toast/Cancel button not pressed; food jammed. | Ensure power is on. Press Toast/Cancel button. Unplug toaster and carefully remove any jammed food. |
| Nierównomierne opiekanie. | Nierównomierna grubość chleba; tworzenie się okruchów. | Ensure bread slices are of similar thickness. Clean crumb tray regularly. |
| Zapach dymu lub spalenizny. | Food jammed; crumb buildup; high shade setting. | Immediately press Cancel. Unplug and allow to cool. Remove jammed food or clean crumb tray. Reduce shade setting for next use. |
Jeśli po wypróbowaniu tych rozwiązań problem nadal występuje, skontaktuj się z obsługą klienta KitchenAid.
8. Specyfikacje
| Funkcja | Szczegół |
|---|---|
| Numer modelu | 5KMT223GER |
| Cotage | 1100 watów |
| Tomtage | 220 wolty |
| Slot Count | 2 |
| Ustawienia cienia | 7 |
| Funkcje specjalne | Keep Warm, Bagel, Defrost, Reheat, Cancel |
| Tworzywo | Metal |
| Wymiary produktu (Gł. x Szer. x Wys.) | 25D x 34W x 25.5H centymetrów |
| Waga przedmiotu | 2200 gram |
| Zawarte komponenty | Pop-up Toaster, Removable Crumb Tray |
9. Gwarancja i wsparcie
Your KitchenAid 5KMT223GER 2-Slot Automatic Toaster is covered by a 2-roczna ograniczona gwarancja od daty zakupu. Niniejsza gwarancja obejmuje wady materiałowe i wykonawcze powstałe w normalnych warunkach użytkowania domowego.
For warranty service, technical support, or to order replacement parts, please contact KitchenAid customer service. Keep your purchase receipt as proof of purchase for warranty claims.