
1. Ważne zabezpieczenia
Podczas korzystania z urządzeń elektrycznych należy zawsze przestrzegać podstawowych zasad bezpieczeństwa, aby zminimalizować ryzyko pożaru, porażenia prądem i obrażeń ciała, w tym:
- Przed użyciem czajnika należy przeczytać całą instrukcję.
- Nie dotykaj gorących powierzchni. Używaj uchwytów lub gałek.
- Aby zapobiec ryzyku pożaru, porażenia prądem elektrycznym i obrażeniom ciała, nie zanurzaj przewodu zasilającego, wtyczek ani podstawy czajnika w wodzie ani innym płynie.
- Należy zachować ścisły nadzór, jeżeli z urządzenia korzystają dzieci lub w ich pobliżu.
- Odłącz od gniazdka, gdy nie jest używane i przed czyszczeniem. Pozostaw do ostygnięcia przed założeniem lub zdjęciem części oraz przed czyszczeniem urządzenia.
- Nie używaj urządzenia z uszkodzonym przewodem lub wtyczką, ani po awarii lub uszkodzeniu urządzenia w jakikolwiek sposób. Skontaktuj się z obsługą klienta w celu sprawdzenia, naprawy lub regulacji.
- Użycie akcesoriów niezalecanych przez producenta urządzenia może spowodować pożar, porażenie prądem lub obrażenia ciała.
- Nie stosować na zewnątrz.
- Nie pozwól, aby przewód zwisał z krawędzi stołu lub blatu i dotykał gorących powierzchni.
- Nie umieszczać na gorącym palniku gazowym lub elektrycznym ani w jego pobliżu, a także w nagrzanym piekarniku.
- Zawsze najpierw podłącz wtyczkę do urządzenia, a następnie podłącz przewód do gniazdka ściennego. Aby odłączyć, ustaw dowolny element sterujący w pozycji „wyłączone”, a następnie wyjmij wtyczkę z gniazdka ściennego.
- Nie używaj urządzenia niezgodnie z jego przeznaczeniem.
- To urządzenie działa na 120 wolty. Ensure your power supply matches this requirement to prevent damage or malfunction.
- Do not overfill the kettle. Fill only to the maximum fill line to prevent boiling water from overflowing.
2. Koniec produktuview
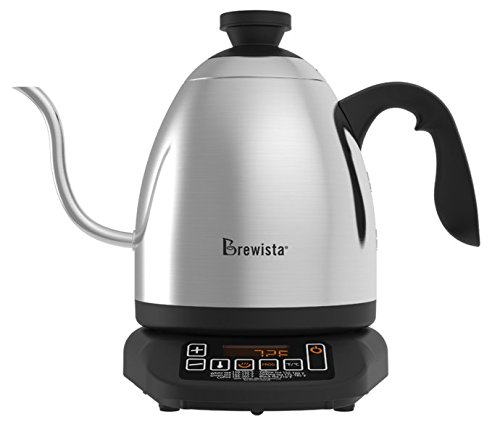
The Brewista SmartPour Variable Digital Kettle is designed for precise temperature control, ideal for brewing coffee and tea. It features a gooseneck spout for controlled pouring and a digital display for accurate temperature readings.

Rysunek 2.1: Przód view of the Brewista SmartPour Variable Digital Kettle. This image shows the stainless steel kettle body, the gooseneck spout, the handle, and the digital control base.
2.1 Składniki
- Korpus kotła: Stainless steel construction with a 1.2-liter capacity.
- Wylewka typu „gęsia szyja”: Designed for precise pouring control.
- Pokrywa: Removable lid with a handle.
- Uchwyt: Ergonomiczna konstrukcja zapewniająca wygodny chwyt.
- Baza mocy: Contains the heating element and digital controls.
- Wyświetlacz cyfrowy: Shows current and target temperatures, and timer settings.
- Przyciski sterujące: Power, Temperature Up/Down, Set Temperature, Keep Warm, Auto-Start.
Rysunek 2.2: Close-up of the control panel on the Brewista SmartPour Kettle base. This image highlights the digital display and various control buttons for temperature adjustment and function selection.
3. Konfiguracja
3.1 Czyszczenie początkowe
- Remove all packaging materials and labels from the kettle and base.
- Wytrzyj zewnętrzną część czajnika i podstawy środkiem adamp płótno.
- Wash the interior of the kettle and the lid with warm, soapy water. Rinse thoroughly.
- Fill the kettle with water to the maximum fill line and boil. Discard this water. Repeat this process two to three times to ensure the kettle is clean and free of manufacturing residues.
3.2 Umieszczenie
- Podstawkę zasilającą należy ustawić na suchej, płaskiej, stabilnej i odpornej na ciepło powierzchni.
- Upewnij się, że przewód zasilający nie zwisa i nie ma kontaktu z gorącymi powierzchniami.
- Podłącz przewód zasilający do uziemionego gniazdka prądu zmiennego 120 V.
4. Instrukcja obsługi
4.1 Napełnianie czajnika
- Zdejmij czajnik z podstawy zasilającej.
- Remove the lid and fill the kettle with fresh, cold water. Do not fill below the minimum or above the maximum fill lines. The capacity is 1.2 liters.
- Dokładnie załóż pokrywę.
- Ponownie umieść czajnik na podstawie zasilającej.
4.2 Włączanie i ustawianie temperatury
- Naciśnij MOC button to turn on the kettle. The digital display will illuminate.
- To select a preset temperature, press the NASTAW TEMPERATURĘ button repeatedly to cycle through common brewing temperatures (e.g., 175°F, 195°F, 205°F, 212°F).
- Aby ustawić niestandardową temperaturę, użyj + I - buttons to adjust the desired temperature in 1-degree increments.
- The kettle will automatically begin heating to the selected temperature. The display will show the current water temperature as it heats.
4.3 Przełączanie jednostek temperatury (°F/°C)
Aby przełączać się między skalą Fahrenheita (°F) a skalą Celsjusza (°C), naciśnij i przytrzymaj + I - buttons simultaneously for a few seconds until the unit changes on the display.
4.4 Funkcja utrzymywania ciepła
- After setting your desired temperature, press the UTRZYMAJ SIĘ CIEPŁO przycisk.
- The kettle will heat to the set temperature and then maintain that temperature for up to one hour.
- Aby dezaktywować funkcję utrzymywania ciepła, naciśnij przycisk UTRZYMAJ SIĘ CIEPŁO button again or turn off the kettle.
4.5 Auto-Start Timer
The auto-start timer allows you to program the kettle to begin heating at a specific time.
- Upewnij się, że czajnik jest napełniony wodą i umieszczony na podstawie.
- Set your desired target temperature using the NASTAW TEMPERATURĘ or +/- pikolak.
- Naciśnij i przytrzymaj AUTOMATYCZNY START button. The display will show the current time.
- Użyj + I - przyciskami, aby ustawić żądany czas rozpoczęcia.
- Naciśnij AUTOMATYCZNY START button again to confirm. The kettle will now display the current time and a small timer icon, indicating the auto-start is active.
- The kettle will begin heating at the programmed time.
Note: The auto-start timer can typically be set for up to 24 hours in advance.
5. Konserwacja i czyszczenie
Regularne czyszczenie i konserwacja przedłużą żywotność czajnika.
5.1 Codzienne czyszczenie
- Unplug the kettle from the power outlet and allow it to cool completely before cleaning.
- Przetrzyj zewnętrzną część czajnika i podstawę zasilającą miękką szmatką.amp płótno. Nie używaj ściernych środków czyszczących ani szorstkich gąbek.
- The kettle body and lid can be hand washed with warm, soapy water. Rinse thoroughly and dry completely before returning to the base.
- Nie zanurzaj podstawy zasilającej, przewodu ani wtyczki w wodzie ani innym płynie.
5.2 Odkamienianie
Mineral deposits (limescale) can build up inside the kettle over time, affecting performance. Descale your kettle regularly, depending on water hardness and frequency of use.
- Fill the kettle with a solution of equal parts white vinegar and water, or use a commercial descaling solution according to its instructions. Ensure the solution covers the mineral deposits.
- Allow the solution to soak for at least 30 minutes, or longer for heavy buildup. For stubborn deposits, you may heat the solution to just below boiling (do not boil vinegar).
- Opróżnij czajnik i dokładnie wypłucz go kilka razy czystą wodą.
- Boil a full kettle of fresh water and discard it to remove any residual descaling agent.
6. Rozwiązywanie Problemów
| Problem | Możliwa przyczyna | Rozwiązanie |
|---|---|---|
| Czajnik nie włącza się. | Niepodłączony do prądu; gniazdko elektryczne nie działa; czajnik nie jest prawidłowo umieszczony na podstawie. | Ensure the power cord is securely plugged into a working 120V outlet. Check if the kettle is correctly placed on the power base. |
| Woda się nie nagrzewa. | Kettle not powered on; temperature not set; insufficient water. | Press the POWER button. Set a desired temperature. Ensure water level is between MIN and MAX lines. |
| Wskazanie temperatury jest niedokładne. | Mineral buildup on temperature sensor; internal sensor malfunction. | Descale the kettle thoroughly. If the problem persists, contact customer support. |
| Kettle leaks or rusts. | Overfilling; manufacturing defect; hard water corrosion. | Do not overfill past the MAX line. Regular descaling can prevent corrosion from hard water. If a defect is suspected, contact customer support. |
| Kettle is slow to heat. | Mineral buildup; low voltage. | Descale the kettle. Ensure the kettle is connected to a stable 120V power supply. |
| Auto-start timer does not activate. | Timer nie został ustawiony prawidłowo; przerwa w dostawie prądu. | Review the auto-start timer setting process. Ensure continuous power supply. |
For issues not listed here, or if solutions do not resolve the problem, please contact Brewista customer support.
7. Specyfikacje
| Numer modelu | BKV12S02 |
| Marka | Brewista |
| Pojemność | 1.2 litrów |
| Tworzywo | Stal nierdzewna |
| Tomtage | 120 wolty |
| Cechy specjalne | Concealed Heating, Indicator Light, Variable Temperature Control, Gooseneck Spout, Keep Warm Function, Auto-Start Timer |
| Pielęgnacja produktu | Prać ręcznie, czyścić czyściwem |
| Waga przedmiotu | 3 funta (ok. 1.36 kg) |
| Wymiary (dł. x szer. x wys.) | 27.3 x 21.1 x 30.4 centymetrów |
| UPC | 735343350429, 645240812855 |
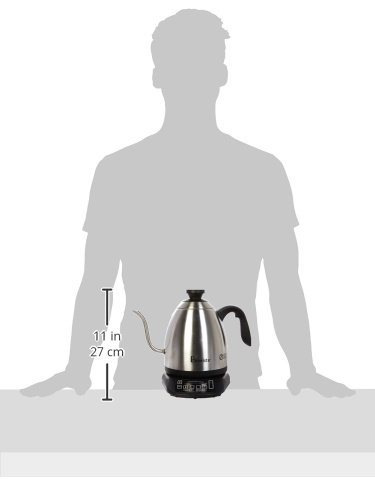
Rysunek 7.1: Image illustrating the approximate size of the Brewista SmartPour Kettle in relation to a person, showing its compact countertop footprint.
8. Gwarancja i wsparcie
For warranty information, product registration, or technical support, please refer to the official Brewista webOdwiedź witrynę lub skontaktuj się z działem obsługi klienta. Zachowaj paragon jako dowód zakupu na wypadek reklamacji.
You may also find additional resources and product information by scanning the QR code provided on the product packaging or by visiting the link below: