1. Wprowadzenie
This manual provides essential information for the safe and efficient installation, operation, and maintenance of your GAF Master Flow 1500 CFM Roof Mount Attic Fan, Model ERV6SMWW. This power roof vent is designed to improve attic ventilation, reduce heat buildup, and contribute to lower energy costs by efficiently removing hot, humid air from your attic space. Please read all instructions carefully before proceeding with installation or operation.

Figure 1: GAF Master Flow 1500 CFM Roof Mount Attic Fan, Shingle Match Weathered Wood.
2. Informacje dotyczące bezpieczeństwa
OSTRZEŻENIE: Ryzyko porażenia prądem. Przed przystąpieniem do prac serwisowych należy odłączyć urządzenie od zasilania.
- Always disconnect power at the circuit breaker or fuse box before installing, servicing, or cleaning the fan.
- Installation should be performed by a qualified electrician or experienced professional in accordance with all local electrical codes and building regulations.
- Podczas montażu należy nosić odpowiedni sprzęt ochrony osobistej, obejmujący rękawice i okulary ochronne.
- Aby zapobiec zagrożeniom elektrycznym, należy zadbać o prawidłowe uziemienie urządzenia.
- Do not operate the fan if any part is damaged or if the wiring is exposed.
- Podczas pracy wentylatora należy trzymać ręce i inne przedmioty z dala od łopatek.
3. Zawartość opakowania
Przed rozpoczęciem instalacji sprawdź, czy wszystkie komponenty są obecne:
- GAF Master Flow 1500 CFM Roof Mount Attic Fan unit
- Integrated Thermostat (PT6 style)
- Installation hardware (screws, nails, etc. - may vary)
- Instrukcja obsługi (ten dokument)
4. Konfiguracja i instalacja
Proper installation is crucial for the performance and longevity of your attic fan. It is recommended that installation be performed by a professional.
4.1 Wybór miejsca
Choose a location on the roof that allows for optimal airflow and is free from obstructions. The fan should be installed near the highest point of the roof to effectively exhaust hot air.
4.2 Roof Opening Preparation
- Mark and cut a circular opening in the roof decking according to the fan's base dimensions.
- Ensure the opening is clean and free of debris.
4.3 Montaż wentylatora
- Position the fan base over the prepared opening, ensuring the flashing is properly integrated with the roof shingles to prevent leaks.
- Secure the fan base to the roof decking using appropriate roofing nails or screws, sealing all fasteners with roofing cement.
- Ensure the fan is level and securely fastened.

Rysunek 2: Example of the attic fan installed on a shingled roof.
4.4 Okablowanie elektryczne
The fan includes an integrated thermostat for automatic operation. Wiring must comply with all local electrical codes.
- Run appropriate electrical conduit and wiring from a dedicated circuit breaker to the fan's junction box.
- Connect the fan's wiring to the household electrical supply, ensuring proper grounding. Refer to the wiring diagram provided with the unit for specific connections.
- Secure all wiring connections within the junction box.

Figure 3: Master Flow adjustable temperature thermostat (Model PT6).
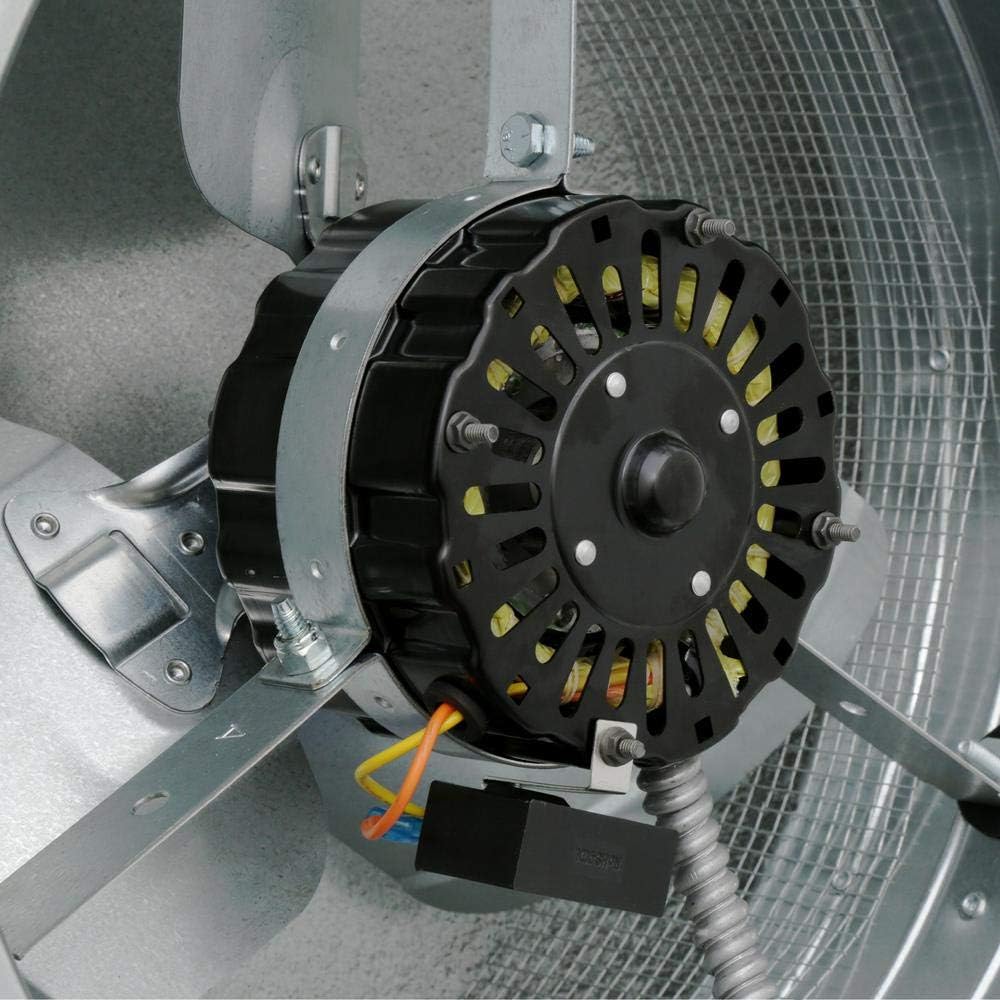
Rysunek 4: Szczegółowy view of the fan motor and electrical connections.

Rysunek 5: Spód view of the fan blades and motor assembly.
5. Instrukcja obsługi
The GAF Master Flow attic fan operates automatically based on the integrated thermostat setting.
5.1 Thermostat Adjustment
The thermostat controls when the fan turns on and off. It is typically adjustable from 60°F to 120°F (15°C to 49°C).
- Locate the thermostat control dial, usually found within the fan housing or accessible from the attic.
- Rotate the dial to set the desired temperature at which the fan should activate. A common setting is between 90°F and 100°F (32°C and 38°C).
- The fan will automatically turn on when the attic temperature exceeds the set point and turn off when the temperature drops below it.
6. Konserwacja
Regular maintenance ensures optimal performance and extends the lifespan of your attic fan.
- Roczna inspekcja: Annually, inspect the fan for any loose connections, debris accumulation, or signs of wear. Ensure the fan blades spin freely.
- Czyszczenie: Carefully clean any dust or debris from the fan blades and motor housing. Ensure power is disconnected before cleaning.
- Roof Seal Inspection: Periodically check the roof flashing and sealant around the fan base for any cracks or deterioration that could lead to leaks. Repair as necessary.
- Kontrola elektryczna: Sprawdź, czy wszystkie połączenia elektryczne są solidne i nie są skorodowane.
7. Rozwiązywanie Problemów
If your GAF Master Flow attic fan is not operating as expected, consult the following table before contacting customer support.
| Problem | Możliwa przyczyna | Rozwiązanie |
|---|---|---|
| Wentylator nie włącza się | Brak zasilania urządzenia | Check circuit breaker or fuse. Ensure power is supplied to the fan. |
| Thermostat setting is too high | Lower the thermostat setting. The attic temperature may not have reached the activation point. | |
| Wadliwe okablowanie lub komponent | Inspect wiring for loose connections. If issues persist, consult a qualified electrician. | |
| Wentylator pracuje w sposób ciągły | Ustawienie termostatu jest zbyt niskie | Podnieś ustawienie termostatu. |
| Wadliwy termostat | If the thermostat is suspected to be faulty, it may require replacement by a professional. | |
| Wentylator jest głośny lub nadmiernie wibruje | Zanieczyszczenia w łopatkach wentylatora | Disconnect power and carefully remove any debris from the fan blades. |
| Luźne elementy montażowe | Ensure the fan is securely mounted to the roof. Tighten any loose fasteners. | |
| Attic remains hot | Insufficient intake ventilation | Ensure adequate soffit or other intake vents are present to allow proper airflow. |
| Fan capacity too low for attic size | Verify the fan's CFM rating is appropriate for your attic square footage. This model is rated for up to 2800 sq ft. |
8. Specyfikacje
| Funkcja | Specyfikacja |
|---|---|
| Numer modelu | ERV6SMWW |
| Przepływ powietrza | Up to 1500 Cubic Feet per Minute (CFM) |
| Obszar zasięgu | Do 2800 stóp kwadratowych |
| Typ termostatu | Adjustable Temperature Thermostat (PT6) |
| Wymiary produktu | 3 x 1 x 2 inches (Unit dimensions, not flashing) |
| Waga przedmiotu | 19 funta |
| ASIN | B01AAYLA40 |
| Pierwszy dostępny | 7 stycznia 2016 r. |
9. Gwarancja i wsparcie
For warranty information or technical assistance, please refer to the documentation included with your purchase or contact Master Flow customer support directly. Keep your proof of purchase for warranty claims.