
1. Wprowadzenie
Klein Tools CL800 to cyfrowy analizator z automatycznym zakresem i rzeczywistą średnią kwadratową (TRMS)amp meter designed for professional electricians and DIY enthusiasts. This versatile tool measures AC/DC voltage, resistance, continuity, frequency, capacitance, and tests diodes via test-leads. It also measures temperature via a thermocouple probe and features a Low Impedance (LoZ) mode for identifying and eliminating ghost or stray voltages. Built for durability, the CL800 is engineered to withstand demanding jobsite conditions.
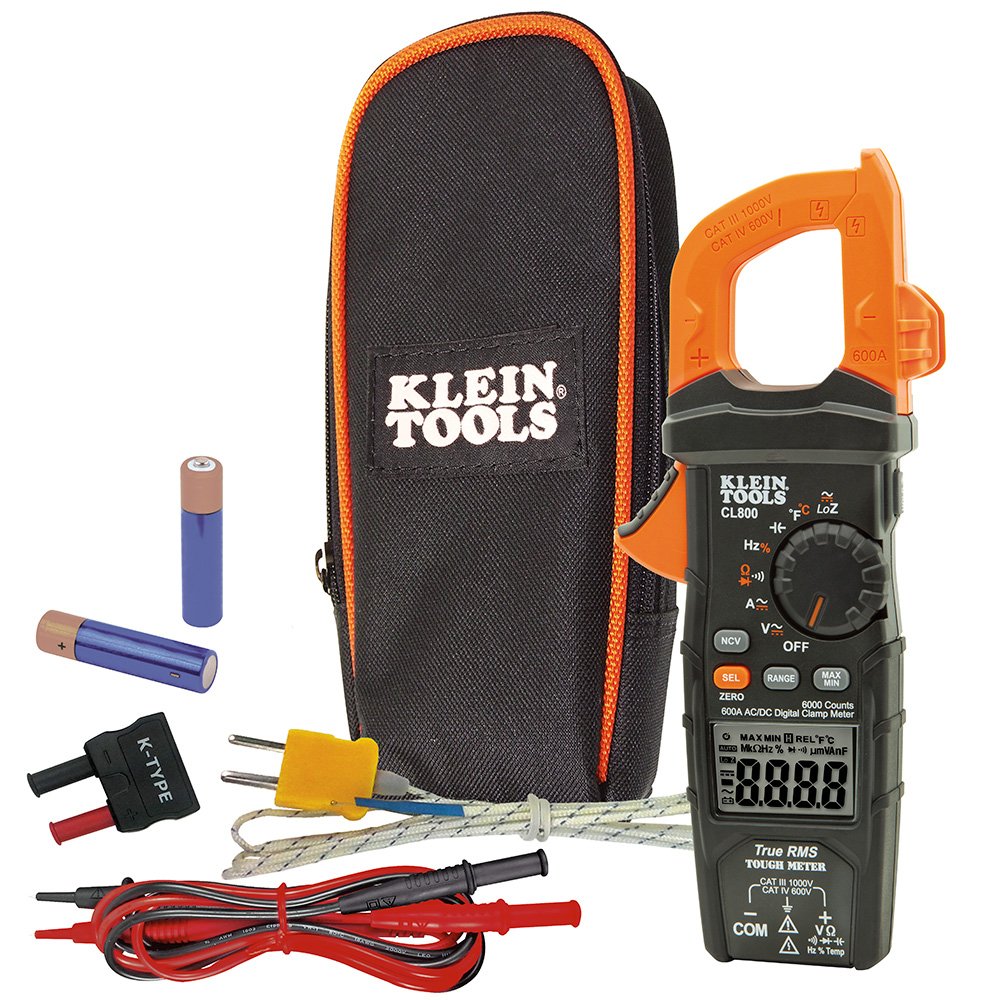
Rysunek 1: Cyfrowy panel sterowania Klein Tools CL800amp Meter highlighting its True RMS measurement technology, voltage, current, resistance, temperature ranges, 2m drop protection, IP40 ingress protection, and CAT III/CAT IV safety ratings.
2. Informacje dotyczące bezpieczeństwa
WARNING: Read, understand, and follow all instructions, cautions, and warnings attached to and/or packed with all test and measurement devices before each use.
- Do not attempt to measure resistance or continuity on live circuits.
- Przed każdym użyciem sprawdź działanie miernika, mierząc znaną objętośćtage lub aktualne.
- Nie należy używać miernika podczas burz z wyładowaniami atmosferycznymi ani w deszczową pogodę.
- Nie używaj miernika ani przewodów pomiarowych, jeśli wyglądają na uszkodzone.
3. Konfiguracja
3.1. Instalacja baterii
The CL800 requires 2 AAA batteries (included). To install or replace batteries:
- Upewnij się, że miernik jest WYŁĄCZONY.
- Znajdź komorę baterii z tyłu miernika.
- Użyj śrubokręta, aby otworzyć pokrywę baterii.
- Insert the batteries, observing correct polarity (+/-).
- Załóż pokrywę i zabezpiecz ją śrubą.
3.2. Podłączanie przewodów pomiarowych
The meter comes with test leads. Connect them to the appropriate jacks:
- The black lead connects to the COM (Common) jack.
- The red lead connects to the VΩHz%Temp jack for most measurements (voltage, resistance, frequency, temperature, capacitance, diode).

Rysunek 2: Góra view of the Klein Tools CL800, illustrating the input jacks for connecting test leads. The black COM jack and the red VΩHz%Temp jack are clearly visible.
4. Instrukcja obsługi
The CL800 features a rotary dial to select measurement functions and buttons for additional settings. The backlit LCD display provides clear readings.

Rycina 3: Przód view of the Klein Tools CL800, displaying the LCD screen, rotary function dial, and control buttons for various measurement modes.
4.1. AC/DC Objętośćtage Pomiar
- Ustaw pokrętło w pozycji V~ (tom ACtage) lub V- (DC tomtage) position. Use the WYBRAĆ przycisk umożliwiający w razie potrzeby przełączanie między prądem zmiennym i stałym.
- Connect the test leads to the circuit points you wish to measure.
- Przeczytaj tomtage wartość na wyświetlaczu.

Figure 4: An electrician uses the Klein Tools CL800 to safely measure voltage across terminals in a circuit breaker panel, demonstrating practical application.
4.2. Pomiar prądu przemiennego/stałego (Clamp)
- Ustaw pokrętło w pozycji A~ (Prąd przemienny) lub A- (DC Current) position. Use the WYBRAĆ przycisk umożliwiający w razie potrzeby przełączanie między prądem zmiennym i stałym.
- Naciśnij klawiszamp spust otwierający szczęki.
- Zamknij pojedynczy przewód (nie wiązkę przewodów) w obudowie.amp szczęki
- Odczytaj aktualną wartość na wyświetlaczu.

Figure 5: An electrician utilizes the clamp function of the Klein Tools CL800 to measure current on a wire, with the backlit display providing visibility in dim conditions.
4.3. Resistance, Continuity, Diode, Capacitance, Frequency, Temperature
Select the corresponding function on the rotary dial. For resistance (Ω), continuity ()))), dioda (->|), and capacitance (--| |--), connect the test leads to the component. For frequency (Hz%) and temperature (°F/°C), connect the leads or thermocouple probe as appropriate.

Figure 6: The Klein Tools CL800 is shown measuring temperature using its thermocouple probe, demonstrating its multi-functionality beyond electrical parameters.
4.4. Low Impedance (LoZ) Mode
The LoZ mode helps identify and eliminate ghost or stray voltages. Select the LoZ function on the dial and connect the test leads to the circuit. This mode provides a more accurate reading by presenting a low impedance to the circuit, which drains away ghost voltagt.j.
4.5. Bez kontaktutageTester (NCVT)
To use the NCVT feature, press the NCV button. Hold the tip of the meter near a voltagŹródło e. Miernik wskaże obecność objętości prądu przemiennegotage with visual and/or audible alerts.
4.6. Backlit Display and Worklight
The CL800 features a backlit display for improved visibility in low-light conditions. It also includes an integrated worklight to illuminate the work area. Refer to the full user manual for specific button presses to activate these features.
5. Konserwacja
5.1. Czyszczenie
Wipe the meter with a dry, lint-free cloth. Do not use abrasive cleaners or solvents. Ensure the meter is off and disconnected from any circuits before cleaning.
5.2. Wymiana baterii
Replace batteries when the low battery indicator appears on the display to ensure accurate readings and proper operation. Follow the steps in Section 3.1.
5.3. Przechowywanie
Gdy miernik nie jest używany, należy przechowywać go wraz z akcesoriami w dołączonym futerale, w chłodnym i suchym miejscu, z dala od bezpośredniego światła słonecznego i ekstremalnych temperatur.
6. Rozwiązywanie Problemów
- Licznik się nie włącza: Sprawdź instalację baterii i upewnij się, że nie są rozładowane. W razie potrzeby wymień je.
- Niedokładne odczyty: Verify correct function selection on the rotary dial and proper test lead connection. Ensure batteries are not low. For DC current, remember to zero out the display using the ZERO button before measurement.
- Na wyświetlaczu pojawia się komunikat „OL” (Przeciążenie): The measured value exceeds the meter's range for the selected function. Select a higher range if available, or ensure the measurement is within the meter's capabilities.
- Display is jumping or unstable: This can occur with AC voltage due to floating voltages. Use the LoZ mode for more stable readings in such situations.
- Negative symbol on DC voltage/prąd: Indicates reversed polarity of the test leads. The magnitude of the reading is still correct.
7. Specyfikacje
| Funkcja | Specyfikacja |
|---|---|
| Producent | Narzędzia Kleina |
| Numer części | Nr CL800 |
| Waga przedmiotu | 12.5 uncji |
| Wymiary produktu | 9.09 x 3.82 x 1.54 cala |
| Numer modelu przedmiotu | Nr CL800 |
| Baterie | Wymagane 2 baterie AAA (w zestawie) |
| Styl wyświetlania | 6000 Count LCD |
| Dokładność pomiaru | TomtagTester |
| Cechy specjalne | Low Battery Indicator, Auto Shut Off |
| Zawarte komponenty | Carrying Case, 41'' (1041.4 mm) Test Leads, Thermocouple with Adapter, and Batteries |
| Orzecznictwo | Meets relevant industry standards (CAT III 1000V, CAT IV 600V) |
| Ochrona przed wnikaniem | IP40 |
| Ochrona przed upadkiem | 6.6 stopy (2 m) |
8. Gwarancja i wsparcie
Cyfrowy czytnik Klein Tools CL800amp Meter comes with a 1-year manufacturer's warranty. For technical support, service, or warranty claims, please refer to the contact information provided in the original product packaging or visit the official Klein Tools webstrona.