1. Wprowadzenie
This manual provides detailed instructions for the proper installation, operation, and maintenance of your Pioneer VSX-330 5.1CH AV Receiver. Please read this manual thoroughly before using the receiver to ensure optimal performance and safety. The Pioneer VSX-330 is designed to deliver a rich audio-visual experience with support for Dolby TrueHD, DTS-HD Master Audio, and Ultra HD 4K Passthrough.

Rycina 1: Przód view of the Pioneer VSX-330 5.1CH AV Receiver, showcasindzięki eleganckiemu wzornictwu i elementom sterującym na przednim panelu.
2. Informacje dotyczące bezpieczeństwa
Always follow these basic safety precautions when using this product to reduce the risk of fire, electric shock, and injury.
- Źródło zasilania: Connect the receiver only to an AC outlet of the voltage wskazane na urządzeniu.
- Wentylacja: Zapewnij odpowiednią wentylację. Nie blokuj otworów wentylacyjnych. Pozostaw wystarczająco dużo miejsca wokół urządzenia, aby zapewnić prawidłowy przepływ powietrza.
- Woda i wilgoć: Do not expose the receiver to rain or moisture. Do not place objects filled with liquids, such as vases, on the unit.
- Ciepło: Keep the receiver away from heat sources such as radiators, heat registers, stoves, or other apparatus that produce heat.
- Czyszczenie: Unplug the receiver from the wall outlet before cleaning. Use a dry cloth for cleaning.
- Serwisowanie: Do not attempt to service the receiver yourself. Refer all servicing to qualified service personnel.
- Kable: Ostrożnie ułóż wszystkie kable, aby uniknąć ryzyka potknięcia się i uszkodzeń.
3. Co znajduje się w pudełku
Sprawdź, czy w opakowaniu znajdują się wszystkie elementy wymienione poniżej:
- Amplituner AV Pioneer VSX-330
- Zdalne sterowanie
- AAA size IEC R03 dry cell batteries (x2) for remote control
- Antena pętlowa AM
- Antena przewodowa FM
- Szybki przewodnik
- Broszura dotycząca bezpieczeństwa
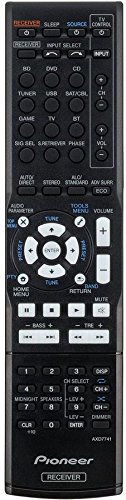
Figure 2: The included remote control for the Pioneer VSX-330 AV Receiver, used for convenient operation.
4. Konfiguracja
4.1 Podłączanie głośników
The VSX-330 supports a 5.1 channel speaker configuration. Connect your speakers to the corresponding terminals on the rear panel.
- Głośniki przednie (L/P): Connect to the FRONT L and R terminals.
- Głośnik centralny: Podłącz do zacisku CENTER.
- Głośniki przestrzenne (L/P): Connect to the SURROUND L and R terminals.
- Głośnik niskotonowy: Connect a powered subwoofer to the PREOUT SUBWOOFER terminal.
Ensure correct polarity (+ to + and - to -) for all speaker connections to avoid phase issues.
4.2 Podłączanie urządzeń audio/wideo
Use HDMI cables for optimal audio and video quality. The receiver features 4 HDMI inputs and 1 HDMI output.

Figure 3: Rear panel of the Pioneer VSX-330 AV Receiver, showing various input and output terminals for audio, video, and speakers.
- Połączenia HDMI:
- Connect your Blu-ray player, game console, or set-top box to the HDMI IN terminals (DVD, BD, SAT/CBL, GAME).
- Connect your TV to the HDMI OUT terminal. This output supports Audio Return Channel (ARC).
- Połączenia audio cyfrowe:
- Use the DIGITAL IN (COAXIAL or OPTICAL) terminals for devices without HDMI, such as CD players or older game consoles.
- Analog Audio/Video Connections:
- Connect older devices using the AV (Composite) IN or AUDIO IN terminals.
- The MONITOR OUT (Composite) can be used to connect to a display for on-screen menu navigation (analogue only).
- Połączenie USB:
- A front USB port is available for connecting iPod/iPhone devices or USB drives for audio playback.
- Połączenia antenowe:
- Connect the supplied AM loop antenna to the AM ANTENNA terminal.
- Connect the supplied FM wire antenna to the FM UNBAL 75Ω terminal.
4.3 Pierwsze włączenie i ustawienia podstawowe
After all connections are made, plug the receiver into a power outlet. Press the GOTOWOŚĆ/WŁĄCZONY button on the front panel or remote control to power on the unit. Use the on-screen display (if connected to a TV via composite video) or the front panel display to configure basic settings such as speaker size, distance, and level.
5. Działanie
5.1 Podstawowe sterowanie
- Moc: Naciśnij GOTOWOŚĆ/WŁĄCZONY button to turn the receiver on or off.
- Wybór wejścia: Użyj WYBÓR WEJŚCIA knob on the front panel or the dedicated input buttons (e.g., BD, DVD, SAT/CBL, GAME) on the remote control to switch between connected devices.
- Regulacja głośności: Dostosuj głośność główną za pomocą GŁOŚNOŚĆ pokrętło na panelu przednim lub GŁOŚNOŚĆ +/- przyciski na pilocie.
5.2 Funkcje audio
The VSX-330 supports various audio formats and enhancements:
- Dolby TrueHD / Dolby Digital Plus / Dolby Pro Logic II: Provides high-definition surround sound.
- DTS-HD Master Audio / DTS Neo:6: Delivers lossless, studio-quality audio.
- DSD Disc (SACD) Playback: Supports 2.8 MHz, 2ch playback via HDMI.
- Advanced Sound Retriever (2ch): Enhances compressed audio formats to near CD quality.
- Auto Level Control (2ch): Compensates for volume differences between audio tracks.
- Kontrola fazy: Optimizes phase characteristics for improved sound imaging.
5.3 Funkcje wideo
The receiver handles advanced video signals:
- Gotowy na 3D: Supports 3D content from Blu-ray discs, broadcasts, and games.
- Deep Colour (36-bit) / "x.v. Colour": Provides richer and more vibrant colors.
- Ultra HD Pass-through: Supports 4K/60p/4:2:0/24-bit, 4K/24p/4:4:4/24-bit, and 4K/24p/4:2:2/36-bit video signals.
5.4 Advanced Surround Modes
Select from various surround modes to optimize your listening experience:
- Action, Drama, Advanced Game, Sports, Classical, Rock/Pop
- Przód Stage Surround, Extended Stereo
- Phones Surround (for headphone listening)
5.5 ECO Modes
The receiver includes ECO modes to reduce power consumption:
- ECO Mode 1: Reduces power consumption during normal operation.
- ECO Mode 2: Further reduces power consumption, suitable for background listening.
5.6 Obsługa tunera
The built-in AM/FM tuner allows you to listen to radio broadcasts. You can store up to 30 presets for your favorite stations.
- Naciśnij TUNER button on the remote or front panel to select the tuner input.
- Użyj DOSTOSUJ +/- buttons to manually tune or the USTAWIENIA PRESET +/- przyciski do wyboru zapisanych stacji.
6. Konserwacja
Proper maintenance ensures the longevity and performance of your receiver.
- Czyszczenie: Przetrzyj powierzchnie zewnętrzne miękką, suchą ściereczką. Nie używaj środków czyszczących o właściwościach ściernych, wosków ani rozpuszczalników.
- Wentylacja: Regularnie sprawdzaj, czy otwory wentylacyjne nie są zablokowane kurzem lub zanieczyszczeniami.
- Przewód zasilający: Periodically inspect the power cord for any damage. If damaged, contact qualified service personnel.
- Składowanie: Jeśli urządzenie będzie przechowywane przez dłuższy czas, należy odłączyć je od gniazdka elektrycznego i przechowywać w chłodnym, suchym miejscu.
7. Rozwiązywanie Problemów
Rozwiązania typowych problemów znajdziesz w tej sekcji. Jeśli problem będzie się powtarzał, skontaktuj się z obsługą klienta.
7.1 Brak zasilania
- Upewnij się, że przewód zasilający jest prawidłowo podłączony zarówno do odbiornika, jak i do sprawnego gniazdka ściennego.
- Sprawdź, czy gniazdko elektryczne działa prawidłowo, podłączając do niego inne urządzenie.
- Sprawdź, czy GOTOWOŚĆ/WŁĄCZONY przycisk został naciśnięty.
7.2 Brak dźwięku
- Sprawdź wszystkie połączenia głośników pod kątem prawidłowej polaryzacji i bezpiecznego dopasowania.
- Sprawdź, czy wybrano właściwe źródło sygnału wejściowego.
- Zwiększ głośność główną.
- Sprawdź czy funkcja WYCISZENIA jest aktywna.
- Verify that the audio cables from your source device are correctly connected to the receiver.
- If using HDMI, ensure your TV's ARC function is enabled and correctly configured if using the TV as the audio source.
7.3 Brak wideo
- Ensure the HDMI cables are securely connected between the source device, receiver, and TV.
- Select the correct input source on the receiver and the correct HDMI input on your TV.
- Check the resolution settings on your source device to ensure compatibility with your TV and receiver.
7.4 Pilot zdalnego sterowania nie działa
- Wymień baterie na nowe baterie AAA.
- Ensure there are no obstructions between the remote control and the receiver's remote sensor.
- Point the remote control directly at the receiver.
8. Specyfikacje
| Funkcja | Specyfikacja |
|---|---|
| Marka | PIONIER |
| Model | VSX-330-K |
| AmpTyp lifikacji | Direct Energy |
| Kanały | 5.1 |
| Moc wyjściowa | 105 W/ch (6 ohms, 1 kHz, THD 1.0%, 1ch Driven) |
| Dekodowanie dźwięku | Dolby TrueHD, Dolby Digital Plus, Dolby Pro Logic II, DTS-HD Master Audio, DTS Neo:6 |
| Odtwarzanie DSD | 2.8 MHz, 2ch (via HDMI) |
| DAC | 192 kHz / 24-bit |
| Wejścia HDMI | 4 |
| Wyjścia HDMI | 1 (ARC compatible) |
| Video Passthrough | 3D Ready, Deep Colour (36-bit), x.v.Colour, Ultra HD (4K/60p/4:2:0/24-bit, 4K/24p/4:4:4/24-bit, 4K/24p/4:2:2/36-bit) |
| Port USB | 1 (Front, for iPod/iPhone, USB drive) |
| Tuner | AM/FM (30 Presets) |
| Wymiary (szer. x wys. x gł.) | Wymiary: 435 x 168 x 331.5 mm |
| Waga | 7.2 kilogramów |
| Źródło zasilania | Prąd zmienny 220-240 V, 50/60 Hz |
| Pobór mocy (podczas pracy) | 165 watów (maksymalnie) |
9. Gwarancja i wsparcie
9.1 Informacje o gwarancji
This Pioneer VSX-330 AV Receiver comes with a 1 Year Seller Warranty. Please retain your purchase receipt as proof of purchase for warranty claims. The warranty covers manufacturing defects under normal use conditions.
For specific terms and conditions of the warranty, please refer to the warranty card included in your product packaging or contact your seller.
9.2 Obsługa klienta
For technical assistance, troubleshooting beyond this manual, or service inquiries, please contact Pioneer customer support or your authorized dealer.
Manufacturer Contact: Pioneer (1800224244)