
Wstęp
Dziękujemy za zakupasing the STOGA Ubox STV040 Dual Lens Car DVR Camera. This manual provides detailed instructions for the proper installation, operation, and maintenance of your device. Please read this manual thoroughly before using the product to ensure optimal performance and safety.
Zawartość opakowania
Proszę sprawdzić zawartość opakowania po otwarciu. Jeśli brakuje któregokolwiek elementu lub jest on uszkodzony, prosimy o kontakt ze sprzedawcą.
- 1 x STOGA Ubox STV040 Car DVR Camera
- 1 x ładowarka samochodowa
- 1 x Car Mount
- 1 x External GPS Module
- 1 x Instrukcja obsługi
Produkt ponadview
Familiarize yourself with the components and features of your STOGA Ubox STV040 Car DVR Camera.

Rysunek 1: Przód view of the DVR camera with the display screen active.

Rysunek 2: Przód view detailing the dual wide-angle lenses and surrounding controls.
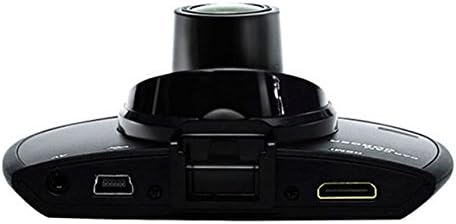
Rysunek 3: Szczyt view illustrating the connectivity ports (HDMI, USB, AV).
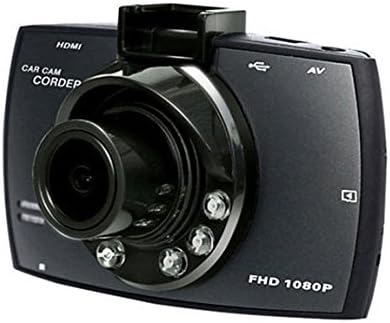
Rysunek 4: Angled perspective of the DVR camera, showing its compact design.
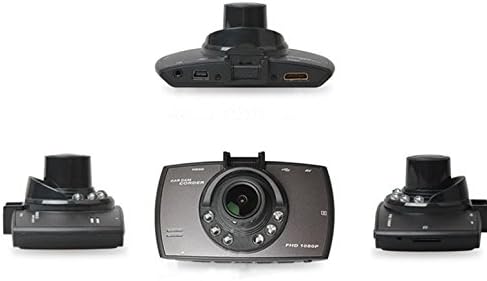
Rysunek 5: Wyczerpujący view of the DVR camera from various angles.
Organizować coś
1. Instalowanie karty Micro SD
Insert a Micro SD card (Class 6 or higher, 4GB-32GB) into the designated slot on the DVR camera. Ensure the card is inserted correctly until it clicks into place. The device supports continuous loop recording and emergency event recording.
2. Montaż kamery
- Attach the car mount to the windshield in a position that does not obstruct your view.
- Securely attach the DVR camera to the car mount.
- Adjust the camera angle to ensure both lenses capture the desired view (front and interior/side). The dual lenses are 180-degree rotatable.
3. Podłączenie zasilania
Connect the car charger to the DVR camera's power input and plug the other end into your vehicle's 12V power outlet (cigarette lighter socket). The camera will typically power on automatically when the vehicle starts and power off when the vehicle is turned off.
4. Podłączenie modułu GPS (opcjonalnie)
Connect the external GPS module to the designated GPS port on the DVR camera. This enables GPS logging, recording location data along with video footage.
Instrukcja obsługi
Włączanie/wyłączanie zasilania
- Automatyczny: The camera powers on and starts recording automatically when the car engine starts. It powers off automatically when the engine is turned off.
- Manual: Aby ręcznie włączyć lub wyłączyć urządzenie, naciśnij i przytrzymaj przycisk zasilania.
Tryby nagrywania
- Nagrywanie w pętli: The camera continuously records video in segments. When the memory card is full, it automatically overwrites the oldest unlocked footage.
- Nagrywanie awaryjne (czujnik G): The built-in G-Sensor detects sudden impacts or collisions. In such an event, the current video segment is automatically locked and protected from being overwritten.
Nawigacja po menu
Use the control buttons located on the device to navigate through the menu options on the 2.0" TFT LCD screen. Adjust settings such as video resolution, date/time stamp, language (English, Chinese, Japanese, Russian), and G-Sensor sensitivity.
Odtwarzanie nagranego dźwięku
- Stop recording if currently active.
- Enter playback mode via the menu.
- Wybierz żądany film file for playback on the device screen.
- Alternatively, remove the Micro SD card and insert it into a computer to view files.
Ochrona hasłem
The device supports password protection to prevent unauthorized access to recordings. Refer to the on-screen menu for setting up and managing this feature.
Konserwacja
- Czyszczenie: Use a soft, dry cloth to clean the camera lenses and screen. Avoid abrasive cleaners or solvents.
- Karta micro sd: Format the Micro SD card regularly (e.g., once a month) to ensure optimal performance and prevent data corruption. Back up important files przed formatowaniem.
- Temperatura: Unikaj wystawiania urządzenia na działanie ekstremalnych temperatur, długotrwałego bezpośredniego światła słonecznego i wysokiej wilgotności.
- Aktualizacje oprogramowania układowego: Sprawdź producenta webokresowo odwiedzaj tę witrynę w celu sprawdzenia dostępności aktualizacji oprogramowania sprzętowego, które poprawią wydajność i dodadzą nowe funkcje.
Rozwiązywanie problemów
| Problem | Możliwa przyczyna / rozwiązanie |
|---|---|
| Kamera się nie włącza. |
|
| Nagrywanie zostaje nieoczekiwanie przerwane. |
|
| Słaba jakość wideo. |
|
| GPS nie działa. |
|
| Akumulator nie trzyma ładunku. |
|
Specyfikacje
| Funkcja | Szczegół |
|---|---|
| Numer modelu | Ubox STV040 |
| Wyświetlacz | 2.0" TFT LCD (960 x 240 pixels) |
| Soczewki | Dual 140-degree A+ wide-angle, 180-degree rotatable |
| Transduktor | CMOS |
| Rozdzielczość wideo | 1280 x 480 @ 30 fps, 640 x 480 @ 30 fps |
| Format wideo | Plik AVI |
| Format obrazu | M-JPG |
| Wizja nocna | Funkcja podglądu na noc w podczerwieni |
| Składowanie | Micro TF (SD HC) card, 4GB-32GB, Class 6 and above |
| GPS | Supports external GPS module |
| G-czujnik | Integrated, supports emergency event recording lock |
| Mikrofon/Głośnik | Zintegrowany |
| Wyjście | CVBS (Video Output) |
| Bateria | 3.7V 700mA Lithium-Polymer battery |
| Zgodność z systemem operacyjnym | Windows 2000/XP/Vista/Windows 7 |
| Obsługiwane języki | English, Chinese, Japanese, Russian |
Gwarancja i wsparcie
Aby uzyskać informacje o gwarancji i pomocy technicznej, zapoznaj się z dokumentacją dołączoną do zakupu lub skontaktuj się ze sprzedawcą. Zachowaj paragon jako dowód zakupu na wypadek roszczeń gwarancyjnych.
For further assistance, you may also visit the official STOGA website (if available) or contact their customer service department.