1. Wprowadzenie
This manual provides detailed instructions for the safe and efficient use of your VIPARSPECTRA 1200W LED Grow Light, Model V1200. Please read this manual thoroughly before installation and operation to ensure optimal performance and plant growth.

2. Informacje dotyczące bezpieczeństwa
- Always disconnect power before installing, cleaning, or performing maintenance.
- Nie należy używać lampy w wilgotnych lub zawilgoconych miejscach.amp conditions. This product is designed for indoor use only.
- Aby zapobiec przegrzaniu, należy zapewnić odpowiednią wentylację wokół lampy.
- Do not look directly into the LED lights when operating, as intense light can cause eye strain. Protective eyewear is recommended.
- Trzymaj lampę z dala od materiałów łatwopalnych.
- Do not attempt to modify or repair the unit yourself. Contact qualified personnel for service.
- Ensure the hanging system is securely installed and can support the weight of the fixture.
3. Zawartość opakowania
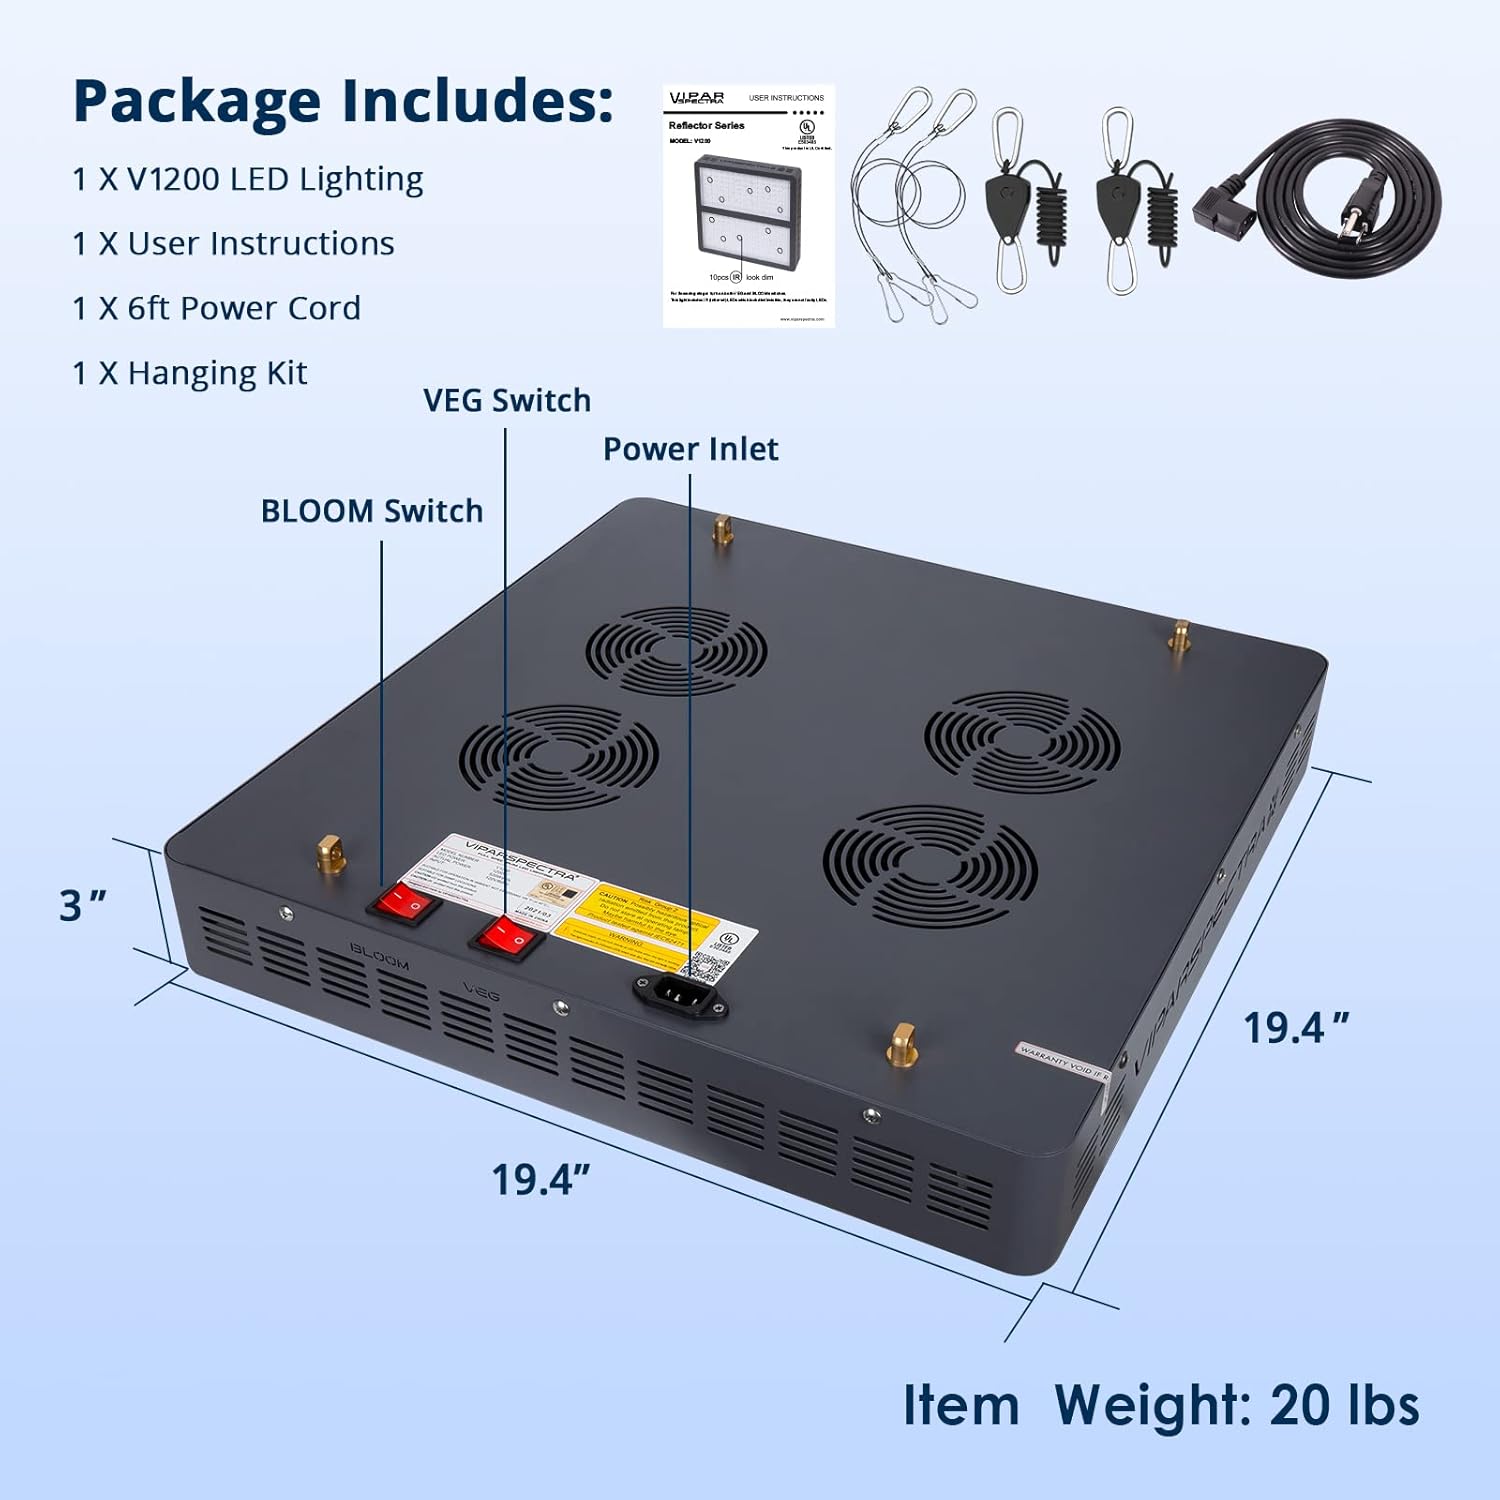
Sprawdź, czy w opakowaniu znajdują się wszystkie elementy:
- 1 x VIPARSPECTRA V1200 LED Grow Light
- 1 x Instrukcja obsługi
- Przewód zasilający 1 x 6 stóp
- 1 x Hanging Kit
4. Funkcje produktu
- Optimal Full Spectrum: Zapewnia zrównoważone spektrum światła odpowiednie dla wszystkich roślin.tages, from vegetative to flowering, mimicking natural sunlight.
- Dual Channel Control: Features independent VEG and BLOOM switches for customized lighting.
- VEG Channel: Primarily blue and white LEDs, ideal for germinating seedlings and promoting early vegetative growth.
- BLOOM Channel: Provides more red wavelengths, crucial for plants during the flowering and fruiting stagt.j.
- Both channels can be used simultaneously for maximum growth performance throughout the plant cycle.
- Efektywne zużycie energii: Replaces traditional 800W HPS/MH lamps while consuming only 520W of actual power.
- Trwała konstrukcja: Built with fire-resistant iron housing and upgraded aluminum cooling heat sinks.
- Zaawansowany system chłodzenia: Equipped with high-speed, quiet fans for effective heat dissipation, maintaining optimal operating temperatures.

5. Konfiguracja i instalacja
- Rozpakuj światło: Carefully remove the grow light and all accessories from the packaging. Inspect for any damage.
- Złóż zestaw do zawieszania: Attach the provided hanging wires to the four corners of the light fixture. Ensure they are securely fastened.
- Zamontuj światło: Hang the light fixture in your grow area using the hanging kit. Ensure the mounting point can safely support the light's weight (approximately 20 lbs). Use the adjustable rope hangers (if included or purchased separately) to set the initial height.
- Podłącz zasilanie: Plug the 6ft power cord into the power inlet on the light fixture, then plug the other end into a standard 120V AC outlet. Ensure the outlet is properly grounded.

6. Działanie
6.1. VEG and BLOOM Switches
The VIPARSPECTRA V1200 features two independent switches to optimize the light spectrum for different plant growth stages:
- VEG Switch: Activates the blue and white LEDs, suitable for the vegetative growth phase (seedlings, clones, and early plant development).
- BLOOM Switch: Activates the red LEDs, ideal for the flowering and fruiting phase, promoting bud and fruit development.
- For maximum growth and yield, both VEG and BLOOM switches can be turned ON simultaneously during the flowering and fruiting stagt.j.
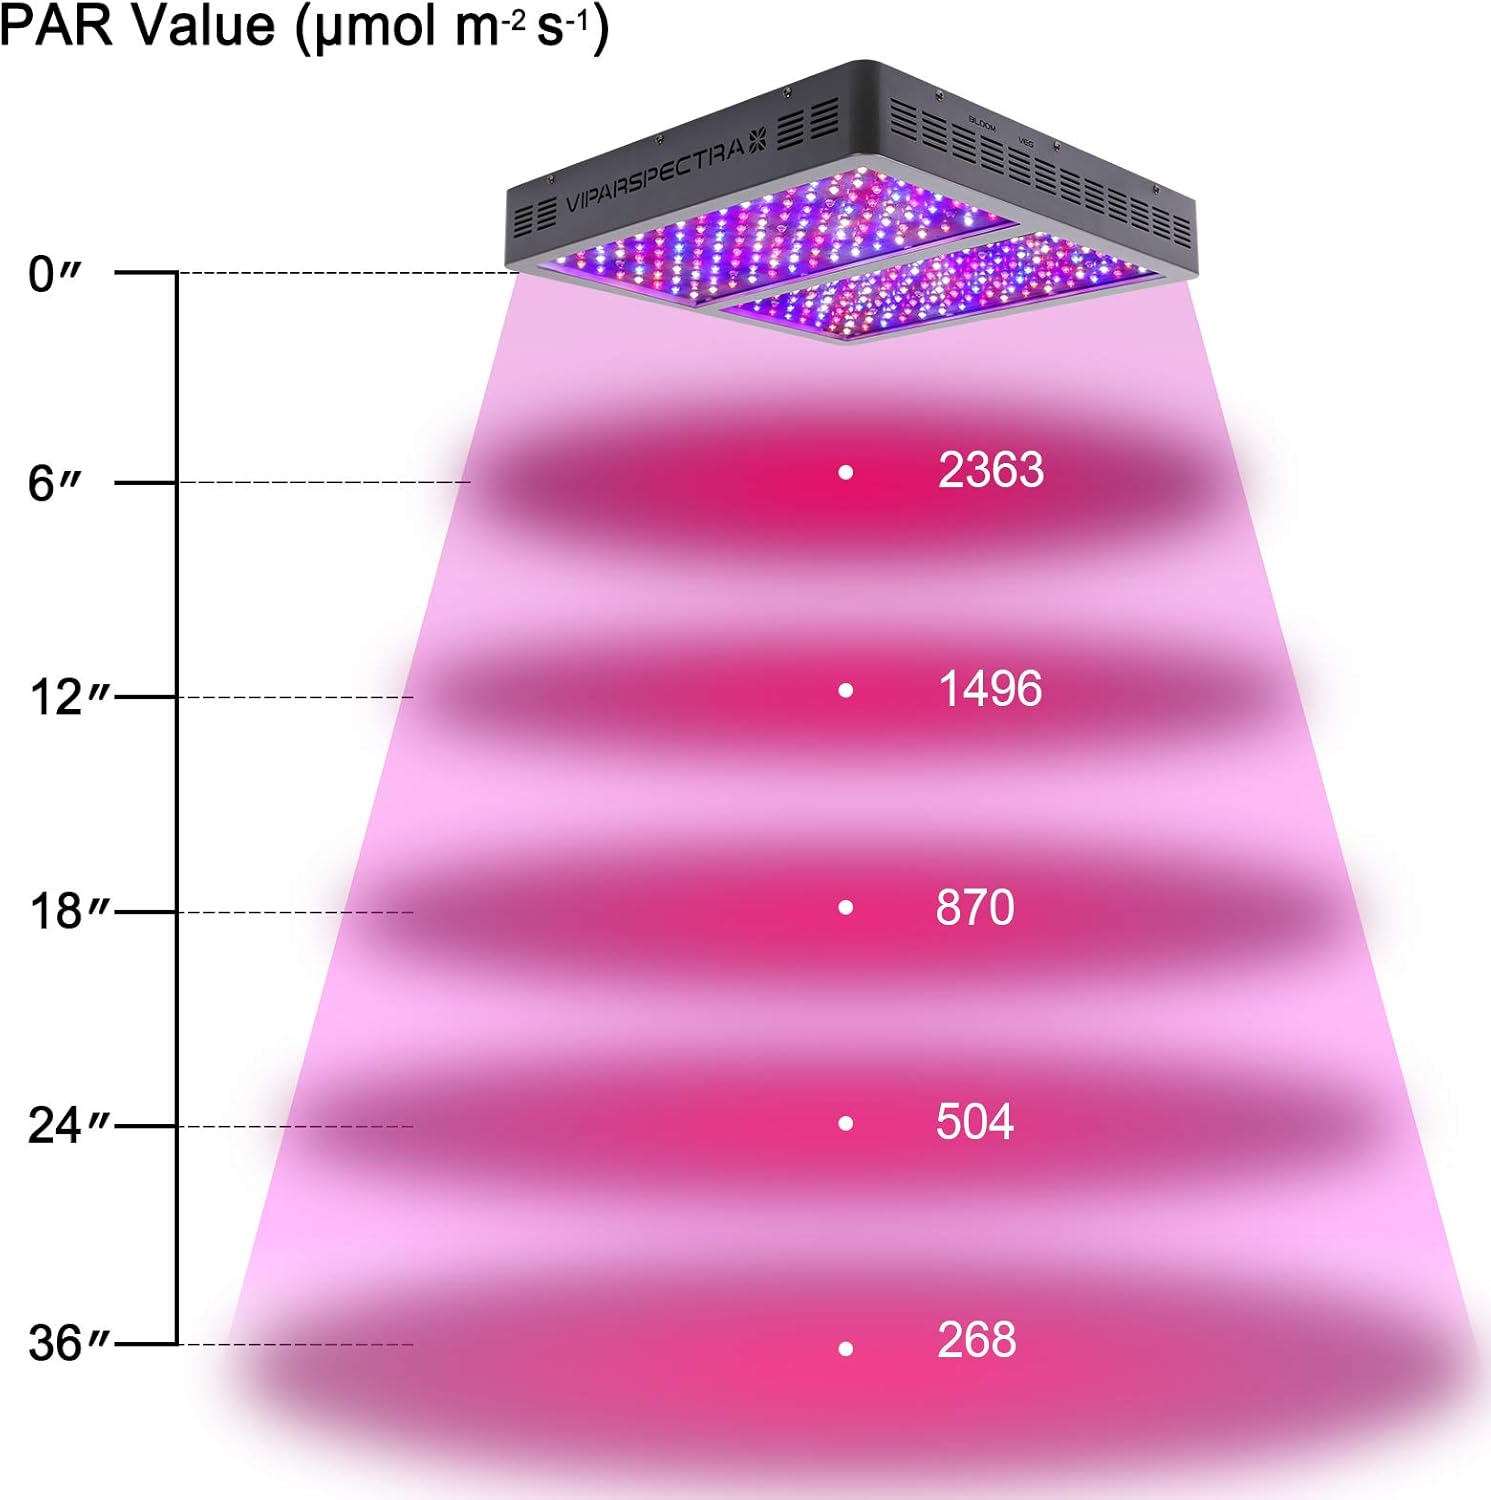
6.2. Recommended Hanging Height and Lighting Schedule
Adjust the hanging height and lighting duration based on your plant's growth stage. Poniżej przedstawiono zalecenia ogólne:
| Wzrost Stage | Wysokość zawieszenia | Harmonogram oświetlenia | Włącza się | Obszar zasięgu |
|---|---|---|---|---|
| Okres aklimatyzacji | 40-44 inches above canopy | 10 godzin włączenia / 14 godzin wyłączenia | VEG ON / BLOOM OFF | Brak |
| Young Vegetative | 36-40 inches above canopy | 12 godzin włączenia / 12 godzin wyłączenia | VEG ON / BLOOM OFF | Brak |
| Wegetatywny Stage | 28-36 inches above canopy | 18 godzin włączenia / 6 godzin wyłączenia | VEG ON / BLOOM ON | 4.5' x 4.5' |
| Kwitnienie Stage | 20-24 inches above canopy | 12 godzin włączenia / 12 godzin wyłączenia | VEG ON / BLOOM ON | 3.5' x 3.5' |
Notatka: Always observe your plants closely and adjust the light height as needed to prevent light stress or stretching. The optimal height can vary based on plant type and environmental conditions.


7. Konserwacja
- Czyszczenie: Ensure the light is unplugged and cool before cleaning. Gently wipe the surface of the LEDs and the fixture with a soft, dry cloth to remove dust and debris. Do not use liquid cleaners directly on the LEDs.
- Wentylacja: Regularly check that the cooling fans are free from obstructions and operating correctly. Ensure adequate airflow around the fixture.
- Kontrola kabla: Periodically inspect the power cord and hanging wires for any signs of wear or damage. Replace immediately if damage is found.
8. Rozwiązywanie Problemów
| Problem | Możliwa przyczyna | Rozwiązanie |
|---|---|---|
| Światło się nie włącza. | No power, loose connection, switch off. | Check power outlet, ensure power cord is securely plugged in, verify VEG/BLOOM switches are ON. |
| Some LEDs appear dim or off. | Infrared (IR) LEDs are not visible to the naked eye. | This is normal for IR LEDs. They are functioning correctly even if they appear off. |
| Światło jest za gorące. | Poor ventilation, obstructed fans. | Ensure adequate airflow around the fixture. Clean any dust or debris from the fans and heat sinks. |
| Plants show signs of stress (e.g., bleaching, burning). | Light is too close to the plants. | Increase the hanging height of the light. Refer to the recommended hanging heights in Section 6.2. |
9. Specyfikacje
| Funkcja | Szczegół |
|---|---|
| Numer modelu | V1200 |
| Marka | VIPARSPEKTRA |
| Rzeczywiste zużycie energii | 520 Watts (approx. 506 watts from specifications) |
| Tomtage | 120 wolty |
| Typ źródła światła | PROWADZONY |
| Liczba źródeł światła | 240 |
| Wymiary produktu (dł. x szer. x wys.) | 19.4" x 19.4" x 3" |
| Waga przedmiotu | 20 funtów |
| Tworzywo | Żelazo, aluminium |
| Funkcja specjalna | VEG & BLOOM Switches |
| Zastosowanie wewnątrz/na zewnątrz | Wnętrz |
| Jasność | 52000 lumenów |
| UPC | 681013748631 |
10. Gwarancja i wsparcie
For warranty information, product support, or technical assistance, please contact VIPARSPECTRA customer service. Refer to the product packaging or the official VIPARSPECTRA webna naszej stronie znajdziesz najnowsze dane kontaktowe.
Zachowaj paragon jako dowód zakupu na wypadek reklamacji.