This manual provides comprehensive instructions for setting up, operating, maintaining, and troubleshooting your Canon PIXMA MX492 Wireless All-in-One Printer. Designed for both home and office environments, this compact printer offers versatile printing, scanning, and copying functionalities, including mobile and tablet printing capabilities.
The Canon PIXMA MX492 is engineered for efficiency and convenience, featuring a small footprint that fits easily into various spaces. It supports wireless connectivity, enabling seamless printing from compatible devices.
Przewodnik po konfiguracji
Follow these steps to set up your Canon PIXMA MX492 printer for the first time.
1. Rozpakowanie i pierwsze rozmieszczenie
Ostrożnie wyjmij drukarkę i wszystkie materiały opakowaniowe z pudełka.
Drukarkę należy ustawić na stabilnej, płaskiej powierzchni, pozostawiając wokół niej odpowiednią ilość miejsca, aby umożliwić wentylację i obsługę papieru.
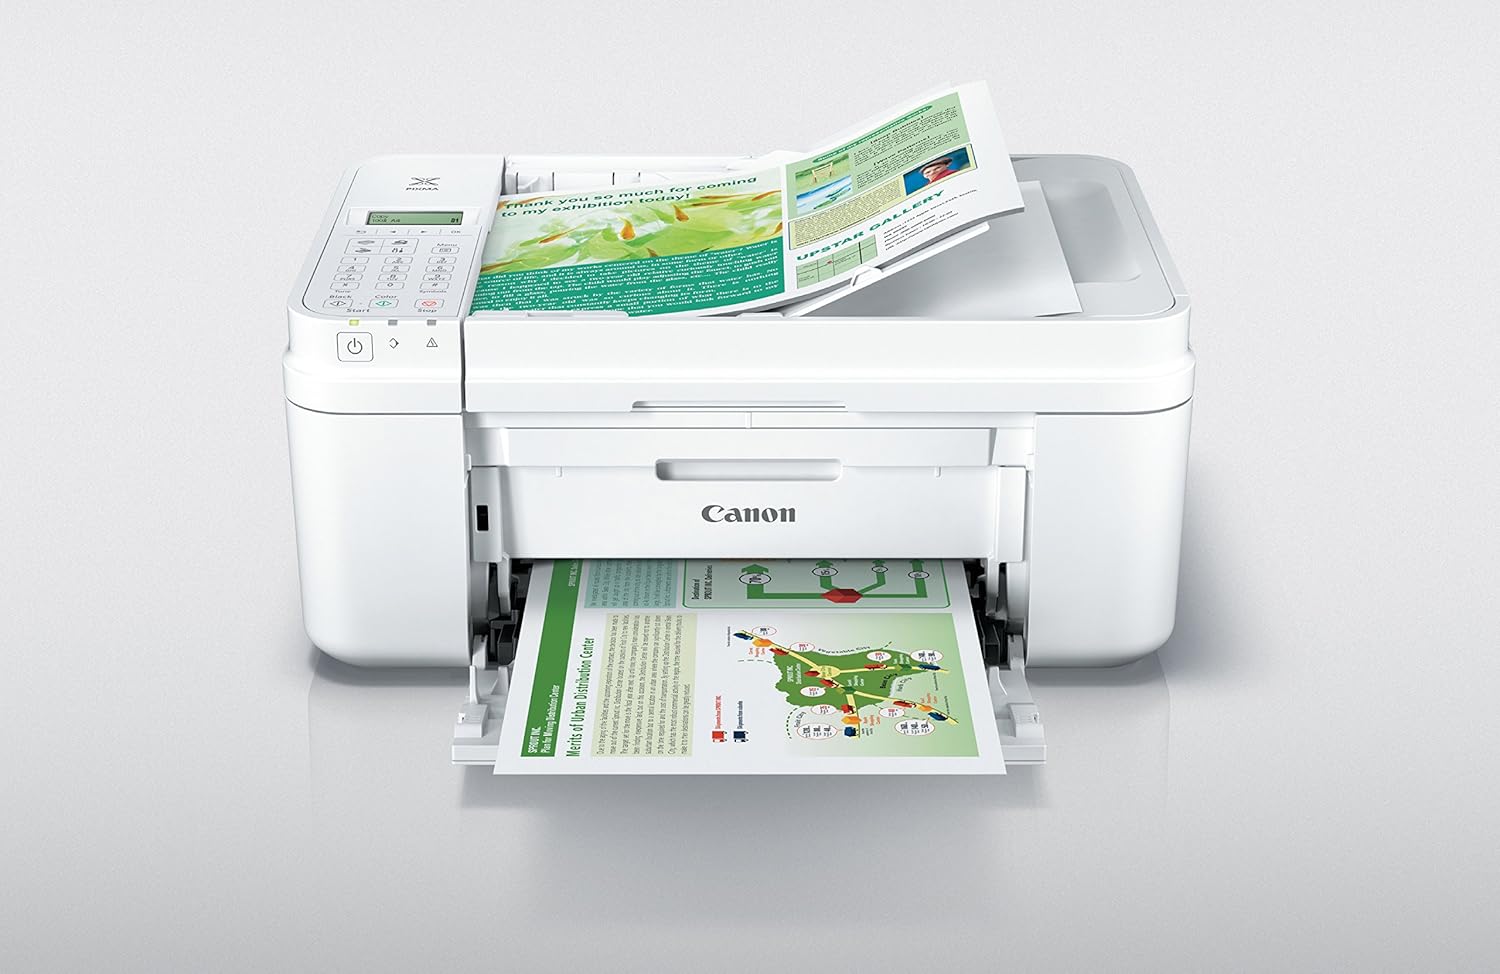
Figure 1: Canon PIXMA MX492 Printer in operation, showing a document being printed.
2. Podłączenie zasilania
Podłącz przewód zasilający do drukarki, a następnie do gniazdka ściennego.
Press the power button to turn on the printer. The power button will be lit green when the printer is on.
3. Instalacja wkładu atramentowego
Open the printer's front cover to access the ink cartridge compartment.
Remove the protective tape from the new ink cartridges.
Insert the color and black ink cartridges into their respective slots until they click into place.
Zamknij przednią pokrywę.
4. Wireless Network Setup (Android Device)
This video demonstrates how to set up your Canon PIXMA MX492 printer on a wireless network using an Android device via the cableless setup method.
Video: Detailed guide on setting up the Canon PIXMA MX492 printer wirelessly with an Android device. This video covers initial power-on, navigating the printer's LCD screen, selecting cableless setup, and connecting to your wireless network via the Canon PRINT app.
Ensure your printer is powered on. If the LCD screen is blank, press the Copy button.
Navigate the printer's menu to find the Wireless LAN Setup option.
Select 'Cableless setup' and follow the on-screen prompts.
Download and open the Canon PRINT app on your Android device from the Google Play Store.
Within the app, select 'Add printer' and follow the instructions to connect your printer to your wireless network.
Rycina 2: Przód view of the Canon PIXMA MX492, showcasindzięki kompaktowej i eleganckiej konstrukcji.
Instrukcja obsługi
The Canon PIXMA MX492 offers various functions including printing, scanning, and copying. Below are general guidelines for operating your device.
1. Ładowanie papieru
Open the paper support and pull out the paper output tray.
Load paper into the rear tray with the print side facing up. Adjust the paper guides to fit the paper size.
Rysunek 3: Góra view of the printer with paper loaded in the rear tray, ready for printing.
2. Drukowanie z komputera
Ensure the printer drivers are installed on your computer (PC or Laptop).
From your application, select 'Print' and choose the Canon MX492 as your printer.
Adjust print settings (e.g., paper size, print quality) as needed and click 'Print'.
3. Mobile and Tablet Printing (AirPrint & Google Cloud Print)
The PIXMA MX492 supports wireless printing from compatible mobile devices, including iPhone, iPad, iPod touch via AirPrint, and Android devices via Google Cloud Print or the Canon PRINT app.
Video: Demonstrates the ease of use of Canon AirPrint with PIXMA printers, highlighting wireless printing capabilities from Apple devices.
For AirPrint: Ensure your Apple device is connected to the same Wi-Fi network as the printer. Open the app you want to print from, tap the share icon or print icon, select your printer, and print.
For Google Cloud Print: Register your printer with Google Cloud Print. From your Android device or Chromebook, select 'Print' and choose your registered printer.
Using Canon PRINT app: Open the app, select the document or photo you wish to print, and follow the in-app instructions.
4. Skanowanie dokumentów
Place the document face-down on the scanner glass or use the Automatic Document Feeder (ADF) for multiple pages.
From your computer, open the Canon scanning software or use the Canon PRINT app on your mobile device.
Select scan settings (e.g., document type, resolution) and initiate the scan.
5. Kopiowanie dokumentów
Umieść dokument na szybie skanera lub w podajniku ADF.
Na panelu sterowania drukarki wybierz opcję „Kopiuj”.
Adjust settings such as number of copies or copy quality using the printer's small LCD display and buttons.
Press the Black or Color Start button to begin copying.
Rycina 4: Przód view of the Canon PIXMA MX492 with the paper output tray extended, ready for use.
Konserwacja
Regularna konserwacja zapewnia optymalną wydajność i długowieczność drukarki.
1. Wymiana wkładu atramentowego
When an ink cartridge is low or empty, a message will appear on the printer's LCD or your computer screen.
Ensure the printer is on. Open the front cover.
Naciśnij zakładkę na pustym wkładzie, aby go zwolnić, a następnie wyjmij go.
Unpack a new Canon ink cartridge, remove the protective tape, and insert it firmly into the correct slot until it clicks.
Close the front cover. The printer will perform an alignment.
2. Czyszczenie drukarki
Zewnętrzny: Przetrzyj zewnętrzną część drukarki miękką, miękką szmatką.amp, lint-free cloth. Avoid using abrasive cleaners.
Szyba skanera: Delikatnie użyj miękkiej, niestrzępiącej się szmatki dampDo czyszczenia szyby skanera należy użyć środka do czyszczenia szyb (bez amoniaku).
Wyrównanie głowicy drukującej: If print quality degrades (e.g., streaky prints, misaligned text), perform a print head alignment from the printer's maintenance menu or through the printer driver on your computer.
Kontrola dyszy: Periodically perform a nozzle check to ensure all print head nozzles are firing correctly. If not, perform a print head cleaning.
Rysunek 5: Kątowy view of the Canon PIXMA MX492, illustrating its compact and modern design.
Rozwiązywanie problemów
This section addresses common issues you might encounter with your Canon PIXMA MX492 printer.
Problem
Możliwa przyczyna / rozwiązanie
Drukarka jest offline lub nie została wykryta.
Ensure the printer is powered on and connected to the same Wi-Fi network as your device.
Restart the printer, router, and computer/mobile device.
Check printer settings on your computer to ensure it's not set to 'Use Printer Offline'.
Zacięcia papieru.
Remove all jammed paper carefully, following the printer's on-screen instructions or manual.
Sprawdź, czy papier jest prawidłowo załadowany i nie jest przepełniony.
Użyj papieru odpowiedniego rodzaju i jakości.
Słaba jakość wydruku (smugi, wyblakłe kolory).
Check ink levels and replace empty cartridges.
Perform a nozzle check and print head cleaning/alignment from the printer's maintenance menu.
Ensure you are using genuine Canon ink cartridges.
Small LCD screen is difficult to read.
The printer features a compact LCD display. Ensure adequate lighting in your environment when viewna ekranie.
For complex operations, utilize the Canon PRINT app on your smartphone or the printer driver software on your computer, which offer larger, more detailed interfaces.
The Canon PIXMA MX492 printer comes with a ograniczona gwarancja. For specific details regarding the terms, conditions, and duration of your warranty, please refer to the warranty card included with your product or visit the official Canon support webZachowaj dowód zakupu na wypadek roszczeń gwarancyjnych.
Wsparcie
For further assistance, technical support, or service inquiries, Canon offers 100% US-based Service & Support.
Wsparcie online: Visit the official Canon support website for FAQs, drivers, software downloads, and digital manuals.
Wsparcie telefoniczne: Contact Canon customer service for direct assistance. Refer to the Canon website for current contact numbers and operating hours.
Fora społecznościowe: Engage with other Canon users and experts on official or unofficial forums for tips and solutions.
You can also find additional resources, including a User Manual (PDF) and Installation Manual (PDF), on the product's Amazon page or Canon's official support site.