1. Wprowadzenie
Thank you for choosing the Microlife BP A80 Semi-automatic Upper Arm Blood Pressure Monitor. This device is designed for accurate and reliable measurement of blood pressure in adults. Please read this instruction manual thoroughly before using the device to ensure safe and correct operation. Keep this manual for future reference.
2. Ważne informacje dotyczące bezpieczeństwa
- Jeśli cierpisz na jakiekolwiek schorzenia, przed użyciem tego urządzenia skonsultuj się z lekarzem.
- Nie stawiaj diagnozy ani nie stosuj samoleczenia na podstawie pomiaru ciśnienia krwi. Zawsze skonsultuj się z lekarzem.
- This device is not suitable for use on infants, children, or pregnant women without medical advice.
- Nie należy używać urządzenia w pojeździe będącym w ruchu ani w samolocie.
- Przechowywać urządzenie i jego elementy poza zasięgiem dzieci.
- Use only Microlife-approved cuffs and accessories.
- Avoid strong electromagnetic fields, such as those near mobile phones or microwave ovens, during use.
3. Koniec produktuview
Familiarize yourself with the components of your Microlife BP A80 blood pressure monitor:

Rysunek 1: Microlife BP A80 Blood Pressure Monitor showing the main unit, display, power button, cuff, and inflation bulb.
- Jednostka główna: Contains the electronics and display.
- Wyświetlacz: Shows blood pressure readings (systolic, diastolic, pulse) and other indicators.
- Przycisk zasilania: Służy do włączania i wyłączania urządzenia.
- Mankiet: Applied to the upper arm for measurement.
- Inflation Bulb: Used to manually inflate the cuff.
- Złącze mankietowe: Port on the main unit for connecting the cuff tube.
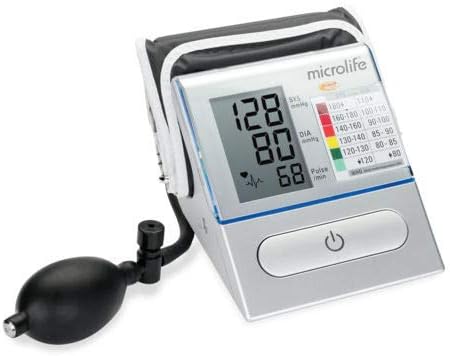
Rysunek 2: Szczegółowy view of the Microlife BP A80 display, highlighting the blood pressure values (systolic, diastolic, pulse) and the integrated WHO blood pressure classification indicator.
4. Konfiguracja
4.1. Instalacja baterii
- Open the battery compartment cover located on the bottom or back of the device.
- Insert four 1.5V AA batteries, ensuring correct polarity (+/-) as indicated inside the compartment.
- Dokładnie zamknij pokrywę komory baterii.
- Jeżeli na wyświetlaczu pojawi się symbol baterii, należy wymienić wszystkie baterie.
4.2. Podłączanie mankietu
- Insert the air tube connector of the cuff firmly into the cuff socket on the left side of the monitor.
- Upewnij się, że połączenie jest solidne, aby zapobiec wyciekaniu powietrza podczas pomiaru.
5. Instrukcja obsługi
5.1. Przed pomiarem
- Unikaj jedzenia, palenia i ćwiczeń przez co najmniej 30 minut przed pomiarem.
- Rest for 5-10 minutes in a quiet environment before taking a measurement.
- Sit comfortably with your back supported and feet flat on the floor. Do not cross your legs.
- Połóż ramię na płaskiej powierzchni tak, aby mankiet znajdował się na wysokości serca.
- Zdejmij obcisłą odzież z ramienia.
5.2. Zakładanie mankietu
- Załóż mankiet na odsłoniętą górną część ramienia, około 2-3 cm nad stawem łokciowym.
- Ensure the artery mark on the cuff aligns with your brachial artery (on the inside of your arm).
- Wrap the cuff snugly around your arm, but not too tightly. You should be able to insert two fingers between the cuff and your arm.
5.3. Wykonywanie pomiaru
- Naciśnij WŁ./WYŁ. button to turn on the monitor. The display will show all segments briefly.
- Once the display shows "0", begin inflating the cuff by repeatedly squeezing the inflation bulb.
- Inflate the cuff until the pressure displayed is about 30 mmHg higher than your usual systolic pressure. If you don't know your usual pressure, inflate to 180-200 mmHg.
- Stop inflating. The device will automatically deflate the cuff slowly and measure your blood pressure.
- Once the measurement is complete, your systolic pressure, diastolic pressure, and pulse rate will be displayed.
- Naciśnij WŁ./WYŁ. button to turn off the device. If you forget, it will automatically shut off after approximately 1 minute.
6. Zrozumienie swoich odczytów
Your blood pressure monitor displays three values:
- Ciśnienie skurczowe (SYS): The top number, indicating the pressure when your heart beats.
- Ciśnienie rozkurczowe (DIA): The bottom number, indicating the pressure when your heart rests between beats.
- Puls: Tętno na minutę.
The Microlife BP A80 also features a WHO (World Health Organization) blood pressure classification indicator on the display, which uses a color scale to help you interpret your readings:
| Kategoria | Skurczowe (mmHg) | Rozkurczowe (mmHg) | Kolor wskaźnika |
|---|---|---|---|
| Optymalny | < 120 | < 80 | Zielony |
| Normalna | 120-129 | 80-84 | Jasnozielony |
| Wysoki Normalny | 130-139 | 85-89 | Żółty |
| Nadciśnienie stopnia 1 | 140-159 | 90-99 | Pomarańczowy |
| Nadciśnienie stopnia 2 | 160-179 | 100-109 | Czerwony |
| Nadciśnienie stopnia 3 | ≥ 180 | ≥ 110 | Ciemnoczerwony |
Note: This classification is a general guideline. Always consult your doctor for interpretation of your blood pressure readings.
7. Konserwacja
7.1. Czyszczenie
- Clean the monitor and cuff gently with a soft, dry cloth.
- W razie potrzeby użyj szmatki delikatnieampened with water or a mild detergent. Do not use abrasive cleaners or solvents.
- Nie zanurzaj urządzenia ani mankietu w wodzie.
7.2. Przechowywanie
- Store the device and cuff in a clean, dry place, away from direct sunlight and extreme temperatures.
- Jeżeli urządzenie nie będzie używane przez dłuższy czas, należy wyjąć baterie, aby zapobiec wyciekowi.
- Unikaj upuszczania i narażania urządzenia na silne uderzenia.
8. Rozwiązywanie Problemów
If you encounter any issues with your Microlife BP A80, please refer to the following table:
| Problem | Możliwa przyczyna | Rozwiązanie |
|---|---|---|
| Urządzenie się nie włącza. | Baterie są rozładowane lub nieprawidłowo włożone. | Wymień baterie na nowe, zwracając uwagę na prawidłową biegunowość. |
| "E1" or "Error" displayed. | Cuff not properly connected or air leakage. | Check cuff connection. Re-apply cuff snugly. |
| "E2" displayed. | Movement during measurement or irregular pulse. | Remain still and quiet during measurement. Repeat measurement after a few minutes. |
| Niespójne odczyty. | Improper cuff placement, incorrect body position, or external factors. | Ensure correct cuff placement and body posture. Avoid talking or moving. Take multiple readings at different times. |
If the problem persists, contact Microlife customer support.
9. Specyfikacje
- Model: BP A80
- Metoda pomiaru: Oscylometryczny
- Zakres pomiarowy:
- Blood Pressure: 20-280 mmHg
- Tętno: 40-200 uderzeń na minutę
- Dokładność:
- Ciśnienie krwi: ±3 mmHg
- Puls: ± 5% odczytu
- Źródło zasilania: 4 baterie AA 1.5 V
- Typ wyświetlacza: LCD
- Wymiary: Approximately 16.5 x 16 x 10 cm (as per package dimensions, actual device may vary slightly)
- Waga: Approximately 600 grams (including batteries, as per package weight)
- Warunki pracy: 10-40 °C (50-104 °F), 15-95% relative humidity non-condensing
- Warunki przechowywania: -20-55 °C (-4-131 °F), 15-95% relative humidity non-condensing
- Międzynarodowy kod artykułu (EAN): 04719003310080
10. Gwarancja i wsparcie
Microlife products are manufactured to the highest quality standards. For detailed warranty information specific to your region, please refer to the warranty card included with your product or visit the official Microlife webstrona.
For technical support, troubleshooting assistance, or to inquire about replacement parts, please contact Microlife customer service. Contact details can typically be found on the Microlife webmiejscu lub na opakowaniu produktu.
Webstrona: www.microlife.com