1. Wprowadzenie
The Mastech MS6612 is a digital luxmeter designed for measuring illuminance. It features a large LCD display with backlight and a bar graph for easy reading. This device offers automatic and manual range switching, data hold, peak value measurement, relative value measurement, and zero calibration functions. It is capable of measuring up to 200,000 Lux or 20,000 Foot-Candles (Fc).
2. Informacje dotyczące bezpieczeństwa
Please read and understand all safety instructions before operating the device. Failure to follow these instructions may result in injury or damage to the meter.
- Do not operate the meter in environments with explosive gas, vapor, or dust.
- Avoid exposing the meter to extreme temperatures or high humidity.
- Aby zapobiec wyciekowi elektrolitu, wyjmij baterie, jeśli miernik nie będzie używany przez dłuższy czas.
- Nie podejmuj prób naprawy ani modyfikacji licznika. Wszelkie prace serwisowe zlecaj wykwalifikowanemu personelowi.
- Utrzymuj miernik w czystości i suchości.
3. Koniec produktuview
The Mastech MS6612 Digital Luxmeter consists of a main unit with an LCD display and control buttons, and a silicon photoelectric diode sensor for light detection.
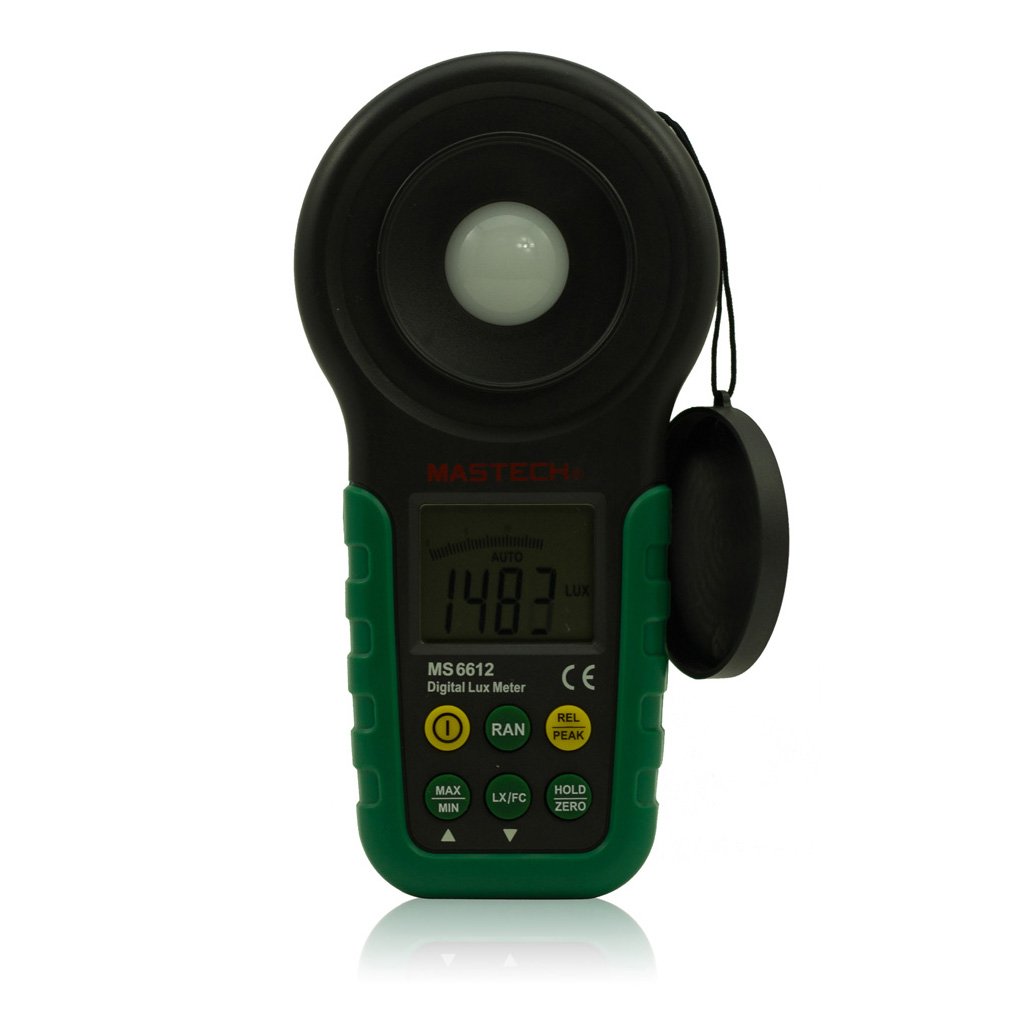
Rysunek 1: Przód view of the Mastech MS6612 Digital Luxmeter. This image shows the main body of the device, including the large LCD screen, control buttons, and the light sensor located at the top.
Kluczowe komponenty:
- Wyświetlacz LCD: 3½ digits with analog bar display for clear readings.
- Przyciski sterujące: For various functions such as power, range, hold, peak, relative, zero, unit conversion, and mute.
- Czujnik światła: Silicon photoelectric diode for accurate light measurement.
- Komora baterii: Located at the rear for a 9V battery.
4. Konfiguracja
4.1 Instalacja baterii
- Znajdź pokrywę komory baterii znajdującą się z tyłu miernika.
- W razie potrzeby otwórz komorę baterii za pomocą śrubokręta.
- Insert one 9V (IEC 6LR61) battery, observing the correct polarity (+/-).
- Załóż pokrywę komory baterii i zabezpiecz ją.
Uwaga: Gdy bateria wymaga wymiany, na wyświetlaczu pojawi się wskaźnik niskiego poziomu naładowania baterii.
5. Instrukcja obsługi
5.1 Włączanie/wyłączanie zasilania
- Naciśnij MOC przycisk, aby włączyć miernik.
- Naciśnij MOC button again to turn the meter off.
- The meter features an automatic power-off function, which will turn off the device if no keys are operated for more than 10 minutes.
5.2 Pomiar podstawowy
- Włącz miernik.
- Point the light sensor towards the light source to be measured.
- The illuminance value will be displayed on the LCD. The meter automatically selects the appropriate range.
5.3 Range Switching (Auto/Manual)
The MS6612 supports both automatic and manual range switching.
- In auto-ranging mode, the meter automatically selects the best measurement range.
- Naciśnij RANGE button to switch between auto and manual ranging modes. In manual mode, you can cycle through available ranges.
- If the measured value exceeds the current range in manual mode, the LCD will display "OL" (Overload).
5.4 Funkcja zatrzymania danych
Aby zamrozić aktualny odczyt na wyświetlaczu:
- Naciśnij TRZYMAĆ button. The "HOLD" indicator will appear on the display.
- Naciśnij TRZYMAĆ Naciśnij przycisk ponownie, aby zwolnić wstrzymane dane i wznowić pomiary na żywo.
5.5 Maximum/Minimum Value Measurement
Do view the maximum or minimum illuminance recorded during a measurement session:
- Naciśnij MAKS./MIN. button. The display will show the maximum recorded value.
- Naciskać MAKS./MIN. again to cycle to the minimum recorded value.
- Naciskać MAKS./MIN. a third time to exit this mode and return to live measurement.
5.6 Peak Value Measurement
This function captures the highest instantaneous illuminance value.
- Naciśnij SZCZYT button to activate peak measurement. The "PEAK" indicator will appear.
- The display will show the highest illuminance detected since activating the function.
- Naciskać SZCZYT ponownie, aby wyjść z tego trybu.
5.7 Relative Value Measurement
This function allows you to set a reference point and measure the difference from that point.
- In a stable light environment, press the REL button. The current reading becomes the reference, and the display will show "0".
- Subsequent measurements will show the difference (positive or negative) from this reference value.
- Naciskać REL again to exit relative measurement mode.
5.8 Zero Calibration Function
To ensure accuracy, especially in low light conditions, perform a zero calibration.
- Place the light sensor in a completely dark environment (e.g., cover it with an opaque cap).
- Naciśnij ZERO button. The display should read "0.00".
- This calibrates the meter to account for any residual sensor output in darkness.
5.9 Unit Conversion (Fc/Lux)
The meter can display measurements in Lux or Foot-Candles (Fc).
- Naciśnij JEDNOSTKA button to toggle between Lux and Fc units.
- The selected unit will be indicated on the LCD.
- Konwersja: 1 Fc = 10.764 Lux; 1 Lux = 0.09290 Fc.
5.10 Touch Tone and Mute Function
The meter may emit a touch tone when buttons are pressed. This can be muted.
- Refer to the specific button on your device for muting the touch tone.
6. Konserwacja
6.1 Czyszczenie
- Wytrzyj licznikasing z miękkim, damp ściereczka. Nie należy używać środków czyszczących o właściwościach ściernych ani rozpuszczalników.
- Keep the light sensor clean and free from dust or smudges to ensure accurate readings. Use a soft, lint-free cloth.
6.2 Wymiana baterii
Replace the 9V battery when the low battery indicator appears on the display. Follow the steps in Section 4.1 for battery installation.
6.3 Przechowywanie
- If storing the meter for an extended period, remove the battery to prevent leakage and potential damage.
- Przechowuj miernik w chłodnym i suchym miejscu, z dala od bezpośredniego światła słonecznego i ekstremalnych temperatur.
7. Rozwiązywanie Problemów
| Problem | Możliwa przyczyna | Rozwiązanie |
|---|---|---|
| Miernik się nie włącza. | Rozładowana lub nieprawidłowo zainstalowana bateria. | Check battery polarity, replace battery. |
| "OL" displayed on screen. | Measurement value exceeds current range (manual mode). | Switch to a higher range or enable auto-ranging. |
| Niedokładne odczyty. | Dirty sensor, uncalibrated zero, or incorrect range. | Clean sensor, perform zero calibration, ensure correct range. |
| Wskaźnik niskiego poziomu naładowania baterii. | Bateria jest słaba. | Wymień baterię 9V. |
8. Specyfikacje
| Parametr | Wartość |
|---|---|
| Zakresy pomiarowe | 20, 200, 2000, 20000, 200000 Lux 20, 200, 2000, 20000 Fc |
| Wyświetlacz | 3½ digits, max reading of 1999, with analog bar display |
| Transduktor | Silicon photoelectric diode |
| Measured Spectral Range | 320~730nm |
| Sampling Oceń | ≥2 times/s |
| Temperatura pracy | -10~50 °C, max 80% RH (Non-Condensed) |
| Temperatura przechowywania | -10~50 °C, max 80% RH (Non-Condensed, removing batteries) |
| Środowisko operacyjne | Do użytku wewnątrz pomieszczeń |
| Wysokość | 2000m highest |
| Zasilacz | 1 x 9V, IEC 6LR61 battery |
| Żywotność baterii | Około 200 godzin |
| Wymiary (wys. x szer. x gł.) | 190 mm x 89 mm x 42.5 mm (7.48 x 3.50 x 1.67 cala) |
| Waga (bez baterii) | Około. 360 g (12.7 oz) |
| Waga (z bateriami) | Około. 420 g (14.8 oz) |
Illuminance Unit Conversion:
- 1 Foot-Candle (Fc) = 10.764 Lux
- 1 Lux = 0.09290 Foot-Candle (Fc)
9. Gwarancja i wsparcie
Mastech products are designed for reliability and performance. For specific warranty information, please refer to the warranty card included with your purchase or visit the official Mastech website. For technical support or service inquiries, please contact Mastech customer service through their official channels.
Proszę zachować paragon jako dowód zakupu na wypadek reklamacji.