1. Ważne informacje dotyczące bezpieczeństwa
Aby zmniejszyć ryzyko pożaru, porażenia prądem lub obrażeń ciała podczas korzystania z urządzenia, należy przestrzegać poniższych podstawowych środków ostrożności:
- Przed użyciem urządzenia należy przeczytać całą instrukcję.
- Przed użyciem urządzenie musi zostać prawidłowo zainstalowane i umieszczone zgodnie z Instrukcją instalacji.
- Nie pozwalaj dzieciom wspinać się, stawać ani wieszać na półkach urządzenia. Mogą uszkodzić urządzenie i doznać poważnych obrażeń.
- Nie przechowuj ani nie używaj benzyny ani innych łatwopalnych oparów i cieczy w pobliżu tego i jakiegokolwiek innego urządzenia.
- Odłącz urządzenie od prądu przed czyszczeniem lub naprawą.
- Jeśli przewód zasilający jest uszkodzony, musi zostać wymieniony przez producenta, jego przedstawiciela serwisowego lub podobnie wykwalifikowaną osobę, aby uniknąć zagrożenia.
- Zapewnij odpowiednią wentylację wokół urządzenia.
2. Koniec produktuview
The Midea WHS-169SE is a compact beverage cooler designed for efficient storage of up to 138 cans. It features a sleek design with a stainless steel door and handle.
Główne cechy:
- See-through glass door, stainless steel handle, single door, door open alarm
- Wyświetlacz temperatury LED
- Światło wewnętrzne
- Półki szklane
Składniki:
The cooler includes a main cabinet, a reversible stainless steel door with a glass panel, a stainless steel handle, multiple glass shelves for organizing beverages, an internal LED light, and a control panel with an LED temperature display.
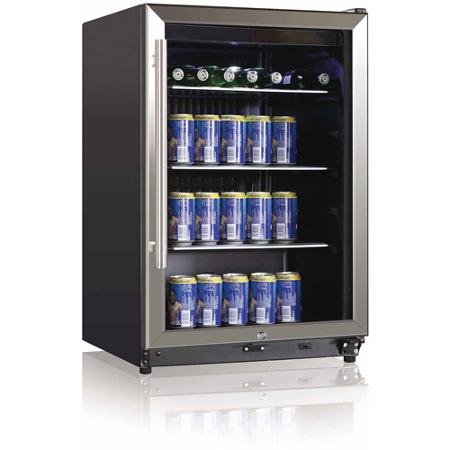
Obraz: Przód view of the Midea WHS-169SE 138-Can Beverage Cooler, showcasinze stalowym wykończeniem i szklanymi drzwiami.
3. Konfiguracja i instalacja
Rozpakowywanie:
- Usuń wszystkie materiały opakowaniowe, łącznie z piankową podstawą i taśmą klejącą.
- Inspect the appliance for any damage. Report any damage to your dealer immediately.
- Materiały opakowaniowe należy przechowywać w miejscu niedostępnym dla dzieci.
Umieszczenie:
- Place the cooler on a flat, solid surface strong enough to support it when fully loaded.
- Aby zapewnić odpowiednią cyrkulację powietrza, należy pozostawić co najmniej 5 cali (12.7 cm) przestrzeni między tylną i boczną ścianą chłodziarki a przyległymi ścianami.
- Avoid placing the cooler in direct sunlight or near heat sources (e.g., oven, radiator).
- This appliance is designed for freestanding installation only.
Niwelacja:
Adjust the leveling legs at the bottom of the cooler to ensure it is stable and level. A level appliance operates more efficiently and prevents the door from swinging open or closing improperly.
Podłączenie elektryczne:
- Plug the appliance into a dedicated, grounded 120 Volt, 60 Hz AC outlet.
- Nie używaj przedłużacza ani wtyczki zasilacza.
- Allow the cooler to stand upright for at least 2-4 hours before plugging it in to allow the refrigerant to settle.
Odwrócenie drzwi:
The door on this appliance is reversible. If you wish to change the door swing direction, refer to the detailed instructions in the separate door reversal guide or contact customer support for assistance. This process typically involves removing hinges and reinstalling them on the opposite side.
4. Instrukcja obsługi
Początkowe uruchomienie:
After plugging in the appliance, allow it to operate for approximately 2-3 hours before placing beverages inside. This allows the interior to reach the desired temperature.
Kontrola temperatury:
- The cooler features an LED temperature display and control buttons, usually located near the top of the door frame or inside the unit.
- Use the 'Up' and 'Down' arrows or '+' and '-' buttons to adjust the desired temperature.
- The temperature range is typically between 34°F (1°C) and 50°F (10°C).
- The LED display will show the set temperature and then revert to displaying the actual internal temperature.
Wewnętrzne światło:
The interior light can be turned on or off using a dedicated button on the control panel. This light helps illuminate the contents of the cooler.
Ładowanie chłodziarki:
- Arrange beverages on the glass shelves to allow for proper air circulation.
- Avoid overloading the shelves, as this can impede cooling performance.
- Ensure the door closes completely after each use to maintain temperature. The door open alarm will sound if the door is left ajar.
5. Pielęgnacja i konserwacja
Czyszczenie:
- Wnętrze: Unplug the appliance. Wash the interior surfaces with a solution of warm water and baking soda (2 tablespoons of baking soda to 1 quart of water). Rinse and dry thoroughly.
- Zewnętrzny: Clean the exterior with a mild detergent and warm water. Wipe dry with a soft cloth. For stainless steel surfaces, use a stainless steel cleaner.
- Uszczelka drzwi: Aby zapewnić szczelność, należy regularnie czyścić uszczelkę drzwi.
- Do not use harsh chemicals, abrasive cleaners, or scouring pads, as they can damage surfaces.
Rozmrażanie:
This appliance is designed with an automatic defrost system. Frost on the evaporator will melt during the compressor's off cycle and drain into a drip tray at the back of the unit, where it evaporates. Manual defrosting is generally not required.
Przerwa w zasilaniu:
W przypadku awarii zasilaniatage. Trzymaj drzwi zamknięte, aby utrzymać temperaturę wewnętrzną tak długo, jak to możliwe. Unikaj otwierania drzwi bez potrzeby.
Vacation and Storage:
- Krótkie wakacje: Leave the cooler operating.
- Długie wakacje/przechowywanie: Remove all contents, unplug the appliance, clean it thoroughly, and leave the door slightly ajar to prevent odors and mold growth.
6. Rozwiązywanie Problemów
Przed skontaktowaniem się z obsługą klienta ponownieview następujące typowe problemy i rozwiązania:
| Problem | Możliwa przyczyna | Rozwiązanie |
|---|---|---|
| Urządzenie nie działa | Not plugged in; circuit breaker tripped; temperature control set to 'OFF' or too high. | Ensure plug is secure; reset circuit breaker; adjust temperature setting. |
| Temperatura nie jest wystarczająco niska | Door opened too frequently; door not closed completely; warm beverages added; poor ventilation; excessive frost. | Minimize door openings; ensure door seals; allow warm beverages to cool before loading; ensure proper clearance around unit; check for frost buildup. |
| Vibrations or excessive noise | Appliance not level; loose parts; contact with wall. | Adjust leveling legs; check for loose components; move appliance away from walls. |
| Drzwi nie zamykają się prawidłowo | Appliance not level; door gasket dirty or damaged; shelves out of position. | Level the appliance; clean or replace gasket; reposition shelves. |
| Światło wewnętrzne nie działa | Wyłącznik światła wyłączony; awaria żarówki LED. | Ensure light switch is on; contact service for bulb replacement. |
7. Specyfikacje
Detailed technical specifications for the Midea WHS-169SE beverage cooler:
| Specyfikacja | Wartość |
|---|---|
| Marka | Midea |
| Numer modelu | WHS-169SE |
| Pojemność | 4.9 Cubic Feet / 138 Cans |
| Kolor | Czarny |
| Typ instalacji | Wolnostojące |
| Liczba drzwi | 1 |
| Tomtage | 120 wolty |
| Rodzaj wykończenia | Stal nierdzewna |
| Rodzaj materiału drzwi | Stal nierdzewna |
| Typ półki | Półki szklane |
| Metoda chłodzenia | Kompresor |
| Orientacja drzwi | Odwracalny |
| Waga przedmiotu | 97 funtów |
| UPC | 814982016535 |
8. Informacje o gwarancji
This Midea appliance comes with a comprehensive warranty:
- Pełna 1-letnia gwarancja: Covers parts and labor for the entire appliance for one year from the date of purchase.
- Compressor 2-Year Warranty: Covers the compressor for two years from the date of purchase.
Please retain your proof of purchase for warranty claims. For full terms and conditions, refer to the warranty card included with your product or visit the Midea official webstrona.
9. Obsługa klienta
If you have any questions, require technical assistance, or need to schedule service, please contact Midea Customer Support:
- Skorzystaj z danych kontaktowych znajdujących się na opakowaniu produktu.
- Odwiedź oficjalną stronę Midea webwitryna zawierająca zasoby pomocy technicznej, odpowiedzi na często zadawane pytania i dane kontaktowe.
- When contacting support, please have your model number (WHS-169SE) and serial number ready.