
1. Koniec produktuview
The RioRand 0.56" Blue LED Digital Voltmeter is a compact device designed for measuring DC voltage in a range of 0 to 99.9V. It features a bright blue LED display for clear readings and is suitable for various applications, including automotive and DIY electronics projects. This manual provides essential information for the proper installation, operation, and maintenance of your voltmeter.

Image 1: The RioRand 0.56" Blue LED Digital Voltmeter displaying a voltage reading of 19.8V.
2. Specyfikacje
| Funkcja | Specyfikacja |
|---|---|
| Zakres pomiaru | Prąd stały 0–99.9 V |
| Objętość zasilaniatage | DC 5 - 28V (required for meter operation) |
| Cutting Size (Panel Mount) | 45.5 x 26.5mm (approx. 1.79 x 1.04 inches) |
| Wymiary całkowite | 48 x 29 x 21 mm (ok. 1.89 x 1.14 x 0.83 cala) |
| Typ wyświetlacza | Three 0.56" LED digital tubes |
| Kolor wyświetlacza | Niebieski |
| Częstotliwość odświeżania | Około 500 ms |
| Dokładność pomiaru | 1% (+/- 1 digit) |
| Waga przedmiotu | Około 0.353 uncji (10 g) |
| Numer modelu | RRQWEUAAQAQAO |
3. Konfiguracja i instalacja
Before installation, ensure all power sources are disconnected to prevent electrical shock or damage to the device. The voltmeter requires a DC power supply between 5V and 28V to operate. It has three wires for connection:
- Czerwony przewód: Positive terminal for the meter's power supply (DC 5-28V).
- Czarny przewód: Common ground for both the meter's power supply and the voltage jest mierzony.
- Yellow/White Wire: Positive terminal for the voltage input to be measured (DC 0-99.9V).
Konfiguracje okablowania:
- Self-Powered (Shared Source, 5V-28V Measurement):
Jeśli objętośćtage you wish to measure is between 5V and 28V, and you want to use this voltage to power the meter itself:- Połącz Czerwony przewód to the positive (+) of the voltagŹródło.
- Połącz Yellow/White Wire to the positive (+) of the voltagŹródło.
- Połącz Czarny drut to the negative (-) of the voltagŹródło.
- Separately Powered (Any 0V-99.9V Measurement):
Jeśli objętośćtage you wish to measure is outside the 5V-28V range (e.g., below 5V or above 28V up to 99.9V), or if you prefer to isolate the meter's power:- Połącz Czerwony przewód to the positive (+) of a separate DC 5-28V power supply.
- Połącz Czarny drut to the negative (-) of the separate DC 5-28V power supply.
- Połącz Yellow/White Wire to the positive (+) of the voltagŹródło, które chcesz zmierzyć.
- Ensure the negative (-) of the voltage source you want to measure is also connected to the Czarny drut (common ground).
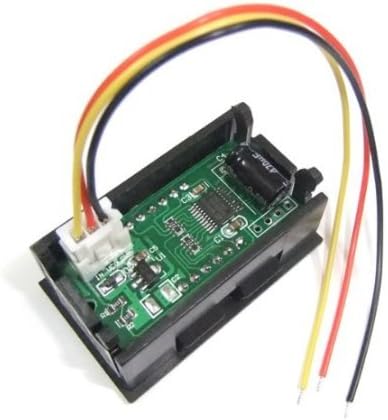
Obraz 2: Tył view of the voltmeter showing the wiring connections. The red, black, and yellow/white wires are visible, connected to the circuit board.
Montaż panelowy: The voltmeter is designed for panel mounting. Cut an opening of approximately 45.5 x 26.5mm (1.79 x 1.04 inches) in your panel. Insert the voltmeter into the opening and secure it if necessary (mounting clips or screws are not typically included and may need to be sourced separately).
Ostrzeżenie: Always observe correct polarity when connecting the wires. Incorrect wiring can damage the voltmeter or the power source. Do not exceed the maximum input voltage of 99.9V for measurement or 28V for the meter's power supply.
4. Instrukcja obsługi
Once properly wired and powered, the voltmeter will automatically display the measured DC voltage on its blue LED screen. The display updates approximately every 500 milliseconds, providing near real-time readings. No additional configuration or calibration is typically required for basic operation.
- Upewnij się, że objętośćtage being measured is within the 0-99.9V range.
- Readings are displayed with one decimal place (e.g., 12.5V).
5. Konserwacja
The RioRand Digital Voltmeter is a low-maintenance device. Follow these guidelines to ensure its longevity:
- Czyszczenie: Do czyszczenia wyświetlacza i obudowy należy używać miękkiej, suchej ściereczki.asing. Unikaj środków czyszczących o właściwościach ściernych i rozpuszczalników.
- Środowisko: Trzymaj urządzenie z dala od nadmiernej wilgoci, kurzu i ekstremalnych temperatur.
- Znajomości: Periodically check wiring connections to ensure they are secure and free from corrosion.
- Składowanie: If storing the voltmeter for an extended period, disconnect it from all power sources and store it in a dry, cool place.
6. Rozwiązywanie Problemów
If you encounter issues with your voltmeter, refer to the following troubleshooting steps:
- No Display / Voltmeter Not Turning On:
- Check the power supply to the red and black wires. Ensure it is within the DC 5-28V range and correctly connected with proper polarity.
- Verify that the power source itself is functional.
- Inspect the wires for any breaks or loose connections.
- Incorrect or Erratic Readings:
- Ensure the yellow/white wire is securely connected to the positive terminal of the voltage you wish to measure, and the black wire is connected to its negative/ground.
- Potwierdź, że objętośćtage being measured is within the 0-99.9V range. Voltages outside this range will not be displayed accurately.
- Check for any interference from nearby electrical components.
- Verify the accuracy of your reference voltage source if comparing readings.
- Display Shows '0.0' or '---':
- If '0.0' is displayed, it indicates either no voltage is being measured or the voltage is extremely low. Verify the connection of the yellow/white wire to the voltagŹródło.
- If '---' or a similar error is shown, it might indicate an out-of-range measurement or a connection issue. Recheck all wiring.
7. Gwarancja i wsparcie
Specific warranty information for this product may vary depending on the retailer and region of purchase. Please refer to your purchase documentation or contact the seller directly for details regarding warranty coverage and return policies.
For technical support or further assistance, please contact RioRand customer service or the authorized distributor from whom you purchased the product. When contacting support, please have your product model number (RRQWEUAAQAQAO) and a detailed description of the issue ready.