
1. Koniec produktuview
The HP ProDisplay P17A is a 17-inch LED-backlit LCD monitor designed for general computing tasks. It features a 5:4 aspect ratio with a maximum resolution of 1280 x 1024 pixels, providing clear and consistent visuals. This monitor is equipped with both VGA and HDMI connectivity options, offering versatility for various system configurations. Its compact design and energy-efficient LED backlighting make it suitable for a range of environments.

Rycina 1: Przód view of the HP ProDisplay P17A monitor, showcasinna wyświetlaczu i stojaku.
2. Instrukcje konfiguracji
2.1 Rozpakowywanie monitora
Ostrożnie wyjmij wszystkie elementy z opakowania. Upewnij się, że znajdują się w nim następujące elementy:
- HP ProDisplay P17A Monitor
- Monitor Stand (base and neck)
- Kabel zasilający
- VGA Cable (may vary by region/package)
- Kabel HDMI (może się różnić w zależności od regionu/opakowania)
2.2 Montaż stojaka
- Aby zapobiec porysowaniu, połóż monitor ekranem do dołu na miękkiej i czystej powierzchni.
- Attach the stand neck to the back of the monitor, aligning the tabs and pushing until it clicks into place.
- Attach the stand base to the bottom of the stand neck, securing it with the captive screw if present.
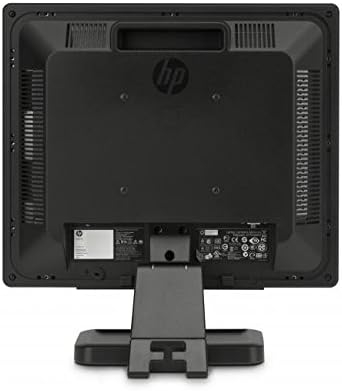
Rysunek 2: Tył view of the monitor, illustrating the stand attachment point and various connectivity ports.
2.3 Kable połączeniowe
- Podłączenie zasilania: Podłącz kabel zasilający do wejścia zasilania monitora, a następnie do uziemionego gniazdka elektrycznego.
- Połączenie wideo:
- For VGA: Connect one end of the VGA cable to the VGA port on the monitor and the other end to the VGA port on your computer. Tighten the screws on the VGA connector.
- For HDMI: Connect one end of the HDMI cable to the HDMI port on the monitor and the other end to the HDMI port on your computer.
- Sprawdź, czy wszystkie połączenia są bezpieczne.
3. Instrukcja obsługi
3.1 Włączanie/wyłączanie
Naciśnij przycisk zasilania znajdujący się na przedniej ramce monitora, aby go włączyć lub wyłączyć. Kontrolka zasilania zaświeci się, gdy monitor jest włączony.
3.2 Regulacja ustawień wyświetlania (menu OSD)
The On-Screen Display (OSD) menu allows you to adjust various monitor settings. Use the buttons on the front bezel to navigate and select options.
- Przycisk menu: Otwiera menu ekranowe.
- Przyciski nawigacyjne (+ / - or Up/Down): Move through menu options and adjust values.
- Przycisk wyboru/OK: Potwierdza wybór lub przechodzi do podmenu.
- Przycisk wyjścia: Wychodzi z bieżącego menu lub OSD.
Typowe ustawienia regulowane obejmują:
- Jasność/Kontrast: Dostosowuje ogólną jasność i różnicę między obszarami jasnymi i ciemnymi.
- Kontrola koloru: Allows adjustment of color temperature, RGB levels, or preset color modes.
- Wybór wejścia: Manually switches between VGA and HDMI input sources.
- Kontrola obrazu: Adjusts sharpness, aspect ratio, and auto-adjustment for analog signals.
- Kierownictwo: Opcje oszczędzania energii, limit czasu wyświetlania OSD, wybór języka.
4. Konserwacja
4.1 Czyszczenie monitora
- Przed czyszczeniem należy zawsze wyłączyć monitor i odłączyć przewód zasilający.
- Delikatnie użyj miękkiej, niestrzępiącej się szmatki dampCzyścić wodą lub nieściernym środkiem do czyszczenia ekranów.
- Do not spray cleaner directly onto the screen or monitor casing.
- Avoid using benzene, thinner, ammonia-based cleaners, or abrasive materials, as these can damage the surface.
4.2 Ogólna opieka
- Unikaj umieszczania monitora w bezpośrednim świetle słonecznym lub w pobliżu źródeł ciepła.
- Należy zapewnić odpowiednią wentylację wokół monitora.
- Nie blokuj otworów wentylacyjnych.
- Chroń ekran przed ostrymi przedmiotami i nadmiernym naciskiem.
5. Rozwiązywanie Problemów
Przed skontaktowaniem się z pomocą techniczną wypróbuj następujące podstawowe czynności rozwiązywania problemów:
5.1 Brak obrazu na ekranie
- Ensure the monitor's power cable is securely connected to both the monitor and a working electrical outlet.
- Verify the power indicator light on the monitor is on. If not, press the power button.
- Check that the video cable (VGA or HDMI) is securely connected to both the monitor and the computer.
- Ensure the correct input source is selected on the monitor (use the OSD menu to switch inputs).
- Uruchom ponownie komputer.
5.2 Słaba jakość obrazu
- Fuzzy or Blurry Image: Upewnij się, że rozdzielczość wyświetlania na Twoim komputerze jest ustawiona na rozdzielczość natywną monitora (1280 x 1024).
- Nieprawidłowe kolory: Adjust color settings through the OSD menu or your computer's display settings.
- Image Off-Center/Incorrect Size (VGA only): Use the "Auto Adjust" function in the OSD menu.
- Migocący: Check the refresh rate setting on your computer; ensure it is set to 60 Hz.
5.3 Monitor Not Responding to Buttons
- Odłącz kabel zasilający monitora, odczekaj 10 sekund, a następnie podłącz go ponownie i spróbuj jeszcze raz.
- Sprawdź, czy żaden przycisk nie jest zablokowany.
6. Specyfikacje techniczne
| Funkcja | Specyfikacja |
|---|---|
| Marka | HEWLETT PACKARD |
| Nazwa modelu | HP P17A |
| Numer modelu | F4M97AAABA |
| Rozmiar ekranu | 17 cali |
| Typ wyświetlacza | Podświetlany wyświetlacz LCD |
| Rozdzielczość natywna | 1280 × 1024 (SXGA) |
| Proporcje obrazu | 5:4 |
| Współczynnik kontrastu | 1000:1 |
| Częstotliwość odświeżania | 60 Hz |
| Czas reakcji | 5 milisekund |
| Viewing kąt | 170 stopni |
| Łączność | 1x VGA, 1x HDMI |
| Pobór mocy | 25 watów (maksymalnie) |
| Wymiary przedmiotu (gł. x szer. x wys.) | 8.12" gł. x 14.85" szer. x 15.24" wys. |
| Waga przedmiotu | 8.2 funtów |
| Typ montażu | Uchwyt ścienny (zgodny ze standardem VESA) |
| Dodatkowe funkcje | Ekran antyodblaskowy |

Figure 3: Dimensions of the HP ProDisplay P17A monitor.
7. Gwarancja i wsparcie
7.1 Informacje o gwarancji
This product is often sold as a refurbished item. Refurbished products typically come with a limited warranty provided by the refurbisher or seller. Please refer to your purchase documentation for specific warranty terms and conditions, including duration and coverage details.
7.2 Wsparcie techniczne
For technical assistance, troubleshooting beyond this manual, or warranty claims, please contact the vendor or HP customer support. Have your monitor's model number (F4M97AAABA) and serial number ready when contacting support.
You can find additional support resources, drivers, and documentation on the official HP support webstrona.