
1. Wprowadzenie
This manual provides detailed instructions for the setup, operation, and maintenance of your TechniSat DIGITRADIO 51 DAB+ Alarm Clock Radio. Please read this manual thoroughly before using the device to ensure proper functionality and safety.
2. Informacje dotyczące bezpieczeństwa
- Ensure the power adapter is connected to a readily accessible power outlet.
- Nie wystawiaj urządzenia na działanie kapiącej lub pryskającej wody.
- Nie stawiać na urządzeniu przedmiotów wypełnionych płynami, takich jak wazony.
- Unikaj umieszczania urządzenia w pobliżu źródeł ciepła lub w miejscu bezpośrednio nasłonecznionym.
- Używaj wyłącznie zasilacza dostarczonego z urządzeniem.
- Nie próbuj samodzielnie otwierać ani naprawiać urządzenia. Wszelkie prace serwisowe zleć wykwalifikowanemu personelowi.
- Urządzenie należy czyścić wyłącznie suchą, miękką ściereczką.
3. Zawartość opakowania
Sprawdź, czy w opakowaniu znajdują się wszystkie elementy:
- TechniSat DIGITRADIO 51 Alarm Clock Radio (Black)
- Zasilacz
- Wired Antenna
- Instrukcja obsługi
4. Koniec produktuview
4.1 Przód View

Rycina 1: Przód view of the DIGITRADIO 51, featuring the central speaker and the clear LCD display.
4.2 Górny panel sterowania

Figure 2: Top control panel with various buttons for radio functions, alarm settings, and volume control.
- Przycisk DAB/FM: Przełącza między trybami radia DAB+ i FM.
- Presets (1, 2): Zapisuje i przywołuje ulubione stacje radiowe.
- < / > Buttons: Navigates menus or tunes radio frequencies.
- Select/Menu Button: Potwierdza wybór lub umożliwia dostęp do menu.
- Przyciski głośności +/-: Dostosowuje głośność dźwięku.
- Alarm (1, 2) Buttons: Sets and activates Alarm 1 or Alarm 2.
- Przycisk uśpienia: Aktywuje funkcję wyłącznika czasowego.
- Snooze Buttons: Tymczasowo wycisza aktywny alarm.
- Przycisk zasilania: Włącza lub wyłącza urządzenie.
4.3 Połączenia tylne
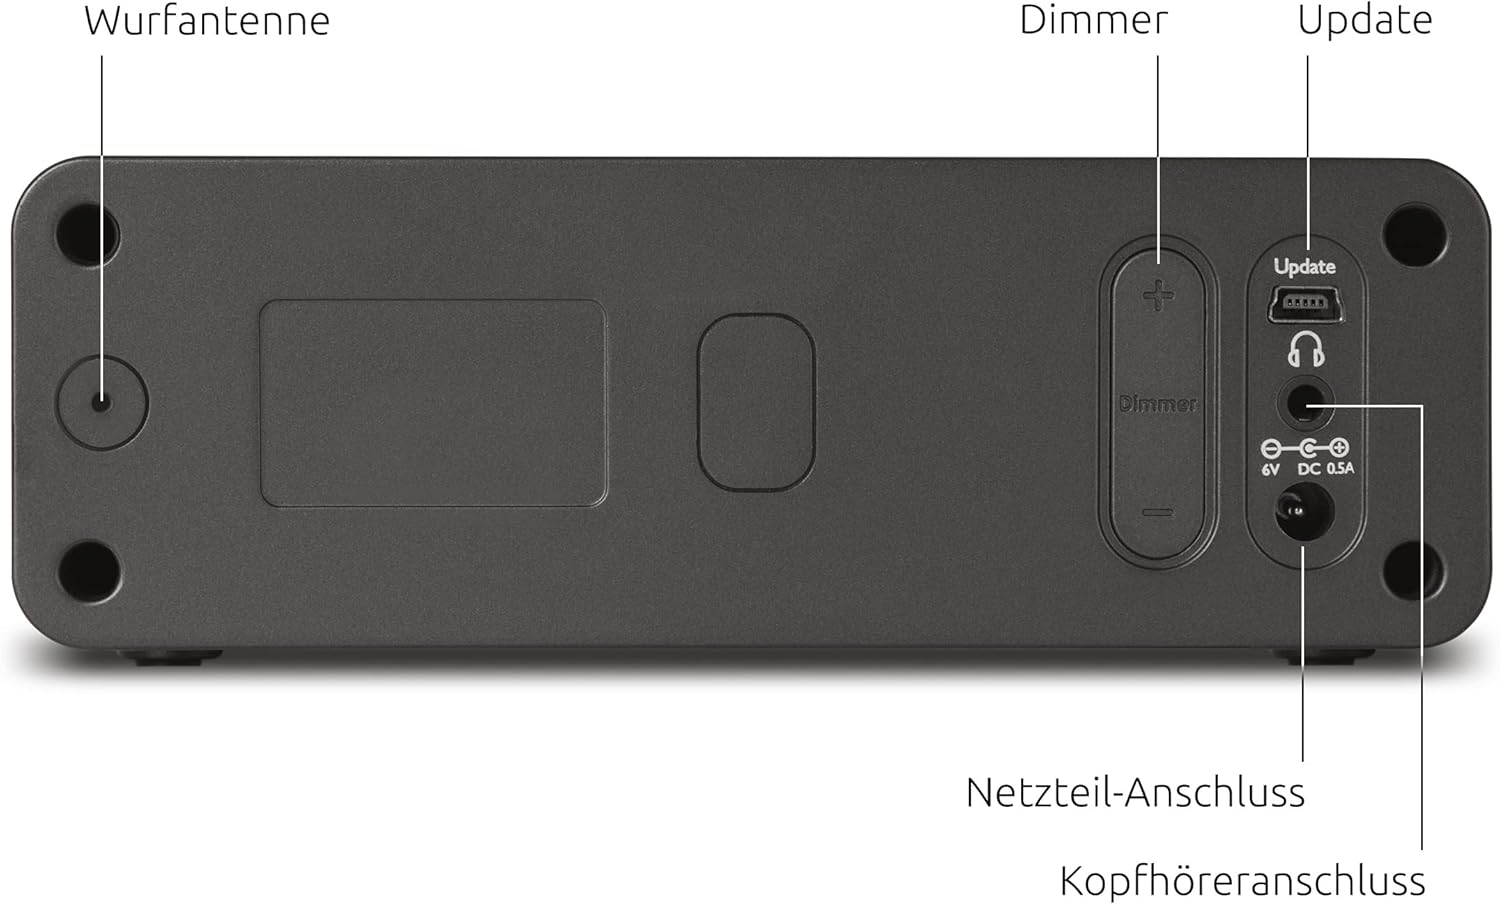
Figure 3: Rear panel connections, including the wired antenna, dimmer controls, USB port for updates, headphone jack, and power input.
- Wired Antenna Input: Connect the supplied wired antenna for optimal radio reception.
- Dimmer Controls (+/-): Adjusts the brightness of the LCD display.
- Update (USB) Port: W celu uzyskania przyszłych aktualizacji oprogramowania sprzętowego.
- Podłączenie słuchawek: Gniazdo 3.5 mm do słuchania w prywatności.
- Podłączenie zasilacza: Connect the external power adapter here.
4.4 Funkcje wyświetlacza

Rysunek 4: Szczegółowy view of the LCD display, highlighting its dimmable feature, time display, and information about the current radio program.
- Możliwość przyciemniania: The display brightness can be adjusted.
- Wyświetlacz czasu: Pokazuje aktualny czas.
- Technologia LCD: Provides clear text and icons.
- Wyświetlacz informacyjny: Shows radio station name, program details, and alarm status.
4.5 Najważniejsze cechyview

Rysunek 5: Koniecview of comfort functions including dual alarm, customizable alarm schedules, sleep timer, and multiple snooze options.
5. Konfiguracja
5.1 Połączenie zasilania
- Connect the power adapter cable to the 'Power Adapter Connection' port on the rear of the radio.
- Plug the power adapter into a standard wall outlet (230V, 50Hz).
5.2 Podłączenie anteny
- Uncoil the wired antenna completely.
- Insert the antenna connector into the 'Wired Antenna Input' on the rear of the radio.
- Position the antenna for optimal reception.
5.3 Initial Power On and Station Scan
- Press the Power button on the top panel to turn on the radio.
- The radio will typically perform an automatic scan for DAB+ stations upon first use. This may take a few minutes.
- The time and date will usually be set automatically via the DAB+ signal.
6. Instrukcja obsługi
6.1 Switching Between DAB+ and FM
Naciśnij DAB/FM button to toggle between DAB+ digital radio and FM analog radio modes.
6.2 Tuning Radio Stations
- Tryb DAB+: Użyj < I > buttons to browse available DAB+ stations. Press Wybierz/Menu aby potwierdzić swój wybór.
- Tryb FM: Użyj < I > buttons to manually tune to FM frequencies. The radio may automatically stop at strong signals.
6.3 Zapisywanie i przywoływanie ustawień wstępnych
- Dostrój żądaną stację radiową.
- Naciśnij i przytrzymaj jeden z Preset (1 or 2) buttons until the display confirms the station has been saved.
- To recall a saved station, simply press the corresponding Preset (1 or 2) naciśnij przycisk krótko.
6.4 Regulacja głośności
Naciśnij Volume + or Tom - buttons to increase or decrease the audio output.
6.5 Ustawianie alarmów
The DIGITRADIO 51 features two independent alarms (Alarm 1 and Alarm 2).
- Naciśnij i przytrzymaj albo Budzik 1 or Budzik 2 przycisk, aby wejść w ustawienia alarmu.
- Użyj < I > buttons to adjust the hour and minute, then press Wybierz/Menu aby potwierdzić każde ustawienie.
- Set the alarm source (DAB, FM, or Buzzer).
- Choose the alarm frequency (Daily, Weekdays, Weekends, or Once).
- Dostosuj głośność alarmu.
- Naciskać Wybierz/Menu aby zapisać ustawienia alarmu.
- Aby aktywować/dezaktywować alarm, naciśnij krótko odpowiedni przycisk. Budzik 1 or Budzik 2 przycisk. Po aktywacji na wyświetlaczu pojawi się ikona alarmu.
6.6 Funkcja drzemki
When an alarm sounds, press any Drzemka button to temporarily silence the alarm for a set period (e.g., 9 minutes). The alarm will sound again after the snooze period.
6.7 Display Dimming
Użyj Ściemniacz + I Ściemniacz - buttons on the rear of the device to adjust the brightness level of the LCD display.
6.8 Wyłącznik czasowy
Wyłącznik czasowy pozwala radiu grać przez ustalony czas, po czym automatycznie się wyłączy.
- Naciśnij Spać przycisk.
- Naciśnij wielokrotnie Spać button to cycle through the available sleep timer durations (e.g., 15, 30, 45, 60, 90 minutes, or Off).
- Radio wyłączy się automatycznie po upływie wybranego czasu.
6.9 Korzystanie ze słuchawek
Connect standard 3.5mm headphones to the 'Headphone Connection' jack on the rear of the device for private listening. The internal speaker will be muted automatically.
7. Konserwacja
7.1 Czyszczenie
- Przed czyszczeniem należy zawsze odłączyć urządzenie od gniazdka elektrycznego.
- Do przecierania powierzchni zewnętrznych należy używać miękkiej, suchej i niepozostawiającej włókien ściereczki.
- Nie należy używać płynnych, ściernych środków czyszczących ani chemicznych sprayów, gdyż mogą one uszkodzić wykończenie lub wewnętrzne elementy.
8. Rozwiązywanie Problemów
| Problem | Możliwa przyczyna | Rozwiązanie |
|---|---|---|
| Brak zasilania / Wyświetlacz wyłączony | Zasilacz nie jest podłączony lub jest uszkodzony. | Check power adapter connection to the radio and wall outlet. Ensure the outlet is functional. |
| No DAB+ or FM reception / Poor sound quality | Antenna not connected or poorly positioned. Weak signal in your area. | Ensure the wired antenna is fully connected and uncoiled. Try repositioning the antenna or the radio. Perform a new station scan. |
| Alarm nie włącza się | Alarm not activated. Incorrect alarm time or source set. Volume too low. | Verify the alarm is activated (icon on display). Check alarm time, source, and volume settings. |
| Wyświetlacz jest zbyt jasny/ciemny | Należy dostosować ustawienia ściemniacza. | Use the Dimmer +/- buttons on the rear of the device to adjust brightness. |
9. Specyfikacje

Rysunek 6: Wymiary produktu do celów referencyjnych.
- Marka: TechniSat
- Model: DIGITRADIO 51 (0000/4981)
- Technologia tunera: DAB+, FM
- Moc wyjściowa głośnika: 1.5 watów
- Typ wyświetlacza: LCD, Dimmable
- Źródło zasilania: Elektryczny przewodowy
- Tomtage: 230 wolty
- Częstotliwość: 50 Hz
- Łączność: 3.5mm Audio (Headphone)
- Wymiary produktu (szer. x gł. x wys.): Wymiary 14.9 x 12.6 x 4.9 cm
- Waga przedmiotu: 436 gramów
- Tworzywo: Plastikowy
- Cechy szczególne: Dual Alarm, Snooze Function, Auto Shut-Off Timer
10. Gwarancja i wsparcie
For warranty information and technical support, please refer to the documentation provided with your purchase or visit the official TechniSat webZachowaj dowód zakupu na wypadek roszczeń gwarancyjnych.