
1. Wprowadzenie
This manual provides essential information for the safe and efficient operation of your InFocus IN2126a WXGA Network Projector. Please read this manual thoroughly before using the projector and retain it for future reference. The InFocus IN2126a is designed for versatile use in various environments, offering high brightness and network capabilities.
2. Informacje dotyczące bezpieczeństwa
Aby zapobiec uszkodzeniu projektora i zapewnić bezpieczeństwo użytkownika, należy przestrzegać następujących środków ostrożności:
- Nie blokuj otworów wentylacyjnych. Zapewnij odpowiedni przepływ powietrza wokół projektora.
- Nie patrz bezpośrednio w obiektyw projektora, gdyamp jest włączony. Jasne światło może uszkodzić wzrok.
- Avoid placing the projector in direct sunlight, near heat sources, or in environments with high humidity or excessive dust.
- Używaj wyłącznie przewodu zasilającego dołączonego do projektora.
- Wszelkie czynności serwisowe należy zlecać wykwalifikowanemu personelowi. Nie należy podejmować prób samodzielnego otwierania ani naprawy projektora.
3. Koniec produktuview
Familiarize yourself with the components and features of your InFocus IN2126a projector.
3.1 Komponenty projektora
Rysunek 1: Widok z przodu view of the InFocus IN2126a projector, showing the lens and ventilation.

Rysunek 2: Strona view of the InFocus IN2126a projector, highlighting the ventilation grilles.
3.2 Połączenia panelu tylnego
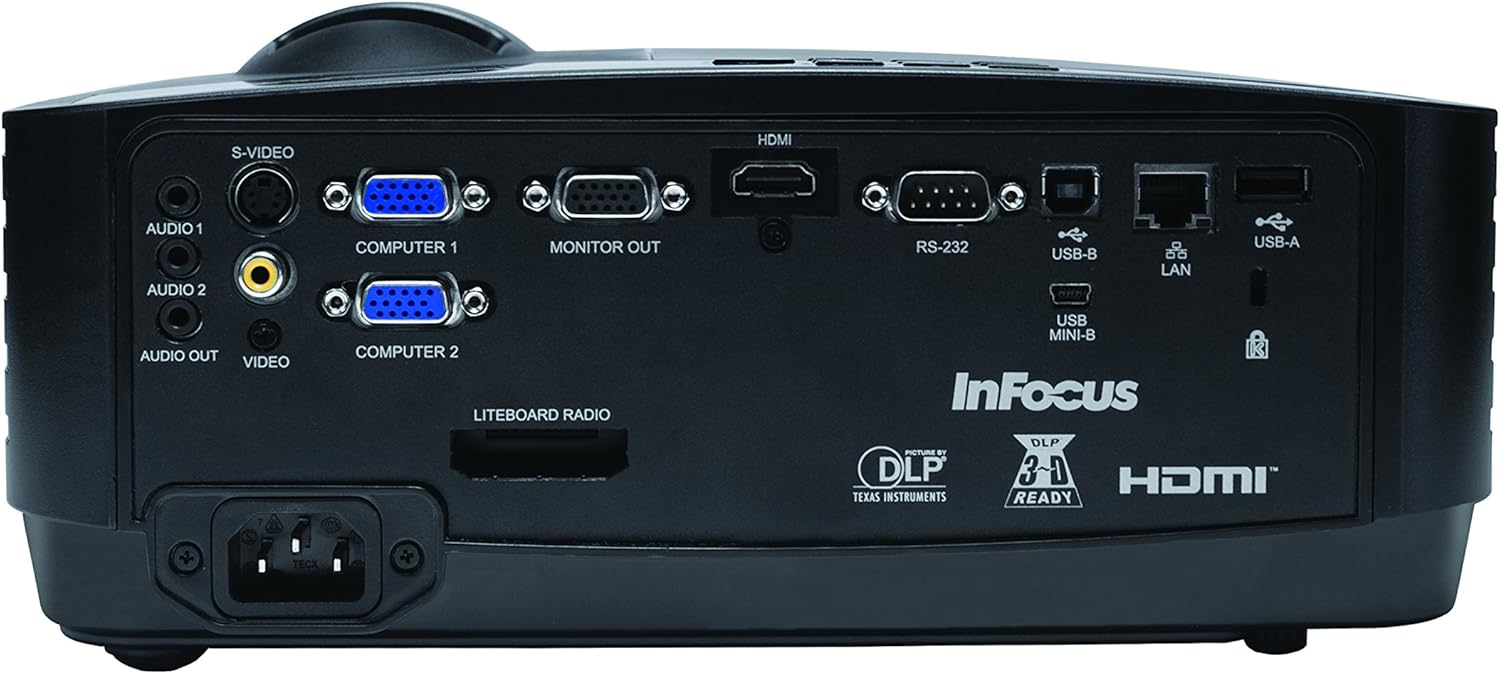
The rear panel provides various input and output ports for connecting external devices.
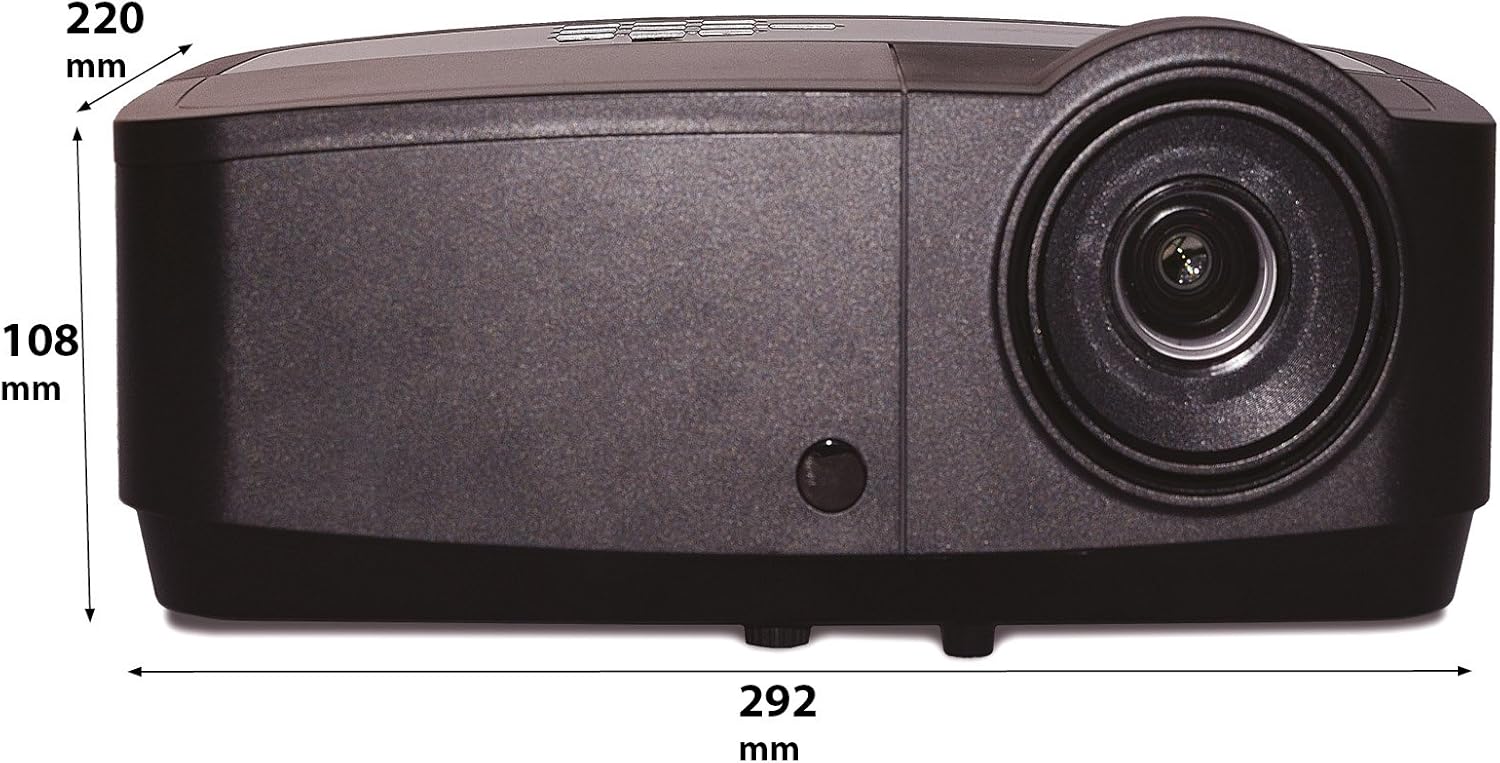
Figure 3: Rear panel of the InFocus IN2126a projector, displaying various connectivity ports including HDMI, VGA, USB, and LAN.
- HDMI: For digital video and audio input.
- COMPUTER 1 / COMPUTER 2 (VGA): Do analogowego sygnału wideo z komputerów.
- MONITOR OUT (VGA): Do podłączenia zewnętrznego monitora.
- USB-B / USB Mini-B: For service or specific USB functions.
- USB-A: For connecting USB devices, such as a wireless adapter.
- Sieć lokalna (RJ45): Do łączności sieciowej.
- RS-232: Do sterowania szeregowego.
- AUDIO 1 / AUDIO 2 (RCA): Do wejścia audio.
- WYJŚCIE DZWIĘKU: Do podłączania zewnętrznych systemów audio.
- WIDEO (RCA): Do wejścia wideo kompozytowego.
- S-WIDEO: Do wejścia S-Video.
- Wejście zasilania: Do podłączenia przewodu zasilającego.
3.3 Elementy sterujące na panelu górnym
The top panel features controls for basic projector functions and image adjustments.

Figure 4: Top panel of the InFocus IN2126a projector, showing the control buttons and focus/zoom rings.
- Przycisk zasilania: Włącza lub wyłącza projektor.
- Menu/Exit Button: Accesses or exits the on-screen display (OSD) menu.
- Przyciski nawigacyjne (w górę, w dół, w lewo, w prawo): Umożliwia nawigację po opcjach menu.
- Przycisk Enter: Potwierdza wybór w menu.
- Przycisk źródła: Wybiera źródła wejściowe.
- Blank Button: Temporarily blanks the screen.
- Przycisk automatyczny: Automatycznie dostosowuje ustawienia obrazu.
- Pierścień ostrości: Dostosowuje ostrość obrazu.
- Pierścień zoomu: Dostosowuje rozmiar obrazu.
3.4 Wymiary
Understanding the physical dimensions is important for installation and placement.

Figure 5: Diagram illustrating the dimensions of the InFocus IN2126a projector (292mm length, 220mm width, 108mm height).
4. Konfiguracja
4.1 Umiejscowienie projektora
Place the projector on a stable, flat surface or mount it securely. Ensure the projector is positioned at an appropriate distance from the screen to achieve the desired image size. Maintain sufficient space around the projector for proper ventilation.
4.2 Podłączanie urządzeń
- Podłączenie zasilania: Connect the power cord to the projector's power inlet and then to a grounded electrical outlet.
- Źródło wideo:
- For digital sources (e.g., Blu-ray player, laptop), use an HDMI cable to connect to the HDMI port.
- For analog computer sources, use a VGA cable to connect to the COMPUTER 1 or COMPUTER 2 port.
- For other video sources, use the appropriate S-VIDEO or VIDEO (RCA) connections.
- Źródło dźwięku: If your video source does not transmit audio via HDMI, connect audio cables to the AUDIO 1 or AUDIO 2 ports.
- Połączenie internetowe: Aby uzyskać dostęp do sieci przewodowej, podłącz kabel Ethernet do portu LAN.
- Połączenie bezprzewodowe: If using a compatible wireless adapter (sold separately), insert it into the USB-A port.
4.3 Włączanie/wyłączanie
- Włączanie: Press the Power button on the projector's top panel or the remote control. The power indicator light will illuminate.
- Aby wyłączyć: Press the Power button again. The projector will enter a cooling cycle before shutting down completely. Do not unplug the projector during the cooling cycle.
5. Obsługa projektora
5.1 Wybór źródła
After powering on, the projector may automatically detect an active input source. If not, or to switch sources:
- Naciśnij Źródło na projektorze lub pilocie.
- Use the navigation buttons to highlight the desired input source (e.g., HDMI, Computer 1, Video).
- Naciskać Wchodzić aby wybrać źródło.
5.2 Regulacja obrazu
- Centrum: Obróć Centrum Obracaj obiektyw projektora, aż obraz stanie się ostry i wyraźny.
- Brzęczenie: Obróć Brzęczenie ring on the projector lens to adjust the image size to fit your screen.
- Korekcja Keystone'a: Jeśli obraz wydaje się trapezoidalny, użyj funkcji korekcji zniekształcenia trapezowego w menu OSD, aby nadać obrazowi kształt kwadratu.
5.3 Menu ekranowe (OSD)
The OSD menu allows you to configure various projector settings.
- Naciśnij Menu przycisk, aby otworzyć menu OSD.
- Użyj W górę/w dół navigation buttons to select a menu category.
- Użyj Lewo/Prawo navigation buttons to adjust settings or enter sub-menus.
- Naciskać Wchodzić aby potwierdzić zmiany.
- Naciskać Wyjście to close the OSD menu.
5.4 Łączność bezprzewodowa
The IN2126a is wireless-ready. To enable wireless display, a compatible InFocus wireless adapter (sold separately) must be connected to the USB-A port. Refer to the wireless adapter's specific instructions for setup and connection procedures.
5.5 Funkcjonalność 3D
The projector supports 3D content. To view 3D content, you will need a compatible 3D source, 3D glasses, and appropriate 3D content. Refer to the projector's OSD menu for 3D settings and ensure your source device is configured for 3D output.
6. Konserwacja
Regularna konserwacja zapewnia optymalną wydajność i wydłuża żywotność projektora.
6.1 Łamp Wymiana
Projektor lamp has a limited lifespan (approximately 4000 hours). When the lamp wskaźnik świeci się lub jasność obrazu znacznie spada,amp needs replacement. Always use an authorized InFocus replacement lamp. Refer to the full service manual for detailed lamp replacement instructions or contact customer support.
6.2 Czyszczenie filtra
Dust accumulation on the air filter can impede airflow and cause overheating. Regularly clean the air filter to maintain proper ventilation. Turn off and unplug the projector before cleaning. Use a soft brush or vacuum cleaner to remove dust from the filter cover.
6.3 Ogólne czyszczenie
- Projektor Casing: Użyj miękkiej, niestrzępiącej się szmatki dampCzyścić łagodnym, nieściernym środkiem czyszczącym. Nie używać silnych środków chemicznych.
- Obiektyw: Use a lens cleaning cloth and specialized lens cleaning solution. Avoid touching the lens surface with your fingers.
7. Rozwiązywanie Problemów
Jeśli masz problemy z projektorem, zapoznaj się z poniższymi typowymi problemami i ich rozwiązaniami:
| Problem | Możliwa przyczyna | Rozwiązanie |
|---|---|---|
| Brak obrazu na ekranie | Wybrano nieprawidłowe źródło sygnału wejściowego; Luźne połączenie kablowe; Projektor w trybie czuwania. | Verify input source; Check all cable connections; Press power button to wake from standby. |
| Obraz jest rozmazany | Nie ustawiono ostrości; Projektor znajduje się zbyt blisko/daleko od ekranu. | Adjust the focus ring; Reposition the projector and adjust zoom. |
| Obraz ma kształt trapezu | Projektor nie jest ustawiony prostopadle do ekranu. | Użyj korekcji trapezowej w menu OSD. |
| Brak dźwięku | Audio cables not connected; Volume too low; Muted. | Check audio cable connections; Adjust volume; Unmute projector. |
| Projektor przegrzewa się i wyłącza | Blocked ventilation; Dirty air filter. | Ensure clear airflow around projector; Clean the air filter. |
For more detailed troubleshooting, consult the complete user manual or contact InFocus customer support.
8. Specyfikacje
Key technical specifications for the InFocus IN2126a WXGA Network Projector:
- Nazwa modelu: IN2126a
- Typ wyświetlacza: DLP
- Rozdzielczość natywna: 1280x800 (WXGA)
- Jasność: 3500 lumenów
- Współczynnik kontrastu: 15000:1
- Reprodukcja kolorów: 1.07 miliarda kolorów (30 bitów)
- Żywotność źródła światła: 4000 godzin
- Technologia łączności: Wireless-ready, HDMI 1.4, VGA (x2), USB (Type-A, Mini-B, Type-B), LAN (RJ45), RS-232, Audio In (x2), Audio Out, Video (RCA), S-Video
- Cechy szczególne: 3D-Ready, Network Projector
- Współczynnik kształtu: Przenośny
- Typ montażu: Uchwyt na blat
- Waga przedmiotu: 7.1 funtów
9. Gwarancja i wsparcie
For information regarding your product's warranty, please refer to the warranty card included with your purchase or visit the official InFocus website. For technical support, service, or to purchase accessories, please contact InFocus customer service through their official channels.