
Wstęp
This manual provides essential information for the safe and efficient operation of your InFocus IN124a XGA Wireless-Ready Projector. Please read this manual thoroughly before using the projector and retain it for future reference. This projector is designed for displaying content with XGA (1024 x 768) native resolution, offering 3500 lumens of brightness and a 15000:1 contrast ratio.
Informacje dotyczące bezpieczeństwa
- Bezpieczeństwo elektryczne: Always connect the projector to a grounded power outlet. Do not use damaged power cords. Disconnect power before cleaning or servicing.
- Ogrzewanie i wentylacja: Ensure adequate ventilation around the projector. Do not block ventilation openings. Avoid placing the projector near heat sources.
- Lamp Bezpieczeństwo: Projektor lamp operates at high temperatures and pressures. Allow the projector to cool down before moving or replacing the lamp. Do not look directly into the lens when the lamp jest włączony.
- Obsługiwanie: Obchodź się z projektorem ostrożnie. Unikaj upuszczania go i narażania na silne uderzenia.
- Wilgoć: Do not expose the projector to rain, moisture, or excessive humidity.
Zawartość opakowania
Sprawdź, czy w opakowaniu znajdują się wszystkie elementy:
- InFocus IN124a Projector
- Kabel HDMI
- Kabel VGA
- Przewód zasilający
- Remote Control (not explicitly listed but standard)
- Optional USB adapter for wireless connectivity (if purchased separately)
Produkt ponadview
Familiarize yourself with the physical components and connections of your InFocus IN124a projector.

This image displays the rear panel of the InFocus IN124a projector, highlighting various connectivity options including HDMI, VGA (Computer 1 and 2), Monitor Out, S-Video, Video, Audio In (1 and 2), Audio Out, RS-232, USB-B, USB Mini-B, and USB-A ports. The power input is located on the lower left.

The top panel of the InFocus IN124a projector is shown, featuring the control buttons for power, menu navigation (up, down, left, right, enter), source selection, blank screen function, and indicators for temperature and lamp status. The focus and zoom adjustment rings are also visible.

Przód view of the InFocus IN124a projector, showing the main projection lens and the power indicator light. The focus and zoom rings are visible near the lens.

Na tym zdjęciu widać bok view of the InFocus IN124a projector, emphasizing the ventilation grilles designed for heat dissipation, crucial for maintaining optimal operating temperature.
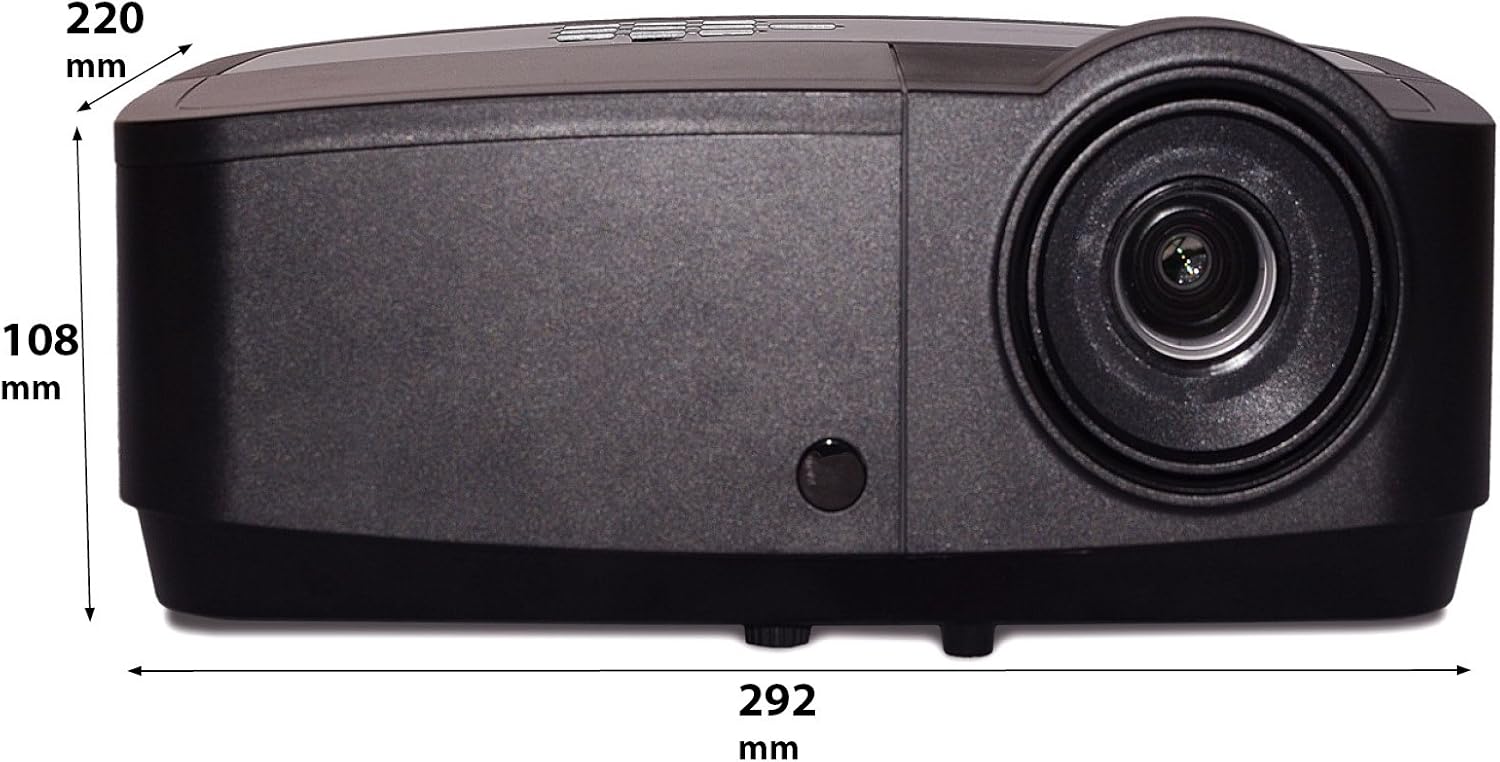
Na tym zdjęciu widać boczną częśćfile of the InFocus IN124a projector, illustrating its physical dimensions: approximately 292 mm in length, 108 mm in height, and 220 mm in width.
Organizować coś
1. Umieszczenie
Position the projector on a stable, flat surface or mount it securely. Ensure the projector is at an appropriate distance from the screen to achieve the desired image size. Avoid direct sunlight or strong ambient light on the screen for optimal viewing.
2. Podłączanie zasilania
- Podłącz przewód zasilający do gniazda zasilania projektora.
- Podłącz drugi koniec przewodu zasilającego do uziemionego gniazdka elektrycznego.
3. Podłączanie źródeł wideo
The IN124a offers multiple connectivity options:
- HDMI: Podłącz kabel HDMI do urządzenia źródłowego (np. laptopa, odtwarzacza Blu-ray) i portu HDMI w projektorze.
- VGA (Komputer 1/2): Use a VGA cable to connect your computer to either the 'COMPUTER 1' or 'COMPUTER 2' port.
- S-Video/Video: For older devices, connect S-Video or composite video cables to the respective ports.
- USB: The USB-A port can be used for displaying content directly from a USB drive. The USB-B port supports USB display functionality.
- Audio: Connect external audio sources to 'AUDIO 1' or 'AUDIO 2' inputs, and use 'AUDIO OUT' for external speakers if needed.
4. Wireless Setup (Optional)
For wireless connectivity, an optional USB adapter is required. Insert the wireless USB adapter into the designated USB port on the projector. Refer to the adapter's specific instructions for software installation and connection procedures on your source device.
Operacyjny
1. Włączanie/wyłączanie zasilania
- Włączanie: Press the 'Power' button on the projector's control panel or remote control. The power indicator light will turn steady blue.
- Wyłączone: Press the 'Power' button again. A confirmation message may appear. Press 'Power' a second time to confirm shutdown. The fan will continue to run briefly to cool the lamp before shutting down completely.
2. Regulacja obrazu
- Centrum: Obróć pierścień regulacji ostrości wokół obiektywu, aż obraz stanie się ostry i wyraźny.
- Brzęczenie: Rotate the zoom ring around the lens to adjust the image size without moving the projector.
- Korekcja Keystone'a: Jeśli obraz wydaje się trapezoidalny, użyj funkcji korekcji zniekształcenia trapezowego w menu projektora, aby nadać obrazowi kształt kwadratu.
3. Wybór źródła
Press the 'Source' button on the control panel or remote control repeatedly to cycle through available input sources (HDMI, Computer 1, Computer 2, S-Video, Video, USB). The projector will automatically detect an active signal.
4. Nawigacja po menu
Press the 'Menu' button to access the On-Screen Display (OSD) menu. Use the arrow buttons to navigate through options and 'Enter' to select. Press 'Menu' or 'Exit' to close the OSD.
5. Tryb 3D
The InFocus IN124a is 3D-Ready. To utilize 3D functionality, you will need compatible 3D content, a 3D-capable source device, and active 3D glasses. Refer to your 3D source device's manual for specific setup instructions. The projector will automatically detect a 3D signal when available.
Konserwacja
1.Pamp Wymiana
Projektor lamp ma żywotność do 10 000 godzin. Kiedy lamp life is nearing its end, a warning message may appear, or the lamp indicator light will illuminate. Only replace the lamp with an authorized InFocus replacement lamp. Always allow the projector to cool completely before attempting lamp wymiana.
2. Czyszczenie
- Projektor Casing: Użyj miękkiej, niestrzępiącej się szmatki dampCzyścić łagodnym, nieściernym środkiem czyszczącym. Nie używać silnych środków chemicznych.
- Obiektyw: Gently wipe the lens with a lens cleaning cloth or lens tissue. Avoid touching the lens surface with your fingers.
- Otwory wentylacyjne: Periodically check and clean the air vents to prevent dust buildup, which can lead to overheating. Use a soft brush or compressed air to clear obstructions.
Rozwiązywanie problemów
Jeśli masz problemy z projektorem, zapoznaj się z poniższymi typowymi problemami i ich rozwiązaniami:
| Problem | Możliwa przyczyna | Rozwiązanie |
|---|---|---|
| Obraz nie jest wyświetlany | Power not connected; Incorrect input source; Source device not active. | Check power connection; Select correct input source; Ensure source device is on and outputting signal. |
| Obraz jest rozmazany lub nieostry | Lens focus not adjusted; Projector too close/far from screen. | Adjust the focus ring on the lens; Adjust projector distance or use zoom ring. |
| Pilot nie działa | Batteries depleted; Obstruction between remote and projector; Remote sensor blocked. | Replace batteries; Remove obstructions; Ensure remote sensor on projector is clear. |
| Projektor przegrzewa się i wyłącza | Blocked ventilation; Dusty air filter. | Ensure vents are clear; Clean air filter (if applicable) and vents. |
Specyfikacje
| Funkcja | Specyfikacja |
|---|---|
| Rozdzielczość natywna | XGA (1024 x 768) |
| Jasność | 3500 lumenów |
| Współczynnik kontrastu | 15000:1 |
| Lamp Życie | Do 7,000 XNUMX godzin (tryb Eco) |
| Technologia łączności | Wireless (with optional adapter), HDMI, USB video |
| Funkcja specjalna | 3D-Ready |
| Wymiary produktu | 14.25 x 12 x 7.75 cala (36.2 x 30.5 x 19.7 cm) |
| Waga przedmiotu | 5.4 funtów (2.45 kg) |
| Zalecane zastosowania | Wewnątrz/na zewnątrz |
Gwarancja i wsparcie
For warranty information and technical support, please refer to the warranty card included with your product or visit the official InFocus webZachowaj paragon jako dowód zakupu na wypadek reklamacji.