
Lelit PL044MMT
Instrukcja obsługi profesjonalnego młynka do kawy Lelit Fred PL044MMT na żądanie
Model: PL044MMT | Brand: Lelit
1. Wprowadzenie
This manual provides comprehensive instructions for the safe and efficient operation, maintenance, and troubleshooting of your Lelit Fred PL044MMT Professional On-Demand Coffee Grinder. Please read this manual thoroughly before using the appliance and keep it for future reference.
The Lelit PL044MMT is a high-performance coffee grinder designed for true espresso enthusiasts. It ensures consistent and excellent grinding results in a compact form factor, suitable for various kitchen setups. The grinder features a continuous micrometric adjustment for precise grind control and a robust stainless steel construction.

Rycina 1.1: Przód view of the Lelit Fred PL044MMT Professional On-Demand Coffee Grinder. The image shows the sleek stainless steel casing, the transparent bean hopper filled with coffee beans, and the central grinding mechanism with a blue indicator light.
2. Funkcje produktu
The Lelit Fred PL044MMT coffee grinder is equipped with advanced features to ensure optimal performance and user convenience:
- Continuous Micrometric Adjustment: Allows for precise and stepless regulation of the grinding degree, from very fine for Turkish coffee to coarse for filtered coffee.
- Ø 38 mm Conical Burrs: Professional-grade conical burrs grind vertically, ensuring consistent and precise results for various coffee preparations.
- On-Demand Grinding: Grinds coffee directly into your portafilter or container as needed, preserving freshness and aroma.
- Programmable Dosing: The side-mounted dose adjustment knob allows setting grinding time between 2 and 20 seconds for consistent shot volumes.
- Stal nierdzewna Casing: The robust and durable stainless steel construction ensures longevity and a premium aesthetic.
- Integrated Filter Holder Support: Provides extreme stability for your portafilter during the grinding process, ensuring cleanliness and ease of use.
- Smoked Bean Hopper: The 250g capacity hopper is designed to protect coffee beans from light, preserving their aroma and freshness. It features a graduated scale (1-7) to indicate grind granularity.
- Anti-Intrusion System: Zwiększa bezpieczeństwo podczas eksploatacji.

Rysunek 2.1: Przód kątowy view of the grinder, highlighting the control knob for grind adjustment and the portafilter support. The blue indicator light is visible, signifying operational status.
3. Konfiguracja
Follow these steps to set up your Lelit Fred PL044MMT coffee grinder:
- Rozpakowywanie: Ostrożnie wyjmij młynek z opakowania. Zachowaj wszystkie materiały opakowaniowe do transportu lub przechowywania w przyszłości.
- Umieszczenie: Place the grinder on a stable, flat, and dry surface. Ensure there is adequate space around the unit for ventilation and operation.
- Czystość: Przed pierwszym użyciem przetrzyj zewnętrzną część młynka miękką szmatką.amp cloth. Ensure the bean hopper and coffee chute are clean and free of any debris.
- Zainstaluj Bean Hopper: Place the transparent bean hopper onto the top of the grinder. Ensure it is securely seated.
- Napełnij pojemnik na ziarna: Open the hopper lid and fill it with fresh, whole coffee beans. Do not overfill. The hopper has a 250g capacity.
- Podłącz zasilanie: Podłącz przewód zasilający do uziemionego gniazdka elektrycznego (240 V).
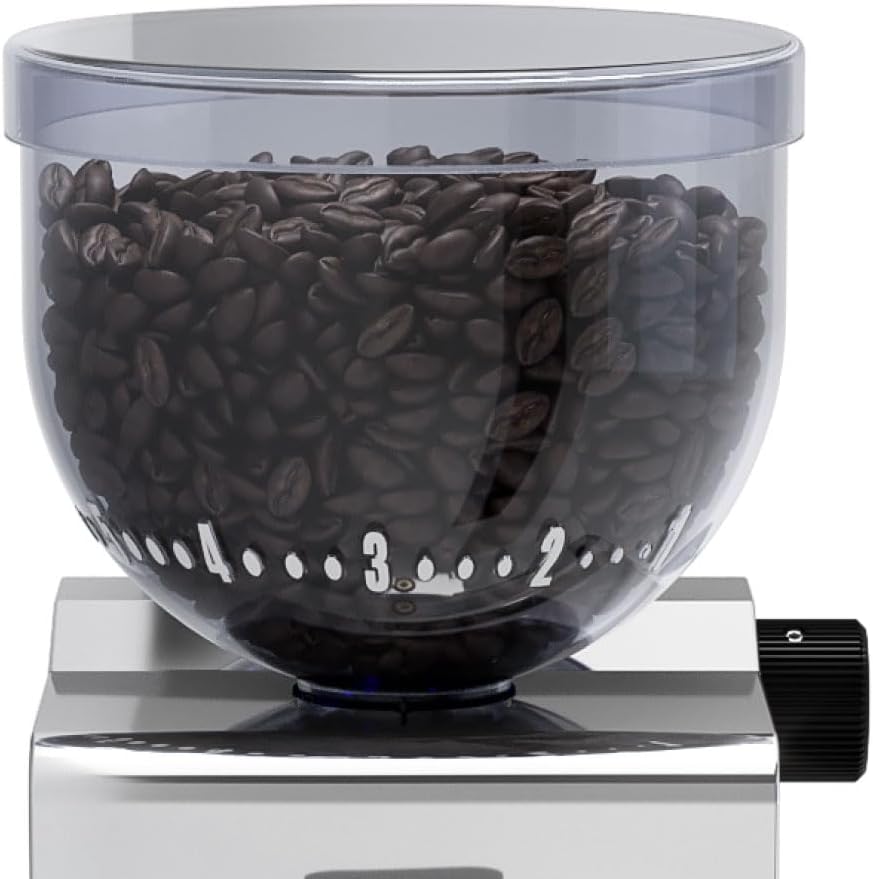
Rysunek 3.1: Zbliżenie view of the transparent bean hopper, showing the numerical grind settings (1-7) around its base. This scale helps in visually identifying the current grind fineness setting.
4. Instrukcja obsługi
Operating your Lelit Fred PL044MMT grinder involves adjusting grind size, setting the dose, and initiating the grinding process.
4.1. Regulacja stopnia zmielenia
The grinder features a continuous micrometric adjustment system for precise control over grind fineness.
- To adjust the grind size, locate the rotary knob on the side of the grinder (refer to Figure 2.1).
- Turn the knob clockwise for a finer grind and counter-clockwise for a coarser grind.
- Make small adjustments and test the grind to achieve the desired consistency for your brewing method (e.g., espresso, moka, filtered coffee).
- It is recommended to adjust the grind size only when the grinder is running or with the hopper empty to prevent burr damage.
4.2. Setting Grinding Time (Dose)
The grinder allows you to program the grinding duration for consistent dosing.
- Locate the dose adjustment knob on the side of the grinder.
- Turn this knob to set the desired grinding time, typically between 2 and 20 seconds.
- Experiment with different times to find the ideal dose for your portafilter or brewing method.
4.3. Mielenie kawy
Once the grind size and dose are set, you can begin grinding:
- Place your portafilter or coffee container securely under the coffee chute, engaging the filter holder support if applicable.
- Press the activation button or push the portafilter against the activation switch (depending on the model's specific mechanism). The grinder will start grinding for the set duration.
- Once grinding is complete, remove your portafilter/container.

Rysunek 4.1: Strona view of the grinder, illustrating the location of the main power switch. This switch controls the overall power supply to the unit.
5. Konserwacja
Regularne czyszczenie i konserwacja zapewnią długowieczność i optymalną wydajność Twojego młynka.
5.1. Codzienne czyszczenie
- After each use, tap the portafilter support to dislodge any residual coffee grounds.
- Przetrzyj zewnętrzną część młynka miękką,amp ściereczką. Nie używaj środków czyszczących o właściwościach ściernych ani nie zanurzaj urządzenia w wodzie.
5.2. Weekly Cleaning (Burrs and Chute)
- Odłącz młynek odłączyć od gniazdka elektrycznego przed czyszczeniem.
- Opróżnij pojemnik na kawę ziarnistą.
- Remove the bean hopper and the upper burr assembly (refer to product diagrams or specific instructions for burr removal if available).
- Use a stiff brush (a dedicated grinder brush is ideal) to remove all coffee grounds from the burrs and the grinding chamber.
- Clean the coffee chute with a brush or a pipe cleaner to ensure no blockages.
- Złóż ponownie zestaw żaren i pojemnik na ziarna kawy, upewniając się, że wszystkie części są pewnie zamocowane.
Notatka: Do not wash burrs with water. Coffee oils can build up, but water can cause rust and damage. Use a dry brush or specialized grinder cleaning tablets.
6. Rozwiązywanie Problemów
This section addresses common issues you might encounter with your Lelit Fred PL044MMT grinder.
| Problem | Możliwa przyczyna | Rozwiązanie |
|---|---|---|
| Szlifierka nie włącza się | Not plugged in; Power switch off; Circuit breaker tripped; Internal fault | Ensure power cord is securely plugged in. Check main power switch (Figure 4.1). Reset circuit breaker if necessary. If problem persists, contact customer support. |
| No coffee grounds dispensed | Bean hopper empty; Coffee chute blocked; Burrs clogged | Refill bean hopper. Clean coffee chute (Section 5.2). Clean burrs thoroughly (Section 5.2). |
| Nierównomierny rozmiar mielenia | Burrs worn or dirty; Grind setting too coarse/fine; Beans too oily | Clean burrs (Section 5.2). Adjust grind setting incrementally. Consider using less oily beans or cleaning more frequently. If burrs are worn, they may need replacement. |
| Szlifierka jest niezwykle głośna | Foreign object in burrs; Loose components; Motor issue | Immediately unplug the grinder. Inspect burrs for foreign objects (e.g., small stones). If none found or noise persists, contact customer support. |
7. Specyfikacje
| Atrybut | Wartość |
|---|---|
| Marka | Lelit |
| Numer modelu | PL044MMT |
| Kolor | Srebrny |
| Wymiary produktu (dł. x szer. x wys.) | 13 x 22 x 34 cm (5.1 x 8.7 x 13.4 cala) |
| Waga przedmiotu | 3.05 kilogramów (6.72 funty) |
| Moc | 160 watów |
| Tomtage | 240 wolty |
| Tworzywo | Stal nierdzewna |
| Typ zadziorów | Conical, Ø 38 mm |
| Pojemność zbiornika na ziarna | 250 gramów |
| Zalecane zastosowania | For coffee and home brewing enthusiasts |
| Konkretne zastosowania | Szlifowanie |
| Producent | Acopino Espresso Cappuccino Machine Klaus Merzweil |
| Wykonano w | Włochy |
8. Gwarancja i wsparcie
For warranty information, technical support, or to inquire about spare parts, please contact your retailer or the official Lelit customer service. Keep your proof of purchase for warranty claims.
While specific spare parts availability information is not provided, Lelit products are known for their quality and support. For any service needs, it is recommended to reach out to authorized service centers.
Ask a question about this manual
Ask about setup, troubleshooting, compatibility, parts, safety, or missing instructions. Manuals+ will review the question and use this page’s manual context to help answer it.