1. Wprowadzenie
This manual provides essential information for the safe and effective use of your GIMA London Aneroid Sphygmomanometer, Model 32725. Please read these instructions carefully before use and retain them for future reference. This device is designed for professional and personal use to measure blood pressure.
Ważne informacje dotyczące bezpieczeństwa:
- Consult a healthcare professional for interpretation of blood pressure readings. Self-diagnosis and treatment based on measurements can be dangerous.
- Do not use this device on infants or individuals unable to communicate.
- Trzymaj urządzenie z dala od wody i ekstremalnych temperatur.
- Regular calibration checks are recommended to ensure accuracy.
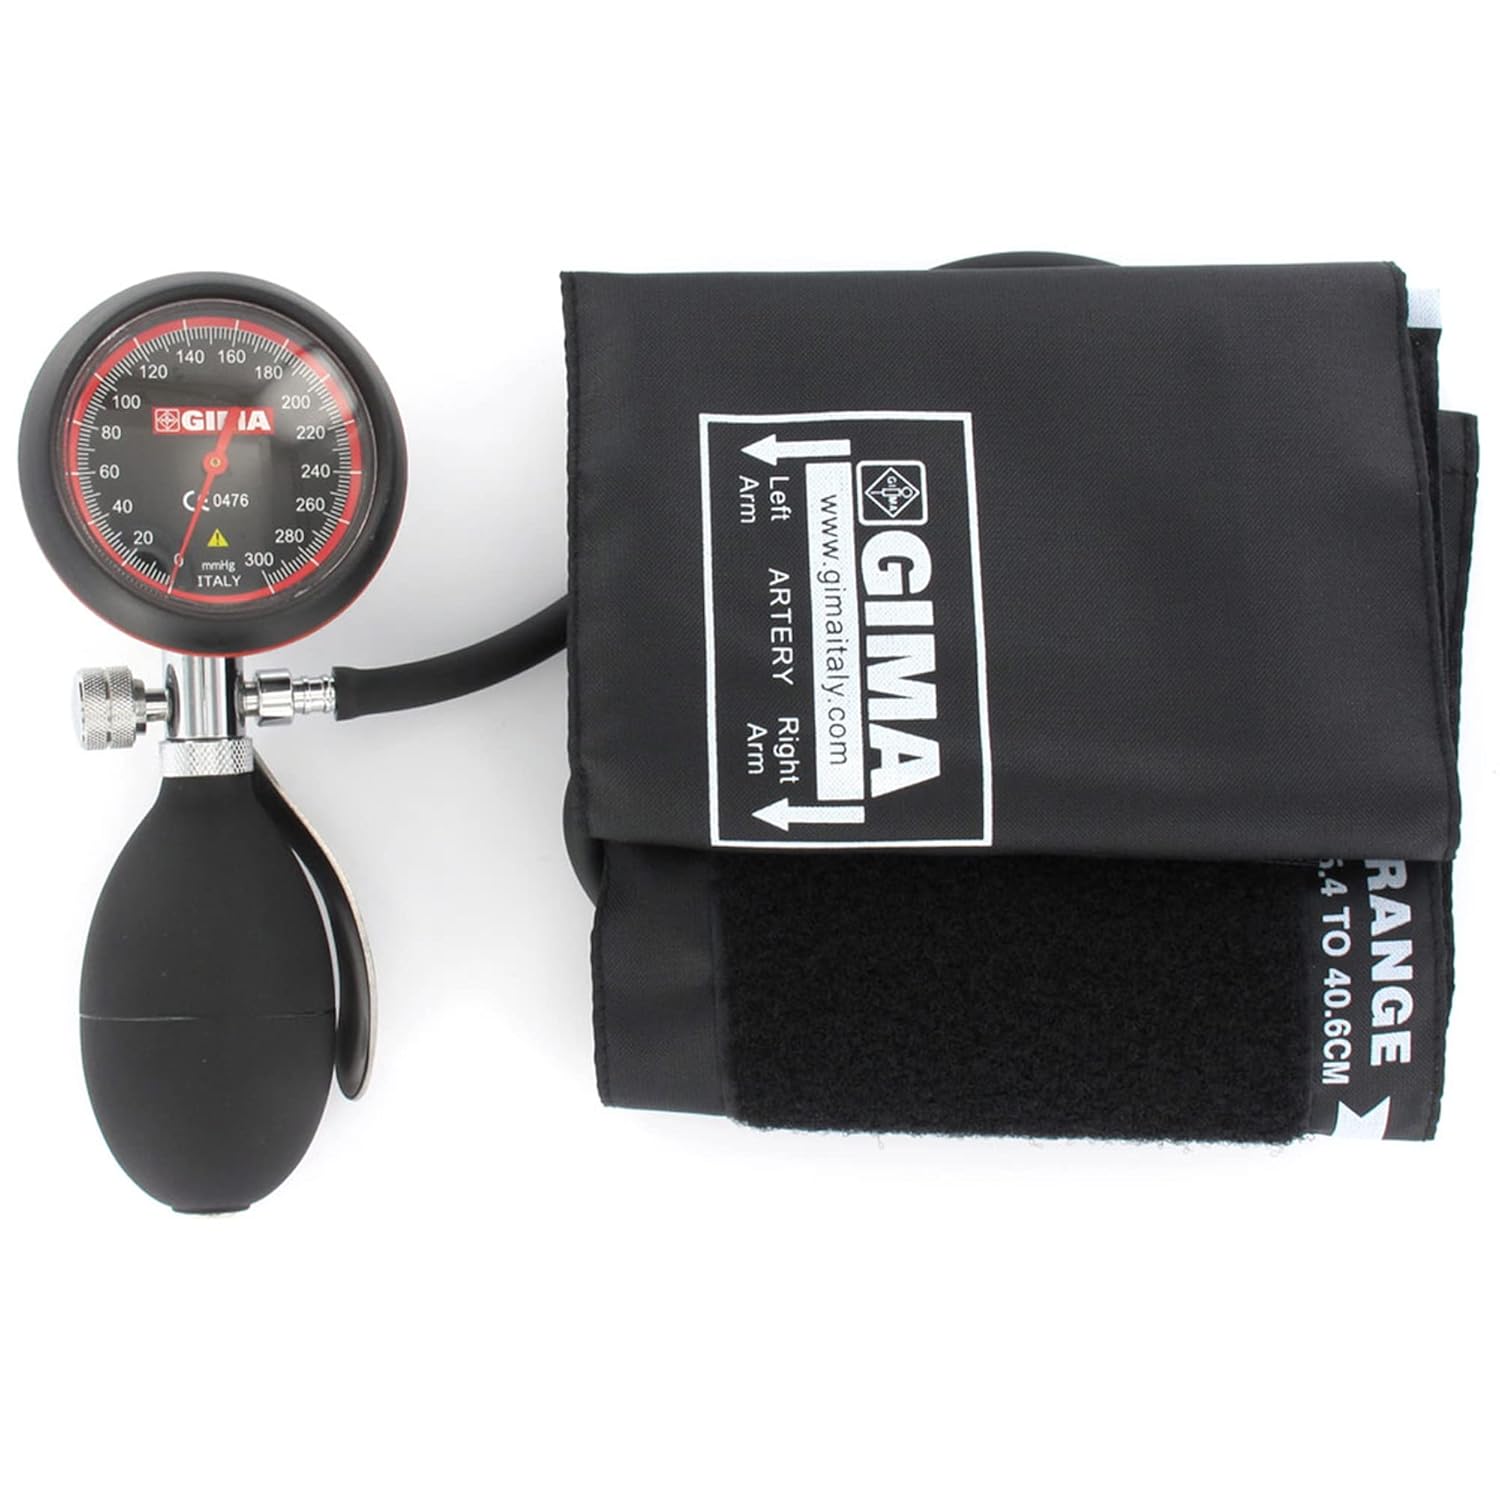
Image 1.1: The GIMA London Aneroid Sphygmomanometer with its black cuff and manometer.
2. Składniki produktu
The GIMA London Aneroid Sphygmomanometer consists of the following main components:
- Ciśnieniomierz: A 55 mm diameter dial with vivid colors for easy reading, protected by a plastic ring. It features a high-quality precision mechanism.
- Mankiet: A calibrated nylon cuff with a Velcro closure, designed for adult use.
- Bladder: A single-tube TPU bladder integrated within the cuff.
- Inflation Bulb: An integrated PVC bulb for inflating the cuff, designed to be latex-free.
- Zawór odpowietrzający: A screw-type valve for controlled deflation.
- Etui transportowe: An elegant matching nylon case for storage and transport.

Image 2.1: Individual components of the sphygmomanometer, including the cuff, manometer, and inflation bulb.

Image 2.2: The device is reliable, lightweight, latex-free, and features an integrated PVC bulb.
3. Konfiguracja
Follow these steps to prepare your sphygmomanometer for use:
- Rozpakować: Ostrożnie wyjmij wszystkie elementy z walizki.
- Connect Cuff and Manometer: Upewnij się, że przewód powietrzny mankietu jest solidnie podłączony do manometru.
- Connect Bulb: Attach the inflation bulb to the air tube leading to the cuff. The connections should be snug to prevent air leakage.

Image 3.1: The sphygmomanometer is available in black (NERO) and red, each equipped with an elegant matching nylon case.
4. Instrukcja obsługi
For accurate blood pressure measurement, follow these guidelines:
- Pozycjonowanie pacjenta: The measurement should be performed under conditions of both physical and mental relaxation. The patient should be in a sitting or supine position. Where possible, take measurements at the same time of day, away from meal times.
- Umiejscowienie mankietu: Wrap the cuff firmly around the upper arm, approximately 2-3 cm above the elbow joint, ensuring the artery mark on the cuff aligns with the brachial artery. The cuff should be snug but not overly tight.
- Inflacja: Close the air release valve by turning it clockwise. Rapidly inflate the cuff by squeezing the inflation bulb until the manometer reads approximately 20-30 mmHg above the expected systolic pressure.
- Deflation and Reading: Slowly open the air release valve by turning it counter-clockwise, allowing the pressure to drop at a rate of 2-3 mmHg per second. Listen for Korotkoff sounds with a stethoscope (not included). The first sound heard indicates systolic pressure, and the disappearance of sounds indicates diastolic pressure.
- Odczyty rekordów: Note down the systolic and diastolic pressure readings.

Image 4.1: The device features a high-quality precision mechanism and a calibrated nylon cuff with Velcro closure and a single-tube TPU bladder.

Image 4.2: The 55 mm diameter dial features vivid, eye-catching colors for easy reading.

Image 4.3: A special outer ring protects the manometer from shocks and the glass from scratches.
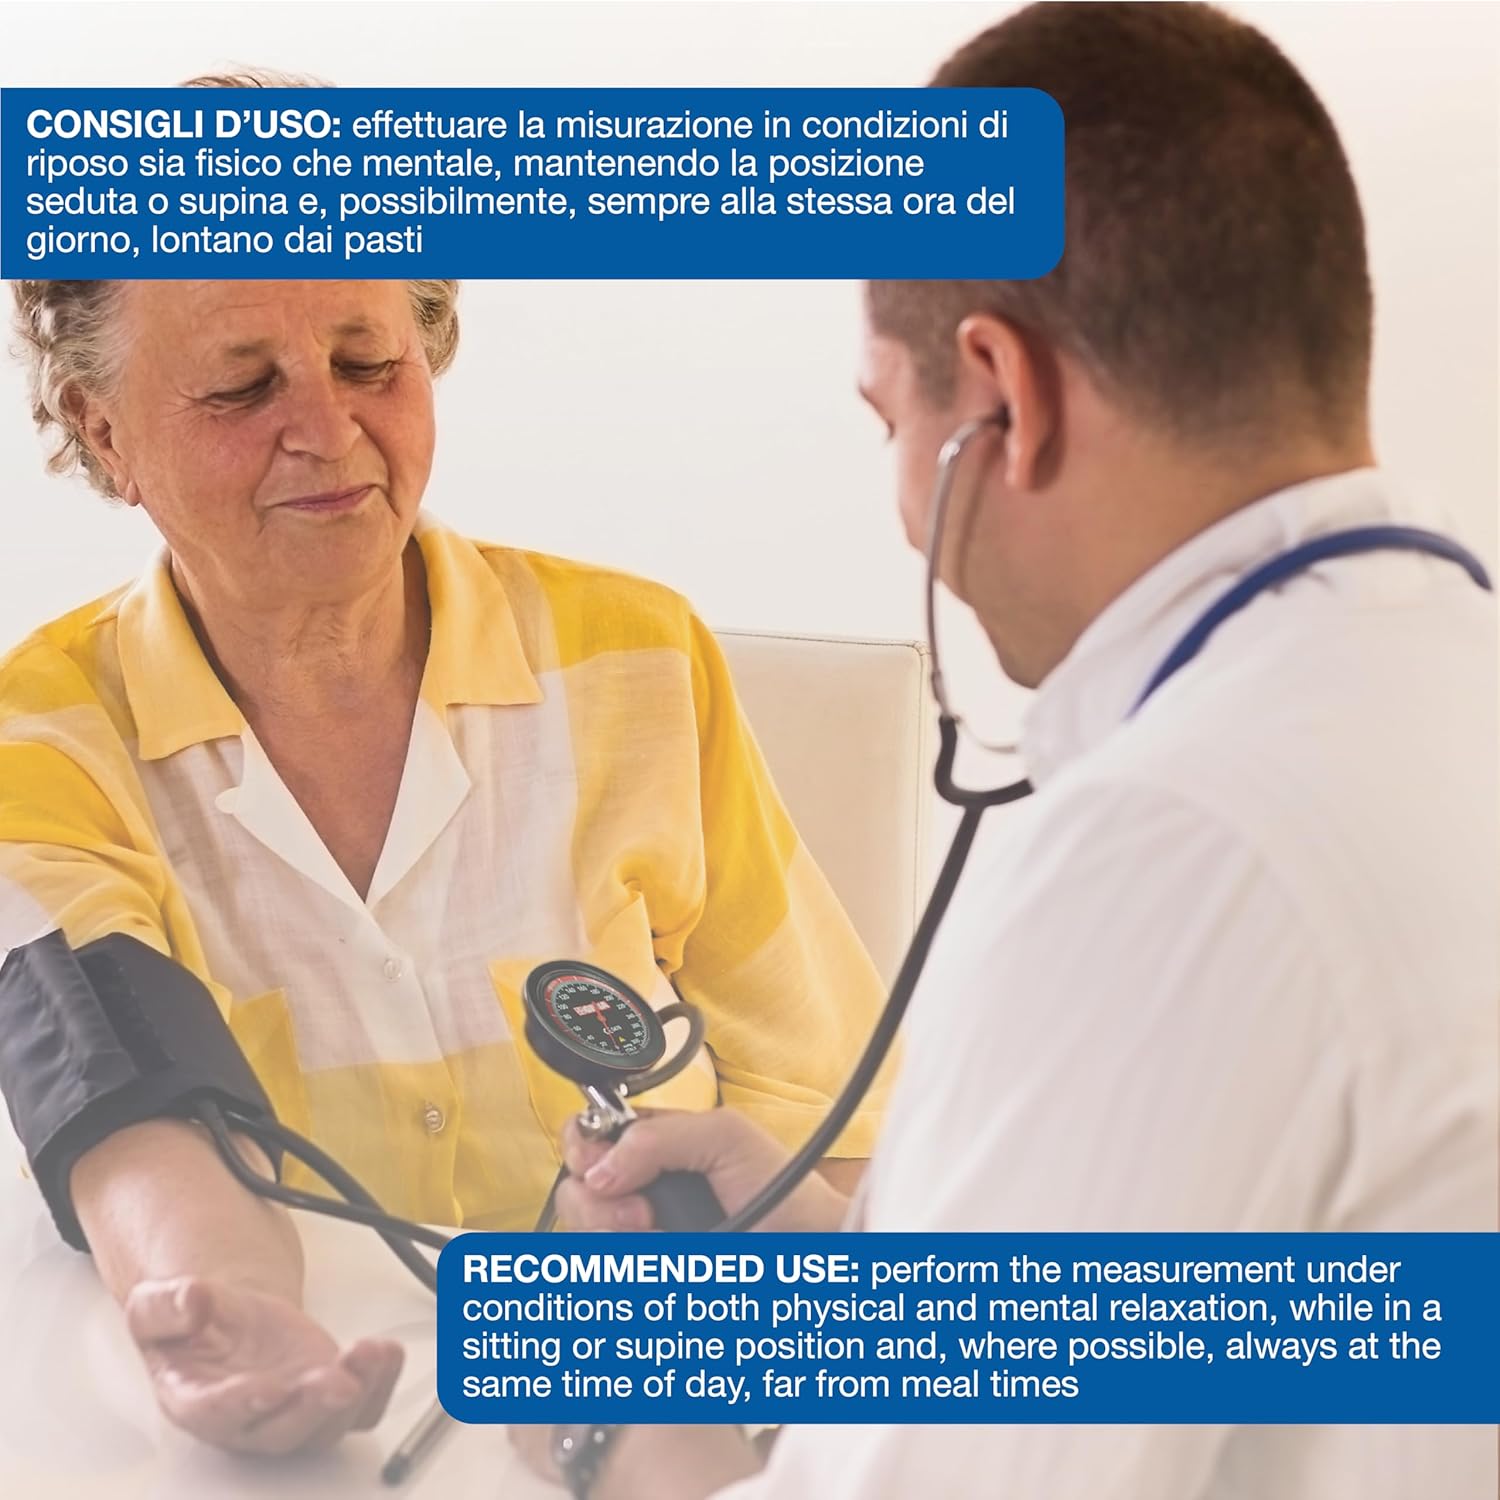
Image 4.4: Recommended use involves performing measurements under conditions of physical and mental relaxation, in a sitting or supine position, ideally at the same time each day and away from meal times.
5. Konserwacja
Właściwa konserwacja gwarantuje długowieczność i dokładność Twojego urządzenia:
- Czyszczenie: Wipe the cuff and manometer with a soft, damp cloth. Do not use abrasive cleaners or immerse any part of the device in water.
- Składowanie: Store the sphygmomanometer in its protective nylon case when not in use. Keep it in a cool, dry place, away from direct sunlight, dust, and extreme temperatures.
- Kalibrowanie: Aneroid sphygmomanometers should be professionally calibrated periodically (e.g., every 1-2 years) to ensure continued accuracy. Consult a qualified technician for calibration services.
6. Rozwiązywanie Problemów
Jeśli masz problemy z urządzeniem, zapoznaj się z poniższymi typowymi problemami i ich rozwiązaniami:
- Cuff not inflating:
- Ensure all connections (cuff to manometer, bulb to cuff) are secure.
- Check that the air release valve is fully closed (turned clockwise).
- Inspect the cuff and bladder for any punctures or leaks.
- Niedokładne odczyty:
- Verify correct cuff size and placement on the arm.
- Ensure the patient is relaxed and positioned correctly.
- Check for proper deflation rate (2-3 mmHg per second).
- Consider professional calibration if readings consistently seem incorrect.
- Wyciek powietrza:
- Dokręć wszystkie połączenia.
- Inspect the inflation bulb, air tubes, and cuff bladder for cracks or holes.
- Ensure the air release valve is fully closed.
If problems persist, contact GIMA customer support or a qualified service technician.
7. Specyfikacje
| Producent | GIMA |
| Numer modelu | 32725 |
| Wymiary produktu (dł. x szer. x wys.) | Wymiary 15 x 7 x 24 cm |
| Waga produktu | 330 gramów |
| Cuff Color | NERO (czarny) |
| Średnica tarczy | 55 mm |
| Bez lateksu | Tak |
| Wymagane baterie | NIE |
| ASIN | B00F378EJO |
| Data pierwszej dostępności na Amazon.com.be | 12 maja 2022 |
| Dostępność części zamiennych | Informacje niedostępne |
8. Gwarancja i wsparcie
For warranty information, please refer to the documentation provided with your purchase or contact GIMA customer service directly. GIMA is committed to providing reliable products and support.
If you require technical assistance, have questions about your device, or need to arrange for service, please contact GIMA customer support through their official webstronę internetową lub dane kontaktowe znajdujące się na opakowaniu produktu.
For more information, visit the official GIMA webstrona: www.gimaitaly.com