
1. Wprowadzenie
This manual provides comprehensive instructions for the installation, operation, and maintenance of your Weiser Augusta/Troy Single Cylinder Handleset. This handleset is designed for residential and light commercial applications, offering security and durability with an ANSI Grade 2 rating. Please read all instructions carefully before beginning installation to ensure proper function and safety.
2. Informacje dotyczące bezpieczeństwa
- Podczas montażu należy zawsze nosić odpowiedni sprzęt ochronny, na przykład okulary ochronne.
- Trzymaj małe części z dala od dzieci, aby zapobiec ryzyku zadławienia.
- Use only the tools specified or recommended in this manual.
- Ensure all screws are tightened securely, but do not overtighten, as this may damage components.
- Jeśli masz wątpliwości co do jakiegokolwiek etapu procesu instalacji, skonsultuj się z wykwalifikowanym ślusarzem lub profesjonalnym instalatorem.
3. Zawartość opakowania
Przed rozpoczęciem instalacji sprawdź, czy wszystkie komponenty są obecne:
- Exterior Handleset Assembly (Augusta/Troy Trim)
- Interior Knob Trim
- Zatrzask rygla
- Zatrzask sprężynowy
- Strike Plates (Full Lip)
- Śruby montażowe
- Klawiatura
- Szablon instalacji (jeśli dołączony)
4. Instalacja
Wymagane narzędzia: Phillips head screwdriver, tape measure, pencil, drill (optional for new installations).
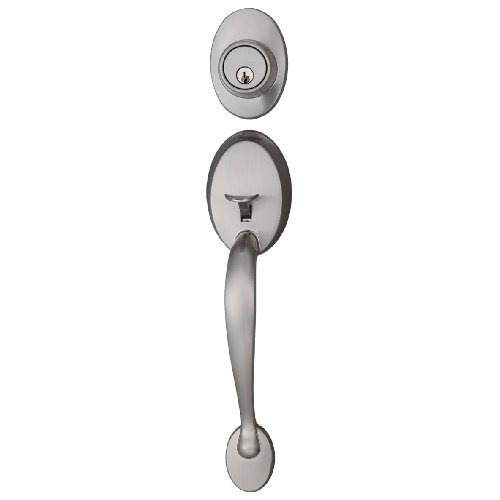
Rysunek 1: Koniecview of the Weiser Augusta/Troy Single Cylinder Handleset components, including the exterior handle, interior knob, and associated hardware.
- Przygotuj drzwi: Ensure your door has the correct bore holes and backset. This handleset is designed for doors with a 2-1/8 inch cross bore and an adjustable backset of 2-3/8 inches or 2-3/4 inches.
- Montaż zasuwki: Insert the deadbolt latch into the edge bore hole, ensuring the bolt faces the correct direction. Secure it with the provided screws.
- Install the Spring Latch: Insert the spring latch into the lower edge bore hole, ensuring the bevel faces the door frame. Secure it with the provided screws.
- Montaż zewnętrznego zestawu klamek: Place the exterior handleset assembly onto the door, aligning the posts with the bore holes.
- Install the Interior Knob Trim: Attach the interior knob trim to the exterior handleset, ensuring the spindle engages with the spring latch mechanism. Secure with the long mounting screws, tightening evenly.
- Operacja testowa: Before closing the door, test the deadbolt and spring latch mechanisms to ensure smooth operation. The deadbolt should extend and retract fully with the key from either side. The lower trim is non-locking.
- Montaż blach zaczepowych: Mark and chisel out recesses for the strike plates on the door frame, aligning them with the latches. Secure the strike plates with the provided screws.
5. Działanie
- Locking the Deadbolt: Insert the key into the exterior cylinder and turn to extend the deadbolt. From the interior, turn the thumbturn to extend the deadbolt.
- Unlocking the Deadbolt: Insert the key into the exterior cylinder and turn to retract the deadbolt. From the interior, turn the thumbturn to retract the deadbolt.
- Operating the Lower Latch: The lower handle operates a spring latch for entry and exit. This latch does not lock and is always accessible from both sides.
6. Konserwacja
- Czyszczenie: Clean the handleset with a soft, damp szmatką. Unikaj środków czyszczących o działaniu ściernym, rozpuszczalników i silnych środków chemicznych, ponieważ mogą one uszkodzić wykończenie.
- Smarowanie: Okresowo nakładaj niewielką ilość smaru grafitowego lub sprayu na bazie silikonu na wpust i mechanizmy wewnętrzne, aby zapewnić płynną pracę. Nie używaj smarów na bazie oleju.
- Kontrola: Regularly check all screws for tightness and ensure the handleset operates smoothly. Tighten any loose screws as needed.
7. Rozwiązywanie Problemów
- Handleset is stiff or difficult to operate:
- Check if mounting screws are overtightened. Loosen slightly if necessary.
- Apply lubricant to the latch and cylinder mechanisms.
- Ensure the door is properly aligned and not binding against the frame.
- Zasuwka nie wysuwa się lub nie chowa całkowicie:
- Verify the strike plate alignment. Adjust if the deadbolt is hitting the frame or strike plate.
- Check for obstructions in the door frame.
- Key is difficult to insert or turn:
- Nanieść smar grafitowy na rowek wpustowy.
- Ensure the key is not bent or damaged.
8. Specyfikacje
| Numer modelu | A9470A/T17AB |
| Marka | Weiser |
| Tworzywo | Zinc (Handle), Nickel (Finish) |
| Skończyć | Antyczny nikiel |
| Typ zamka | Single Cylinder Key Lock |
| Niepowodzenie | Regulowany 2-3/8" lub 2-3/4" |
| ANSI Rating | Klasa 2 |
| Zawarte komponenty | Knob, Latch, Lock |
9. Gwarancja i wsparcie
Weiser products are manufactured to the highest standards and are backed by a limited lifetime warranty on mechanical components and finish. For detailed warranty information, technical support, or to purchase replacement parts, please visit the official Weiser webOdwiedź witrynę lub skontaktuj się z działem obsługi klienta. Zachowaj dowód zakupu na wypadek reklamacji.