Pioneer VSX-923-K
Instrukcja obsługi amplitunera audio-wideo Pioneer VSX-923K
Model: VSX-923-K
1. Wprowadzenie
This user manual provides detailed instructions for the safe and efficient operation of your Pioneer VSX-923K A/V Receiver. Please read this manual thoroughly before using the product and retain it for future reference.
The Pioneer VSX-923K is a 7.2 channel A/V receiver designed to amplify your audio and video experience, offering advanced features such as 4K Ultra HD video upscaling, high-resolution audio playback, and extensive connectivity options.
2. Ważne instrukcje bezpieczeństwa
Podczas korzystania z tego produktu należy zawsze przestrzegać podstawowych zasad bezpieczeństwa, aby zmniejszyć ryzyko pożaru, porażenia prądem elektrycznym i obrażeń ciała.
- Przeczytaj te instrukcje.
- Zachowaj tę instrukcję.
- Przestrzegaj wszystkich ostrzeżeń.
- Postępuj zgodnie ze wszystkimi instrukcjami.
- Nie należy używać tego urządzenia w pobliżu wody.
- Czyścić wyłącznie suchą szmatką.
- Nie zasłaniaj żadnych otworów wentylacyjnych. Montaż należy wykonać zgodnie z instrukcją producenta.
- Nie należy instalować w pobliżu źródeł ciepła, takich jak grzejniki, kratki wentylacyjne, piece lub inne urządzenia (w tym amp(lifiers) wytwarzające ciepło.
- Chroń przewód zasilający przed deptaniem i przytrzaśnięciem, zwłaszcza w pobliżu wtyczek, gniazdek i miejsc, w których wychodzi z urządzenia.
- Stosować wyłącznie dodatki/akcesoria wskazane przez producenta.
- Odłączaj urządzenie od zasilania podczas burzy z piorunami lub jeśli nie używasz go przez dłuższy czas.
3. Koniec produktuview
The Pioneer VSX-923K A/V Receiver is designed to be the central hub of your home entertainment system. It features multiple inputs and outputs to connect various audio and video sources.
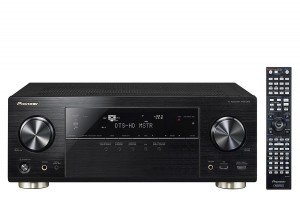
Rycina 3.1: Przód view of the Pioneer VSX-923K A/V Receiver alongside its remote control. The receiver features a black finish with a central display, input selectors, and volume knob. The remote control is slim and black with numerous buttons.
3.1 Główne cechy
- 7.2 Channel A/V Receiver with dual sub-woofer preouts.
- 4K Ultra HD video upscaling and pass-through.
- High-Resolution Audio playback (WAV, FLAC, AIFF, Apple Lossless up to 192kHz/24-bit).
- Network streaming via DLNA or Apple AirPlay.
- Smartphone connectivity for iPod, iPhone, iPad, or Android.
- Built-in ECO Mode for energy saving.
- Multi-room audio with powered Zone 2 output.
4. Konfiguracja
4.1 Rozpakowywanie i umieszczanie
Carefully remove the receiver from its packaging. Ensure all accessories are present (remote control, batteries, setup microphone, FM antenna, AM loop antenna, power cord).
Place the receiver on a stable, level surface with adequate ventilation. Avoid placing it in direct sunlight or near heat sources. Allow at least 10 cm (4 inches) of clear space around the top and sides for proper airflow.
4.2 Podłączenie głośników
The VSX-923K supports a 7.2 channel speaker configuration. Connect your speakers to the corresponding terminals on the rear panel. Ensure correct polarity (+ to + and - to -) for all speakers.
- Głośniki przednie (L/P): Podłącz do zacisków FRONT L/R.
- Głośnik centralny: Podłącz do zacisku CENTER.
- Głośniki przestrzenne (L/P): Podłącz do zacisków SURROUND L/R.
- Surround Back/Height Speakers (L/R): Podłącz do zacisków SURROUND BACK/HEIGHT L/R.
- Subwoofery: Connect to SUBWOOFER 1 and SUBWOOFER 2 pre-out jacks using RCA cables.
4.3 Connecting Audio/Video Components
Use appropriate cables (HDMI, optical, coaxial, RCA) to connect your source devices (Blu-ray player, game console, cable box, etc.) to the receiver's input jacks.
- HDMI: For high-definition audio and video. Connect HDMI OUT to your TV/projector and HDMI IN to your source devices. The VSX-923K has 8 HDMI inputs.
- Optical/Coaxial Digital: For digital audio from devices without HDMI.
- Dźwięk analogowy: For analog audio devices (e.g., CD player, turntable with pre-amp).
- USB: Do podłączania urządzeń pamięci masowej USB w celu odtwarzania muzyki.
- LAN: Connect an Ethernet cable for network features (Internet Radio, DLNA, AirPlay).
4.4 Konfiguracja początkowa i kalibracja MCACC
After connecting all components, power on the receiver. Pioneer's Multi-Channel Acoustic Calibration System (MCACC) will guide you through the initial speaker setup and room calibration process. Use the supplied setup microphone for accurate measurements.
- Connect the MCACC setup microphone to the front panel jack.
- Umieść mikrofon w miejscu, w którym najczęściej słuchasz.
- Follow the on-screen instructions on your TV to start the MCACC calibration.
- The system will emit test tones to measure speaker size, level, distance, and equalization.
5. Instrukcja obsługi
5.1 Podstawowa obsługa
- Włączanie/wyłączanie: Naciśnij przycisk ZASILANIE na panelu przednim lub pilocie.
- Wybór wejścia: Use the INPUT SELECTOR buttons on the front panel or remote to choose your desired source (e.g., BD/DVD, GAME, TV/SAT).
- Regulacja głośności: Adjust the MASTER VOLUME knob on the front panel or VOL +/- buttons on the remote.
- Tryby dźwięku: Press the SURROUND, STEREO, or ADVANCED SURROUND buttons on the remote to select different audio processing modes.
5.2 Funkcje sieciowe
Connect the receiver to your home network via an Ethernet cable or an optional wireless LAN adapter to access the following features:
- Radio internetowe: Uzyskaj dostęp do tysięcy stacji radiowych online na całym świecie.
- DLNA: Przesyłaj muzykę strumieniowo files from compatible devices on your home network (e.g., PC, NAS).
- Apple AirPlay: Stream music wirelessly from your Apple devices.
- Aktualizacje oprogramowania układowego: Keep your receiver's software up-to-date via network connection.
5.3 Sterowanie smartfonem/tabletem
Download the free Pioneer iControlAV2013 app for your iOS or Android device to control the receiver remotely. The app provides an intuitive interface for input selection, volume control, sound mode adjustments, and more.
5.4 Tryb EKO
Activate ECO Mode to reduce power consumption without significantly compromising sound and video performance. This feature can be enabled or disabled through the receiver's on-screen menu.
6. Konserwacja
6.1 Czyszczenie
To maintain the appearance of your receiver, wipe the cabinet and front panel with a soft, dry cloth. Do not use abrasive cleaners, waxes, or solvents as they may damage the finish.
W przypadku uporczywych plam lekko dampNamocz szmatkę w wodzie z dodatkiem łagodnego detergentu, a następnie natychmiast wytrzyj do sucha.
6.2 Wentylacja
Ensure that the ventilation openings on the top and sides of the receiver are not blocked. Proper ventilation is crucial to prevent overheating and ensure long-term reliability.
6.3 aktualizacji oprogramowania sprzętowego
Periodically check for firmware updates via the network connection. Updates can improve performance, add new features, and resolve potential issues. Refer to the on-screen menu for checking and performing updates.
7. Rozwiązywanie Problemów
If you experience problems with your receiver, refer to the following common issues and solutions before contacting customer support.
| Problem | Możliwa przyczyna | Rozwiązanie |
|---|---|---|
| Brak zasilania | Przewód zasilający nie jest prawidłowo podłączony. | Check power cord connection to the receiver and wall outlet. |
| Brak dźwięku | Incorrect input selected; speakers not connected properly; volume too low; Mute is on. | Select correct input; check speaker wire connections; increase volume; press MUTE button on remote. |
| Brak wideo | Incorrect input selected; HDMI cable not connected properly; TV input not set to receiver. | Select correct input; check HDMI cable connections; ensure TV is on the correct HDMI input. |
| Pilot nie działa | Baterie są rozładowane lub nieprawidłowo włożone; między pilotem a odbiornikiem znajduje się przeszkoda. | Replace batteries; ensure correct polarity; remove obstacles; point remote directly at receiver. |
| Funkcje sieciowe nie działają | Network cable disconnected; router/modem issue; incorrect network settings. | Check LAN cable connection; restart router/modem; verify network settings in receiver menu. |
8. Specyfikacje
The following are key technical specifications for the Pioneer VSX-923K A/V Receiver:
| Funkcja | Szczegół |
|---|---|
| Model | VSX-923-K |
| Kanały | Kanał 7.2 |
| Dźwięk Wattage | 190 Watts (per channel, 6 ohms, 1 kHz, 1% THD, 1 ch driven) |
| Video Upscaling | 4K Ultra HD |
| Wejścia HDMI | 8 |
| Wyjścia HDMI | 1 |
| Formaty audio | MP3, WMA, AAC, FLAC, WAV, AIFF, Apple Lossless |
| Łączność | USB, HDMI, Ethernet (LAN), Bluetooth (Built-In), FM Tuner |
| Cechy specjalne | Built-In Bluetooth, Subwoofer Pre-outs (x2), FM Tuner, Internet Radio, DLNA, AirPlay, ECO Mode, Zone 2 Audio Output |
| Wymiary (w przybliżeniu) | 43.5 x 36.25 x 16.8 cm (szer. x gł. x wys.) |
| Waga (w przybliżeniu) | 11.5 kilogramów |
9. Gwarancja i wsparcie
Aby uzyskać informacje dotyczące gwarancji, zapoznaj się z kartą gwarancyjną dołączoną do produktu lub odwiedź oficjalną stronę internetową firmy Pioneer webZachowaj dowód zakupu na wypadek roszczeń gwarancyjnych.
For technical support, service, or inquiries, please contact Pioneer customer service. Contact details can typically be found on the Pioneer webmiejscu lub w opakowaniu produktu.
Oficjalny pionier Webstrona: www.pioneer-india.in