
1. Wprowadzenie
Dziękujemy za zakupasing the Fonestar AS-170RU Hi-Fi Amplifier. This device is designed to provide high-fidelity stereo audio amplification, featuring a built-in USB/MP3 player, AM/FM digital tuner, and multiple audio inputs. This manual provides detailed instructions for safe installation, operation, and maintenance of your amplifier. Przed użyciem należy dokładnie przeczytać instrukcję i zachować ją do wykorzystania w przyszłości.
2. Instrukcje bezpieczeństwa
- Zasilanie: Zapewnij amplifier jest podłączony do zasilacza o odpowiedniej pojemnościtage specified on the unit. Disconnect the power cord from the outlet if the unit will not be used for an extended period.
- Wentylacja: Do not block ventilation openings. Ensure adequate space around the unit for proper airflow to prevent overheating.
- Woda i wilgoć: Nie wystawiaj urządzenia na działanie deszczu, wilgoci ani kapiących/rozpryskujących się płynów. Nie stawiaj na urządzeniu przedmiotów wypełnionych płynami, takich jak wazony.
- Źródła ciepła: Trzymaj urządzenie z dala od źródeł ciepła, takich jak grzejniki, kratki wentylacyjne, piece lub inne urządzenia (w tym amp(lifiers) wytwarzające ciepło.
- Czyszczenie: Czyścić wyłącznie suchą szmatką. Nie używaj środków czyszczących w płynie ani w aerozolu.
- Serwisowanie: Nie próbuj samodzielnie naprawiać tego produktu. Wszelkie czynności serwisowe należy powierzyć wykwalifikowanemu personelowi serwisowemu.
- Umieszczenie: Umieść urządzenie na stabilnej, płaskiej powierzchni. Unikaj umieszczania go w bezpośrednim świetle słonecznym lub w pobliżu silnych pól magnetycznych.
3. Zawartość opakowania
Sprawdź, czy w przesyłce znajdują się następujące elementy:
- Fonestar AS-170RU Hi-Fi Ampżywsze
- Zdalne sterowanie
- Antena AM
- Antena FM
- Instrukcja obsługi (ten dokument)
4. Koniec produktuview
4.1 Panel przedni
The front panel provides access to essential controls and the display.
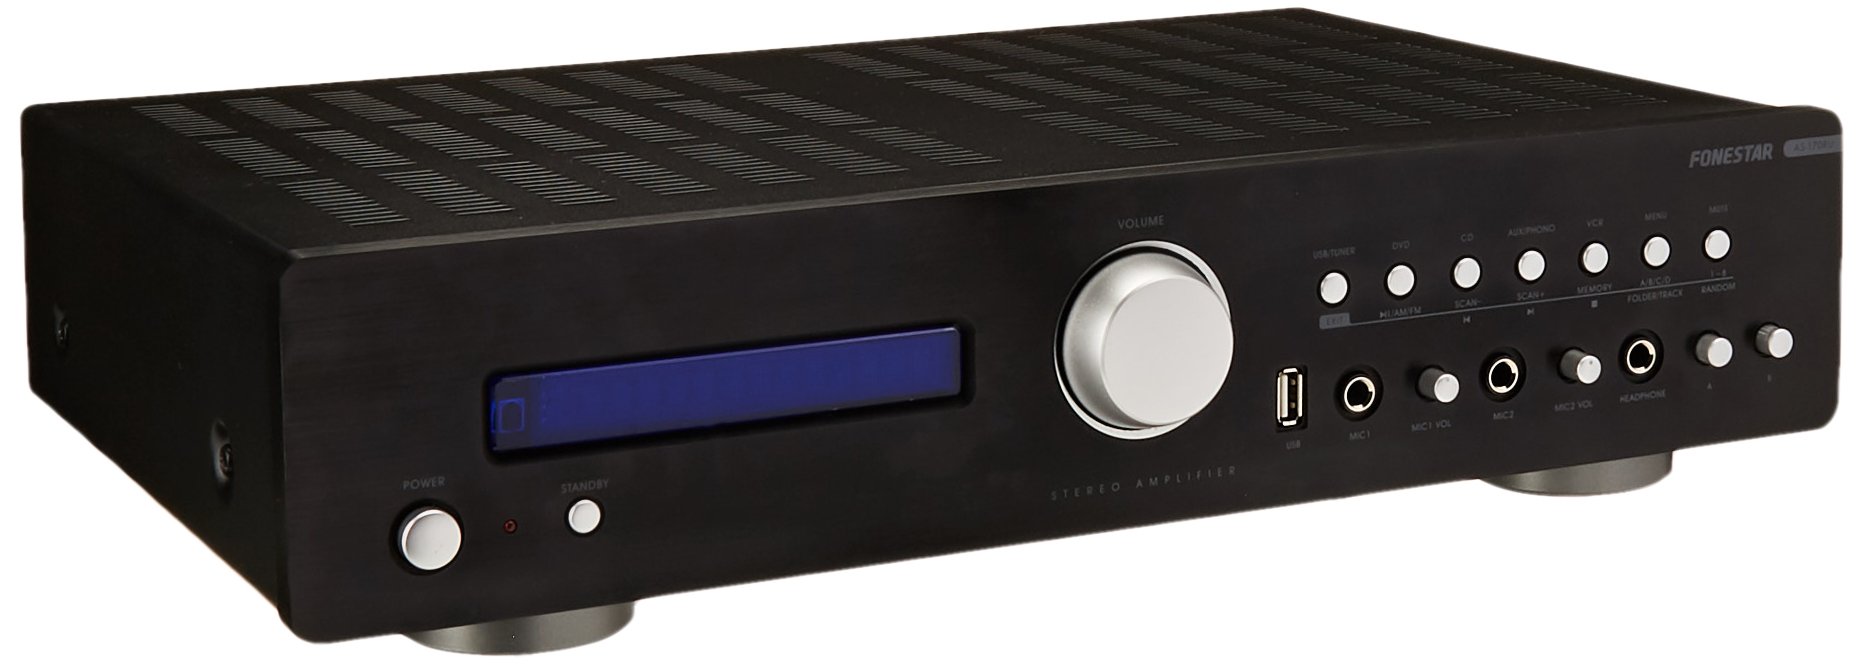
Image: Fonestar AS-170RU Front Panel. Na tym zdjęciu widać przód view z amplifier, showing the VFD display, USB port, headphone output, input selectors, volume knob, and other control buttons.
- Przycisk zasilania: Obraca amplifier włączony lub wyłączony.
- Wyświetlacz VFD: Shows current input, volume level, tuner information (frequency, RDS), and USB/MP3 track details (ID3 tag).
- Port USB: For connecting USB storage devices to play MP3 files.
- Wyjście słuchawkowe: Gniazdo 6.3 mm do podłączenia słuchawek.
- Selektory wejść: Buttons for choosing audio sources (CD, DVD, VCR, AUX/Phono, USB/Tuner).
- Regulacja głośności: Rotary knob to adjust the master volume level.
- Wejścia mikrofonowe: Two 6.3mm microphone jacks with independent volume control.
- Regulacja tonów: Buttons or menu options for adjusting Bass, Treble, and Balance.
4.2 Panel tylny
The rear panel contains all the necessary connections for your audio sources, speakers, and antennas.

Image: Fonestar AS-170RU Rear Panel. This image illustrates the rear connections of the amplifier, including speaker terminals (A/B), various RCA input jacks (CD, DVD, VCR, AUX/Phono), REC OUT, PRE OUT, AMP IN, and antenna connections (FM COAX, AM LOOP ANT).
- Speaker Outputs (A/B): Terminals for connecting two pairs of speakers. Supports 4-16 ohms for A or B, or 8-16 ohms for A+B.
- Wejścia audio (RCA):
- Wejście CD: Do podłączenia odtwarzacza CD.
- Wejście DVD: For connecting a DVD player or other audio source.
- VCR Input: For connecting a VCR or other audio source.
- AUX/PHONO Input: For connecting auxiliary devices or a turntable (Phono input may require a pre-amplifier if your turntable does not have one built-in).
- NAGRANIE WYJŚCIA: Wyjście RCA do podłączenia urządzenia nagrywającego.
- PRZEDWYJŚCIE: RCA output for connecting to an external power ampliyfikator.
- AMP W: RCA input for connecting an external pre-ampliyfikator.
- Połączenia antenowe:
- FM COAX 75Ω: Do podłączenia anteny FM.
- AM LOOP ANT: For connecting the supplied AM loop antenna.
4.3 Pilot zdalnego sterowania
The included remote control allows convenient operation of the ampz daleka.

Image: Fonestar AS-170RU Remote Control. This image shows the remote control unit with various buttons for power, input selection, volume, mute, tuner functions, USB playback controls, and tone adjustments.
- CZEKAJ: Zasilanie włącz / wyłącz.
- Selektory wejść: Buttons for CD, DVD, VCR, AUX/PHONO, USB/TUNER.
- Zwiększanie/zmniejszanie głośności (VOL +/-): Reguluje główną głośność.
- NIEMY: Wycisza dźwięk.
- AM/FM: Switches between AM and FM tuner modes.
- SKANDOWAĆ: Skanuje stacje radiowe.
- PAMIĘĆ: Stores radio station presets.
- USB Playback Controls: Play/Pause, Stop, Skip Track, Folder/Track navigation.
- EQ OFF / BASS / TREBLE: Access tone controls.
- RDS / ID3: Displays RDS information for radio or ID3 tag dla MP3 files.
5. Konfiguracja
5.1 Podłączanie głośników
- Zapewnij amplifier jest wyłączony i odłączony od gniazdka zasilania.
- Connect your speakers to the "SPEAKERS OUTPUT" terminals on the rear panel.
- Dopasuj dodatni (+) zacisk amplifier (red) to the positive (+) terminal of your speaker, and the negative (-) terminal (black) to the negative (-) terminal.
- The AS-170RU supports two groups of speakers (A and B). You can connect one pair to "SPEAKERS A" and another to "SPEAKERS B".
- Upewnij się, że impedancja głośników jest zgodna z amplifier's specifications: 4-16 ohms for A or B, or 8-16 ohms for A+B.
5.2 Podłączanie źródeł dźwięku
Use RCA cables to connect your audio components to the corresponding input jacks on the rear panel.
- Odtwarzacz CD: Connect to the "CD" input.
- Odtwarzacz DVD: Connect to the "DVD" input.
- Magnetowid: Connect to the "VCR" input.
- Auxiliary Device (e.g., smartphone, tablet): Connect to the "AUX/PHONO" input.
- Obrotnica: Connect to the "AUX/PHONO" input. If your turntable does not have a built-in pre-amplifier, you may need an external phono pre-ampliyfikator.
5.3 Podłączanie anten
- Antena FM: Connect the supplied FM wire antenna to the "FM COAX 75Ω" terminal. Extend the wire for optimal reception.
- Antena AM: Connect the supplied AM loop antenna to the "AM LOOP ANT" terminals. Position the loop for best reception.
5.4 Połączenie zasilania
Once all audio and speaker connections are made, plug the amplifier's power cord into a suitable AC power outlet.
6. Instrukcja obsługi
6.1 Podstawowa obsługa
- Włączanie/wyłączanie: Press the Power button on the front panel or the STANDBY button on the remote control to turn the amplifier włączony lub wyłączony.
- Wybierz źródło wejścia: Press the desired input selector button on the front panel (CD, DVD, VCR, AUX/PHONO) or the remote control (CD, DVD, VCR, AUX/PHONO, USB/TUNER).
- Dostosuj głośność: Aby dostosować poziom dźwięku, obróć pokrętło głośności na panelu przednim lub użyj przycisków VOL +/- na pilocie.
- Niemy: Press the MUTE button on the remote control to temporarily silence the audio. Press it again to restore sound.
6.2 Odtwarzanie USB/MP3
- Insert a USB storage device (flash drive) into the USB port on the front panel.
- Select "USB/TUNER" as the input source. The amplifier will automatically detect and begin playing MP3 files.
- Use the playback controls on the remote control (Play/Pause, Stop, Skip Track, Folder/Track) to navigate and control your music.
- The VFD display will show track information, including ID3 tags jeśli dostępne.
- Ten amplifier supports up to 65,000 indexable folders and files, with a maximum of 8 folder levels.
6.3 Obsługa tunera AM/FM
- Select "USB/TUNER" as the input source, then press the AM/FM button on the remote control to switch between AM and FM bands.
- Automatyczne skanowanie: Press the SCAN button on the remote control to automatically search for and store available radio stations.
- Strojenie ręczne: Use the tuning buttons (usually arrow keys) on the remote control to manually adjust the frequency.
- Zaprogramowane stacje: Ten amplifier supports 64 presets. Use the MEMORY button to store and recall your favorite stations.
- Funkcja RDS: If available, press the RDS button on the remote control to display Radio Data System information (e.g., station name, program type).
6.4 wejścia mikrofonowe
- Connect microphones to the 6.3mm MIC 1 and MIC 2 jacks on the front panel.
- Adjust the independent volume controls for each microphone to achieve the desired level.
6.5 Tone and Balance Control
Ten amplifier allows adjustment of bass, treble, and balance through its menu system or dedicated buttons on the remote control. Refer to the remote control section for specific buttons like EQ OFF, BASS, TREBLE.
7. Konserwacja
- Czyszczenie: Przed czyszczeniem odłącz zasilanie. Do przecierania powierzchni zewnętrznych użyj miękkiej, suchej ściereczki. Nie używaj środków czyszczących o właściwościach ściernych, wosków ani rozpuszczalników.
- Wentylacja: Okresowo sprawdzaj, czy otwory wentylacyjne są wolne od kurzu i zanieczyszczeń.
- Składowanie: Jeśli urządzenie będzie przechowywane przez dłuższy czas, należy odłączyć je od gniazdka zasilania i przechowywać w chłodnym, suchym miejscu, z dala od bezpośredniego światła słonecznego i ekstremalnych temperatur.
8. Rozwiązywanie Problemów
If you encounter problems with your amplifier, refer to the following table for possible solutions.
| Problem | Możliwa przyczyna | Rozwiązanie |
|---|---|---|
| Brak zasilania | Przewód zasilający nie jest podłączony; Gniazdo zasilania jest uszkodzone; Amplifier w trybie czuwania. | Ensure power cord is securely plugged in. Test the outlet with another device. Press the Power/STANDBY button. |
| Brak dźwięku | Wybrano nieprawidłowe wejście; Głośność jest zbyt niska; Głośniki nie są prawidłowo podłączone; Funkcja wyciszenia jest aktywna. | Select the correct input source. Increase volume. Check speaker connections. Deactivate MUTE. |
| Słaby odbiór radia | Antenna not connected or poorly positioned; Interference. | Connect and adjust the position of the AM/FM antennas. Move the ampTrzymaj urządzenie z dala od innych urządzeń elektronicznych. |
| Odtwarzanie USB nie działa | USB device not inserted correctly; Incompatible file format; USB device faulty. | Ensure USB device is fully inserted. Check if filePliki są w formacie MP3. Spróbuj użyć innego urządzenia USB. |
| Amplifier turns off unexpectedly or cycles power | Overheating; Short circuit in speaker wiring; Internal fault. | Ensure adequate ventilation. Check speaker wires for frayed strands causing short circuits. If the problem persists, disconnect power and contact qualified service personnel. |
9. Specyfikacje
- Model: AS-170RU
- Moc wyjściowa: 80 + 80 W RMS at 4 Ω
- Impedancja głośnika: 4-16 Ω (A or B), 8-16 Ω (A+B)
- Ochrona: 3 circuits (short circuits, overload, overvoltage)
- Odtwarzacz USB: MP3 file odtwarzanie, ID3 tag support. Max 65,000 indexable folders/files, max 8 folder levels.
- Tuner: Digital AM/FM, 64 presets, RDS.
- Wejścia: 2 x Microphone (6.3mm), 4 x RCA (CD, DVD, VCR, AUX/Phono), 1 x RCA (AMP W).
- Wyjścia: 1 x RCA (REC OUT), 1 x RCA (PRE OUT), Headphone (6.3mm).
- Wyświetlacz: Blue VFD.
- Kontrola tonów: Bass, Treble, Balance (via menu/remote).
- Wymiary: 40 x 40 x 60 cm (ok. 15.7 x 15.7 x 23.6 cala)
- Waga: 7.2 kg (ok. 15.87 funta)
10. Gwarancja i wsparcie
For warranty information and technical support, please refer to the warranty card included with your product or contact your authorized Fonestar dealer. Do not attempt to repair the unit yourself, as this may void your warranty.