GIMA OXY 6
Instrukcja obsługi pulsoksymetru GIMA OXY 6-palcowego
Model: OXY 6 (34285)
1. Wprowadzenie
The GIMA OXY 6 Finger Pulse Oximeter is a portable device designed for non-invasive spot-checking of arterial oxygen saturation (SpO2) and pulse rate. It is suitable for use in medical and hospital environments, as well as for personal use under medical guidance. This manual provides essential information for the safe and effective operation of the device.
2. Informacje dotyczące bezpieczeństwa
Please read all safety warnings and precautions before using the device. Failure to do so may result in inaccurate readings or device malfunction.
- This device is intended for spot-checking and not for continuous monitoring.
- Nie używaj pulsoksymetru w środowisku MRI lub CT.
- Trzymaj urządzenie z dala od wody i wilgoci.
- Consult a medical professional for interpretation of readings. This device is not a substitute for professional medical advice.
- Ensure the finger is clean and free of nail polish or artificial nails, as these can affect accuracy.
- Avoid excessive movement during measurement to ensure stable readings.
3. Koniec produktuview
The GIMA OXY 6 features a high-resolution OLED color display showing SpO2, pulse rate, pulse bar graph, perfusion index (PI), and battery level. It is designed for ease of use with a compact form factor.

Rysunek 1: Przód view of the GIMA OXY 6 Pulse Oximeter, displaying SpO2 and pulse rate values on its screen.
3.1. Zawartość opakowania
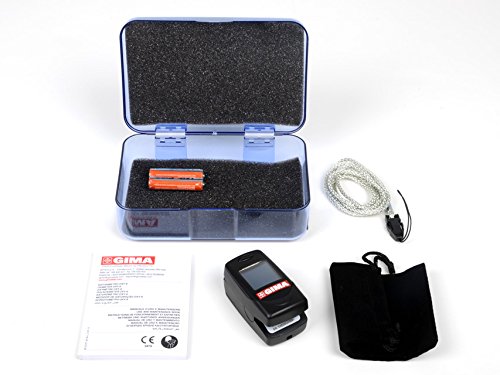
Rysunek 2: The package includes the GIMA OXY 6 Pulse Oximeter, a plastic case, AAA batteries, and a lanyard.
- GIMA OXY 6 Pulse Oximeter
- 2 baterie AAA
- Plastikowy futerał
- Falrep
- Instrukcja obsługi
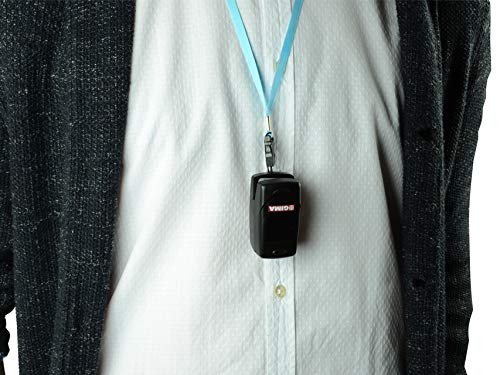
Rysunek 3: The GIMA OXY 6 Pulse Oximeter attached to a lanyard, demonstrating its portability and ease of carrying.
4. Konfiguracja
4.1. Instalacja baterii
- Otwórz pokrywę komory baterii znajdującą się z tyłu urządzenia.
- Włóż dwie baterie AAA zgodnie ze wskaźnikami polaryzacji (+/-) wewnątrz komory.
- Dokładnie zamknij pokrywę komory baterii.
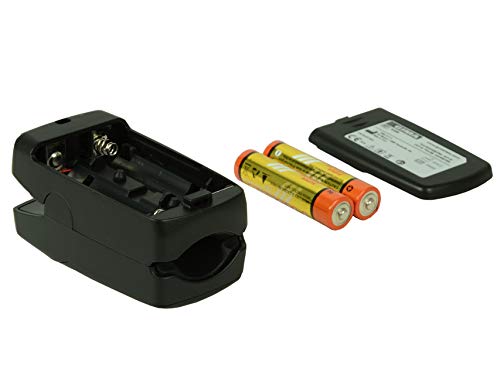
Rysunek 4: Open battery compartment showing placement for two AAA batteries.
5. Instrukcja obsługi
5.1. Wykonywanie pomiaru
- Ensure the device has fresh batteries installed.
- Otwórz klamp pulsoksymetru.
- Insert one finger (preferably the index, middle, or ring finger) into the rubber opening of the oximeter, ensuring the finger is fully inserted and resting on the sensor. The recommended finger thickness for this model is 1-22 mm.
- Zwolnij clamp. The device will automatically turn on and begin measurement.
- Keep your hand still during the measurement. Avoid bending your finger or making hand movements.
- Readings for SpO2, Pulse Rate, and Perfusion Index (PI) will appear on the display within a few seconds.

Rysunek 5: The GIMA OXY 6 Pulse Oximeter correctly placed on a finger for measurement.
5.2. Zrozumienie wyświetlacza
- SpO2: Peripheral Oxygen Saturation, displayed as a percentage.
- PR: Pulse Rate, displayed in beats per minute (bpm).
- LICZBA PI: Perfusion Index, a numerical value indicating the strength of the pulse signal at the sensor site.
- Wykres słupkowy tętna: Visual representation of pulse strength.
- Wskaźnik baterii: Pokazuje aktualny poziom naładowania baterii.
5.3. Automatyczne wyłączanie zasilania
Urządzenie wyłączy się automatycznie po około 8 sekundach bezczynności lub po zabraniu palca.
5.4. Niska objętośćtage Alarm
Gdy bateria jest naładowanatage is low, a low voltage alarm will be indicated on the display. Replace the batteries promptly to ensure accurate operation.
5.5. Przewodnik głosowy
The GIMA OXY 6 features an 8-language voice guide (English, French, Italian, Spanish, Greek, Portuguese, Arabic) for enhanced usability. Refer to the full manual for specific instructions on activating and changing voice guide settings.
6. Konserwacja
6.1. Czyszczenie
- Wyczyść powierzchnię pulsoksymetru miękką ściereczką.ampened with medical alcohol (70% ethanol or isopropanol).
- Nie zanurzaj urządzenia w wodzie ani żadnym roztworze czyszczącym.
- Przed ponownym użyciem należy upewnić się, że urządzenie jest całkowicie suche.
6.2. Wymiana baterii
Wymień baterie, gdy poziom naładowania baterii jest niski.tage indicator appears. Always use two new AAA alkaline batteries. Dispose of used batteries according to local regulations.
6.3. Przechowywanie
Store the oximeter in its plastic carrying case in a cool, dry place, away from direct sunlight and extreme temperatures. Remove batteries if the device will not be used for an extended period.
7. Rozwiązywanie Problemów
| Problem | Możliwa przyczyna | Rozwiązanie |
|---|---|---|
| Brak wyświetlania po włączeniu zasilania | Baterie są rozładowane lub nieprawidłowo zainstalowane. | Wymień baterie lub zainstaluj je ponownie prawidłowo, zwracając uwagę na biegunowość. |
| Niedokładne odczyty | Finger not properly inserted; excessive movement; nail polish; cold finger. | Re-insert finger correctly; remain still; remove nail polish; warm the finger. |
| "Finger Out" or similar error message | Finger not detected or improperly placed. | Upewnij się, że palec jest całkowicie wsunięty i spoczywa na czujniku. |
| Urządzenie niespodziewanie się wyłącza | Low battery; automatic power-off due to inactivity. | Replace batteries; ensure finger is inserted for measurement. |
8. Specyfikacje
| Numer modelu | 34285 (OXY 6) |
| Typ wyświetlacza | Kolorowy wyświetlacz OLED |
| Parametry pomiarowe | SpO2, Pulse Rate, Perfusion Index (PI) |
| Zakres pomiaru SpO2 | (Typical range, refer to device for exact range) |
| Zakres pomiaru tętna | (Typical range, refer to device for exact range) |
| Dokładność | High precision and repeatability with noise suppression |
| Wymagania dotyczące zasilania | 2 baterie alkaliczne AAA 1.5 V |
| Żywotność baterii | Approximately 3 hours of continuous operation with full batteries |
| Wymiary (dł. x szer. x wys.) | Wymiary 16 x 5.5 x 10 cm |
| Waga | 200 gramów (w tym baterie) |
| Finger Thickness Range | 1-22 mm |
| Przewodnik głosowy | 8 languages (GB, FR, IT, ES, GR, PT, Arabic) |
9. Gwarancja i wsparcie
Information regarding specific warranty terms and customer support for the GIMA OXY 6 Pulse Oximeter is not provided in this document. Please refer to the product packaging or contact GIMA customer service for details.
Ask a question about this manual
Ask about setup, troubleshooting, compatibility, parts, safety, or missing instructions. Manuals+ will review the question and use this page’s manual context to help answer it.