BW BW7MY
BW 7-inch TFT Color LCD Car Rear View Monitor aparatu
Instrukcja obsługi
Produkt ponadview
The BW 7-inch TFT Color LCD Car Rear View Camera Monitor is designed to enhance your driving safety and convenience. It features a high-resolution display and two AV inputs, allowing connection to a rear view camera, car DVD, VCR, or other video equipment. The monitor supports automatic activation for rear view cameras and offers adjustable screen settings for optimal viewing.

Image: The BW 7-inch TFT Color LCD Car Rear View Camera Monitor, shown with its adjustable stand and included remote control. The screen displays a car on a scenic road.
Co jest w pudełku
Sprawdź, czy w opakowaniu znajdują się wszystkie elementy wymienione poniżej:
- 1 x 7-inch Car Monitor
- 1 x uchwyt
- 1 x Video & Power Cable
- 1 x Pilot zdalnego sterowania
- 1 x Instrukcja obsługi
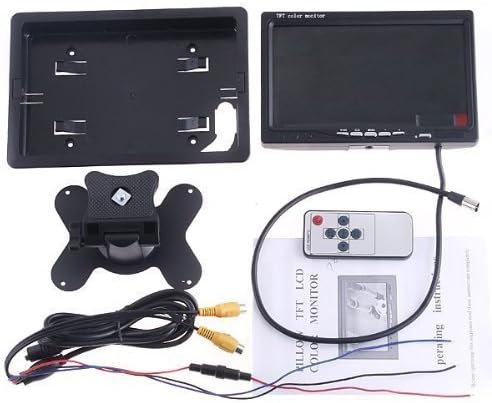
Image: All components included in the product package, neatly arranged. This includes the monitor, bracket, cables, remote control, and user manual.
Konfiguracja i instalacja
The monitor offers flexible installation options, either standing on a flat surface or mounting using the provided bracket.
Montaż monitora
- Attach the monitor to the provided bracket. The bracket allows for adjustment of the viewkąt.
- Secure the bracket to a suitable surface in your vehicle. Ensure the mounting location does not obstruct your view lub zakłócać działanie pojazdu.

Zdjęcie: Tył view of the monitor, showing the connection points and the design of the back casing, which attaches to the mounting bracket.

Image: The monitor with its back casing detached, illustrating how the monitor can be separated from its housing for custom installations or maintenance.
Instrukcje okablowania
Connect the monitor using the provided video and power cable. Refer to the diagram below for proper connections:
- Podłączenie zasilania: Connect the red wire to a positive 12V DC power source and the black wire to a negative/ground point.
- Wejścia AV: The monitor has two AV inputs (AV1 and AV2).
- AV1: Typically used for car DVD, VCR, or other general video equipment.
- AV2: Dedicated for connection to a car backup camera.
- Reverse Priority (Blue Wire): Connect the blue wire to the positive wire of your vehicle's reverse light. This enables the monitor to automatically display the rear view camera feed when the vehicle is put into reverse. If the blue wire is not connected, you will need to manually switch to the AV2 input.

Image: A detailed wiring diagram illustrating the connections for power (red and black wires), AV inputs (yellow RCA connectors for AV1 and AV2), and the blue wire for automatic reverse camera activation.

Obraz: Zbliżenie view of the monitor's control buttons (V1/V2, Menu, etc.) and the multi-pin input connector for the video and power cable.
Instrukcja obsługi
The monitor can be operated using the buttons on the front panel or the included IR remote controller.
Podstawowa obsługa
- Włączanie/wyłączanie: The monitor will automatically power on when a video signal is detected or when the vehicle is put into reverse (if the blue wire is connected). It will power off automatically after backing. You can also use the power button on the monitor or remote.
- Przełączanie wejść: Press the "V1/V2" button on the monitor or remote to switch between AV1 and AV2 inputs.
- Nawigacja po menu: Use the "MENU" button to access display settings. Navigate options using the arrow buttons on the remote or corresponding buttons on the monitor.
Ustawienia wyświetlania
Within the menu, you can adjust the following display parameters:
- Jasność: Dostosuj ogólną jasność ekranu.
- Kontrast: Zmień różnicę między obszarami jasnymi i ciemnymi.
- Kolor: Dostosuj intensywność kolorów.
- Proporcje ekranu: Switch between 16:9 (widescreen) and 4:3 (standard) aspect ratios to match your video source.

Image: A composite image showing the monitor displaying various content, including a car scene and a soccer game, demonstrating its versatility for different video inputs.
Specyfikacje
Detailed technical specifications for the BW 7-inch Car Monitor:
| Funkcja | Specyfikacja |
|---|---|
| Rozmiar ekranu | 7 cala |
| Komponent wyświetlacza | Kolorowy wyświetlacz TFT LCD |
| Rezolucja | 800 x 480 pikseli |
| Współczynnik kontrastu | 100:1 |
| Video Frequency | PAL/NTSC |
| Wejście wideo | Two way video input (AV1, AV2) |
| Zasilacz | Prąd stały 12 V |
| Materiał obudowy | ABS |
| Temperatura pracy | 0 do 80 stopni Celsjusza |
| Temperatura przechowywania | -10 do 80 stopni C |
| Wymiary produktu (dł. x szer. x gł.) | 193 x 135 x 25mm (7.6 x 5.3 x 1.0 cali) |
| Masa netto produktu | 381 g (0.84 funta) |
| Numer modelu | BW7MY |
| Metoda kontroli | Remote, Buttons |
| Audio | No Audio input or Output |
Rozwiązywanie problemów
- Monitor does not turn on:
- Ensure the power cable is securely connected to a 12V DC power source.
- Sprawdź, czy źródło zasilania ma odpowiednią głośnośćtagi aktualne.
- Nie wyświetla się żaden obraz:
- Verify that the video input cables (AV1 or AV2) are correctly connected to your video source (e.g., camera, DVD player).
- Ensure the correct AV input is selected on the monitor (use the V1/V2 button).
- If using a rear view camera, confirm the camera is powered on and functioning.
- Tył view camera does not activate automatically:
- Ensure the blue wire from the monitor's power cable is correctly connected to the positive wire of your vehicle's reverse light.
- If the blue wire is not connected, you must manually switch to the AV2 input when backing up.
- Poor image quality (blurry, distorted):
- Check the video cable connections for looseness or damage.
- Adjust the Brightness, Contrast, and Color settings in the monitor's menu.
- Ensure the video source (camera, DVD) is outputting a clear signal.
- Pilot nie działa:
- Ensure there are no obstructions between the remote and the monitor's IR receiver.
- Check and replace the battery in the remote control if necessary (1 CR123A battery required).
Konserwacja i pielęgnacja
To ensure the longevity and optimal performance of your BW monitor, follow these maintenance guidelines:
- Czyszczenie: Use a soft, dry cloth to clean the monitor screen and housing. For stubborn smudges, slightly dampen the cloth with water. Avoid using harsh chemicals, abrasive cleaners, or solvents, as these can damage the display or finish.
- Temperatura: Operate and store the monitor within the specified temperature ranges (Operating: 0 to 80°C; Storage: -10 to 80°C). Extreme temperatures can affect performance and lifespan.
- Wilgoć: Keep the monitor dry. Exposure to moisture or liquids can cause electrical damage.
- Uszkodzenia fizyczne: Avoid dropping the monitor or subjecting it to strong impacts. Protect the screen from scratches.
- Zasilanie: Always use a stable DC 12V power supply. Fluctuations or incorrect voltagMoże to uszkodzić urządzenie.
Gwarancja i wsparcie
For warranty information or technical support, please refer to the documentation provided with your purchase or contact the manufacturer directly. Specific warranty terms and conditions may vary.
Producent: BW Group
Ask a question about this manual
Ask about setup, troubleshooting, compatibility, parts, safety, or missing instructions. Manuals+ will review the question and use this page’s manual context to help answer it.