1. Wprowadzenie
Dziękujemy za zakupasing the Gemini PS3-USB 3 Channel 10-Inch Mixer. This manual provides essential information for the proper setup, operation, and maintenance of your mixer. Please read this manual thoroughly before use to ensure optimal performance and to prevent damage.
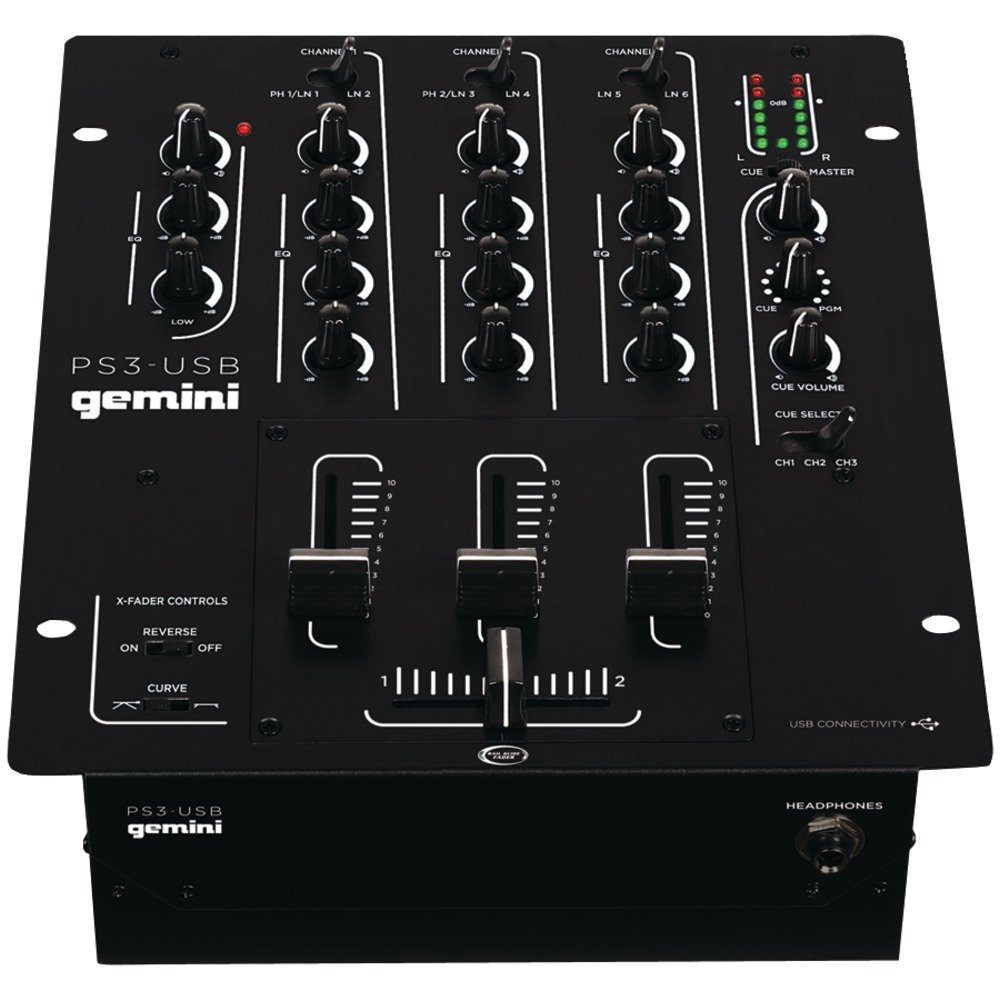
Rycina 1: Przód view of the Gemini PS3-USB Mixer, showing controls and inputs.
2. Instrukcje bezpieczeństwa
- Źródło zasilania: Podłączaj urządzenie wyłącznie do wskazanego źródła zasilania.
- Wentylacja: Zapewnij odpowiednią wentylację. Nie blokuj otworów wentylacyjnych.
- Woda i wilgoć: Nie wystawiaj urządzenia na działanie deszczu ani wilgoci. Nie stawiaj na urządzeniu przedmiotów wypełnionych płynami.
- Ciepło: Trzymaj urządzenie z dala od źródeł ciepła, takich jak grzejniki, kratki wentylacyjne, piece lub inne urządzenia (w tym amp(lifiers) wytwarzające ciepło.
- Czyszczenie: Czyścić wyłącznie suchą szmatką.
- Serwisowanie: Wszelkie prace serwisowe należy zlecać wykwalifikowanemu personelowi. Nie należy podejmować prób samodzielnego serwisowania produktu.
3. Konfiguracja
3.1 Rozpakowanie
Carefully unpack the mixer and check for any signs of damage. Retain the packaging materials for future transport or storage.
3.2 Podłączanie zasilania
Connect the provided power adapter to the mixer's power input and then to a suitable electrical outlet.
3.3 Połączenia audio
The PS3-USB features 5-line, 3-channel inputs with 2 convertible Phono/Line RCA inputs.
- Wejścia gramofonowe/liniowe: Connect turntables or line-level devices (CD players, media players) to the RCA inputs. Use the Phono/Line switch to select the appropriate input type for each channel.
- Wyjście główne: Connect the Master RCA outputs to your ampgłośniki lub aktywne głośniki.
- Wyjście nagrywania: Connect the Record RCA outputs to a recording device if you wish to record your mix.
- Słuchawki: Plug your 1/4" (6.3mm) headphones into the front panel headphone connector.
3.4 Połączenie USB
Connect the mixer to your Mac or PC using a standard USB cable. This allows for simultaneous playback and recording through your computer's media player software.
4. Instrukcja obsługi
4.1 Elementy sterujące i funkcjeview
Familiarize yourself with the mixer's layout:
- Channel Gain Control: Dostosowuje poziom wejściowy dla każdego kanału.
- 3-Band Rotary EQ: Provides control over High, Mid, and Low frequencies for each channel.
- Suwaki kanałów: Control the volume of each individual channel.
- Crossfader: A user-replaceable Rail Glide crossfader with curve and reverse controls for blending between channels.
- Głośność: Steruje ogólnym poziomem wyjściowym miksera.
- Mierniki VU: Visual indicators for master or cue levels.
- Sekcja sygnałów: Includes rotary cue volume, CUE/PGM controls, and a split cue switch for headphone monitoring.
- Sekcja mikrofonu: Features a rotary microphone volume control and a 2-band EQ for microphone input.
4.2 Podstawowe mieszanie
- Connect your audio sources to the appropriate Phono/Line inputs.
- Set the Phono/Line switch for each channel to match your source.
- Adjust the Gain control for each active channel to achieve a healthy input level without clipping (distortion).
- Use the channel faders to bring up the volume of your desired audio sources.
- Utilize the 3-band EQ to shape the sound of each channel.
- Use the crossfader to smoothly transition between channels.
- Monitor your mix using headphones via the Cue section and adjust the Master Volume for the main output.
4.3 Odtwarzanie i nagrywanie przez USB
Once connected via USB, your computer should recognize the PS3-USB as an audio device.
- Odtwarzanie nagranego dźwięku: Select the PS3-USB as the output device in your computer's sound settings or media player software to route audio through the mixer.
- Nagranie: Select the PS3-USB as the input device in your recording software. The mixer's master output will be sent to your computer for recording.
5. Konserwacja
- Czyszczenie: Do czyszczenia zewnętrznej części miksera należy używać miękkiej, suchej ściereczki. Nie należy używać płynnych środków czyszczących ani rozpuszczalników.
- Wymiana crossfadera: The Rail Glide crossfader is user-replaceable. Refer to the Gemini website or authorized service centers for replacement parts and instructions if needed.
- Składowanie: When not in use for extended periods, store the mixer in a cool, dry place, preferably in its original packaging.
6. Rozwiązywanie Problemów
| Problem | Możliwa przyczyna | Rozwiązanie |
|---|---|---|
| No sound output from master. | Master volume too low; incorrect input selection; ampproblemy z głośnikiem/głośnikiem. | Increase Master Volume. Check Phono/Line switches. Verify amppołączenia wzmacniacza/głośnika i zasilanie. |
| No sound from a specific channel. | Channel fader down; Gain too low; incorrect Phono/Line selection; source device off/muted. | Raise channel fader. Adjust Gain. Correct Phono/Line switch. Check source device. |
| Zniekształcony dźwięk. | Input Gain too high; Master Volume too high; faulty cable. | Reduce channel Gain. Reduce Master Volume. Replace cables. |
| USB recording/playback not working. | Incorrect USB connection; computer audio settings incorrect; driver issues. | Ensure USB cable is securely connected. Select PS3-USB as audio device in computer settings. Restart computer. |
7. Specyfikacje
- Model: PS3USB
- Kanały: 3
- Wejścia: 5-Line, 2 Convertible Phono/Line RCA, USB
- Wyjścia: Master RCA, Record RCA, 1/4" (6.3mm) Headphone
- EQ: 3-Band Rotary EQ per channel, 2-Band EQ for Microphone
- Crossfader: User-replaceable Rail Glide with Curve and Reverse controls
- Łączność: USB for Mac/PC Playback & Recording
- Dimensions (Approximate Shipping): 12.00 cala x 10.00 cala x 3.25 cala
- Weight (Approximate Shipping): 6.2 funta (2.8 kg)
- Kod UPC: 747705208149
8. Gwarancja i wsparcie
This Gemini product is covered by a 90-dniowa gwarancja from the date of purchase. This warranty covers manufacturing defects and workmanship under normal use. It does not cover damage caused by misuse, accident, modification, or unauthorized repair.
For technical support, service inquiries, or warranty claims, please contact your authorized Gemini dealer or visit the official Gemini webwitryna do informacji kontaktowych.
Zachowaj dowód zakupu w celu potwierdzenia gwarancji.