Wstęp
This manual provides essential instructions for the safe and effective operation of your Toshiba Camileo X200 HD 1080p Camcorder. Please read this manual thoroughly before using the device and retain it for future reference. The Camileo X200 is designed for capturing high-definition video and still images with ease.
Co jest w pudełku
Sprawdź, czy w opakowaniu znajdują się wszystkie elementy:
- Toshiba Camileo X200 HD 1080p Camcorder
- Bateria
- Kabel USB
- Zasilacz sieciowy
- Mini kabel HDMI
- Zdalne sterowanie
Produkt ponadview
Familiarize yourself with the main components of your Camileo X200 camcorder.

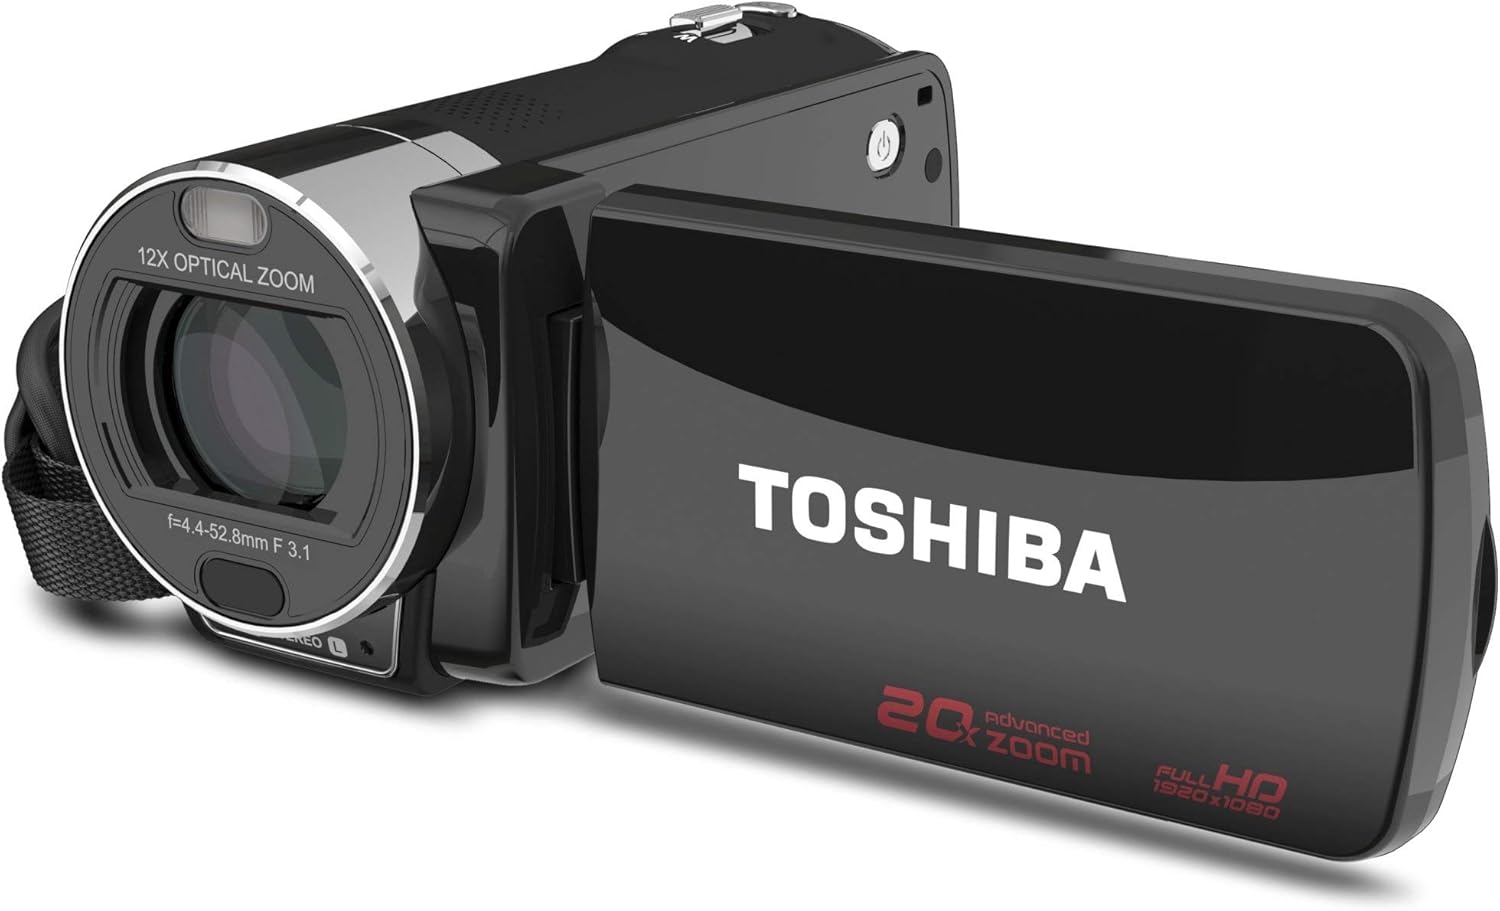
Obraz: przód i bok view of the Toshiba Camileo X200 camcorder with the 3-inch LCD screen open. The lens with "12X OPTICAL ZOOM" is visible, along with the "TOSHIBA" logo on the screen's exterior and "20x advanced zoom FULL HD 1920x1080" markings.
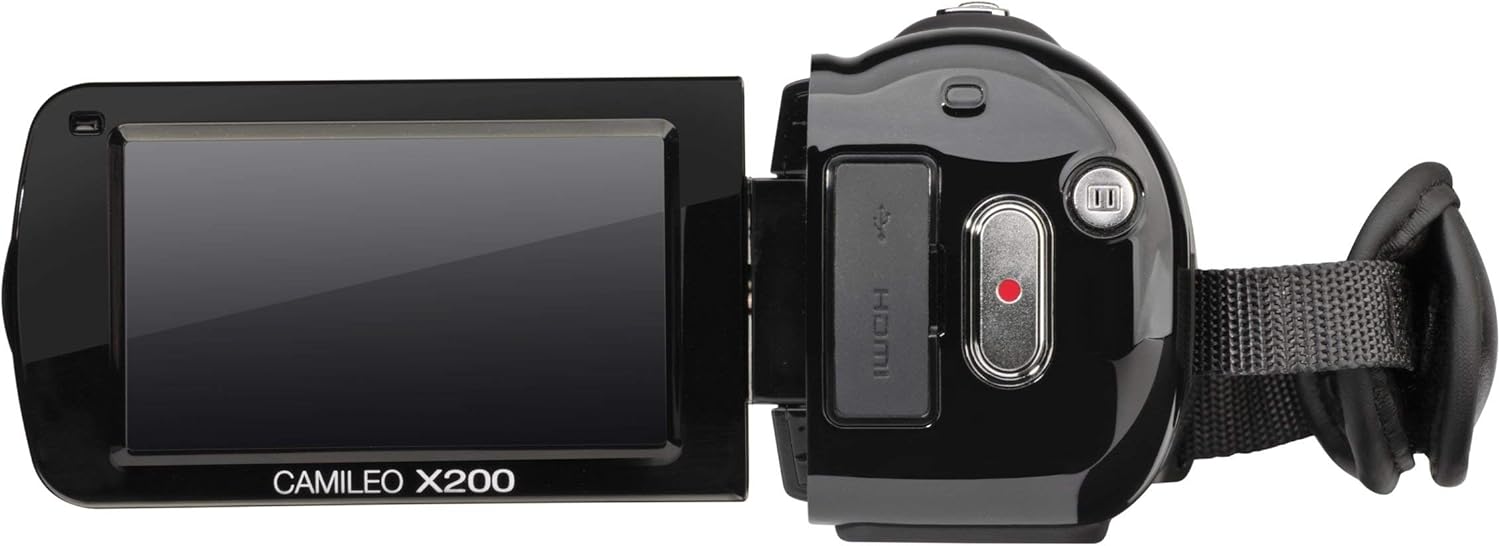
Obraz: Bok view of the Toshiba Camileo X200 camcorder, showing the USB and HDMI ports under a protective cover, and the record button.

Obraz: Góra view of the Toshiba Camileo X200 camcorder, highlighting the zoom lever and power button.
Obraz: Inny view of the Toshiba Camileo X200 camcorder with the screen open, showing the "CAMILEO X200" branding on the interior of the screen panel.
Kluczowe komponenty:
- Obiektyw: Features 12x optical zoom and 60x digital zoom.
- 3" Swiveling LCD Monitor: Touch screen interface for navigation and playback.
- Przycisk nagrywania: Rozpoczyna i zatrzymuje nagrywanie wideo.
- Przycisk zasilania: Włącza lub wyłącza kamerę.
- Port USB: For connecting to a computer and charging.
- Port HDMI: For connecting to an HDTV or monitor.
- Gniazdo mikrofonu: Do podłączenia mikrofonu zewnętrznego.
- Gniazdo karty SD: For memory expansion (SD/SDHC/XD cards).
Organizować coś
1. Wkładanie baterii
- Otwórz pokrywę komory baterii znajdującą się na spodzie kamery.
- Insert the provided Lithium-Ion battery, ensuring the contacts align correctly.
- Zamknij pokrywę komory baterii, aż do momentu jej bezpiecznego zamknięcia.
2. Ładowanie akumulatora
Przed pierwszym użyciem w pełni naładuj akumulator.
- Connect the AC adapter to the camcorder's USB port.
- Podłącz zasilacz sieciowy do gniazdka elektrycznego. Zaświeci się kontrolka ładowania.
- Charging can also be done via USB connection to a computer.
3. Wkładanie karty pamięci
The Camileo X200 requires an SD, SDHC, or XD memory card (not included) for recording.
- Locate the memory card slot, usually on the side or bottom of the camcorder.
- Włóż kartę pamięci metalowymi stykami skierowanymi w dół (lub zgodnie ze schematem obok gniazda), aż do zatrzaśnięcia.
- Aby wyjąć kartę, delikatnie wciśnij ją, aż wysunie się.
Instrukcja obsługi
1. Włączanie/wyłączanie zasilania
- To power on, open the LCD screen or press the Power button.
- To power off, close the LCD screen or press and hold the Power button.
2. Nagrywanie wideo
- Sprawdź, czy włożono sformatowaną kartę pamięci.
- Włącz kamerę.
- Skadruj ujęcie korzystając z ekranu LCD.
- Press the Record button (usually a red circle) to start recording. The recording indicator will light up.
- Naciśnij ponownie przycisk nagrywania, aby zatrzymać nagrywanie.
- Notatka: The camcorder records in 1920x1080p Full HD resolution.
3. Robienie zdjęć
- Switch the camcorder to photo mode (if applicable, via the touch screen menu).
- Skomponuj kadr.
- Press the Shutter button (often integrated with the record button or a separate button) to capture a 16MP interpolated photo.
4. Using Zoom
- Use the zoom lever (typically located near the top of the camcorder) to zoom in (T for Telephoto) or zoom out (W for Wide).
- The camcorder features 12x optical zoom and 60x digital zoom. Optical zoom provides higher quality without pixelation.
5. Using the 3" Touch Screen
- Navigate menus, change settings, and review footage by touching the LCD screen.
- On-screen editing features allow for trimming videos directly on the device.
6. Elektroniczna stabilizacja obrazu (EIS)
The Camileo X200 includes Electronic Image Stabilization to reduce blur caused by camera shake during recording. This feature is automatically engaged.
7. Funkcje audio
- The camcorder has a built-in stereo microphone for capturing audio.
- An external microphone can be connected via the microphone jack for enhanced audio quality.
8. Funkcje specjalne
Explore the menu for options such as slow-motion recording, time-lapse, and various color filters (e.g., black and white).
9. Podłączanie do komputera
- Podłącz kamerę do komputera za pomocą dołączonego kabla USB.
- The camcorder will appear as a removable drive, allowing you to transfer video and photo files.
- The Toshiba CAMILEO Uploader software (if available for your OS) can assist with web przesyłanie.
10. Connecting to a TV (HDMI)
- Use the included mini HDMI cable to connect the camcorder to an HDTV or monitor.
- Switch your TV's input to the corresponding HDMI port to view your recordings in high definition.
Konserwacja
Czyszczenie kamery
- Do czyszczenia zewnętrznej części kamery należy używać miękkiej, suchej ściereczki.
- Aby uniknąć zarysowań, do czyszczenia obiektywów i ekranu LCD należy używać specjalnej ściereczki i płynu do czyszczenia obiektywów.
- Unikaj stosowania silnych środków chemicznych i materiałów ściernych.
Pielęgnacja baterii
- Gdy nie używasz baterii, przechowuj ją w chłodnym i suchym miejscu.
- Aby przedłużyć żywotność akumulatora, należy unikać jego całkowitego rozładowywania.
- Jeśli akumulator będzie przechowywany przez dłuższy okres, należy go naładować do około 50% pojemności.
Składowanie
- Store the camcorder in a protective case to prevent dust and damage.
- Avoid exposing the camcorder to extreme temperatures or high humidity.
Rozwiązywanie problemów
Zapoznaj się z poniższymi typowymi problemami i rozwiązaniami:
| Problem | Możliwa przyczyna / rozwiązanie |
|---|---|
| Kamera nie włącza się. | Battery is depleted. Charge the battery using the AC adapter or USB cable. Ensure the battery is correctly inserted. |
| Poor autofocus performance. | The camcorder may take a few seconds to focus, especially during zoom operations or in low light. Ensure sufficient lighting and stable camera movement. |
| Video appears shaky or blurry. | While Electronic Image Stabilization (EIS) is present, excessive movement, especially at higher zoom levels, can still cause blur. Use a tripod or stabilize the camcorder for best results. |
| Krótki czas pracy baterii. | Battery life can vary based on usage and settings. Ensure the battery is fully charged. For extended recording, consider using the AC adapter or having a spare charged battery. |
| Nie można przenieść files do komputera. | Ensure the USB cable is securely connected to both the camcorder and the computer. Check if the camcorder is recognized as a removable drive. Try a different USB port or cable. |
| Ekran dotykowy nie reaguje. | Clean the screen with a soft cloth. Restart the camcorder. If the issue persists, contact customer support. |
Specyfikacje
| Funkcja | Szczegół |
|---|---|
| Rozdzielczość przechwytywania wideo | 1080p Pełna rozdzielczość HD (1920x1080) |
| Technologia czujnika fotograficznego | CMOS (8MP sensor, 16MP interpolated photos) |
| Zoom optyczny | 12x |
| Zoom cyfrowy | 60x |
| Rozmiar ekranu | 3 Inches (swiveling LCD touch screen) |
| Stabilizacja obrazu | Elektroniczna stabilizacja obrazu (EIS) |
| Typ pamięci flash | SD; SDHC; XD (card not included) |
| Format przechwytywania wideo | H.264, MPEG-4 |
| Obsługiwany format audio | AAC, MP3 |
| Technologia łączności | HDMI, USB |
| Waga przedmiotu | 1.2 funta |
| Wymiary produktu | 4.69 x 2.09 x 2.36 cala |
| Numer modelu | PA3973U-1C0K |
| Wymagane baterie | 1 bateria litowo-jonowa (w zestawie) |
Oficjalne filmy produktowe
Watch this official video for additional guidance on using your Toshiba Camileo X200.
Wideo: Krótki wstępview video demonstrating the Toshiba Camileo X200 camcorder's features and usage. This video is provided by the seller.
Gwarancja i wsparcie
For warranty information and technical support, please refer to the documentation included with your purchase or visit the official Toshiba support webZachowaj dowód zakupu na wypadek roszczeń gwarancyjnych.