
Wstęp
This manual provides detailed instructions for the installation, operation, and maintenance of your Zmodo PKD-DK4216-500GB H.264 4-Channel DVR System. This system is designed for security surveillance, offering remote access capabilities and night vision cameras. Please read this manual thoroughly before using the product to ensure proper setup and functionality.
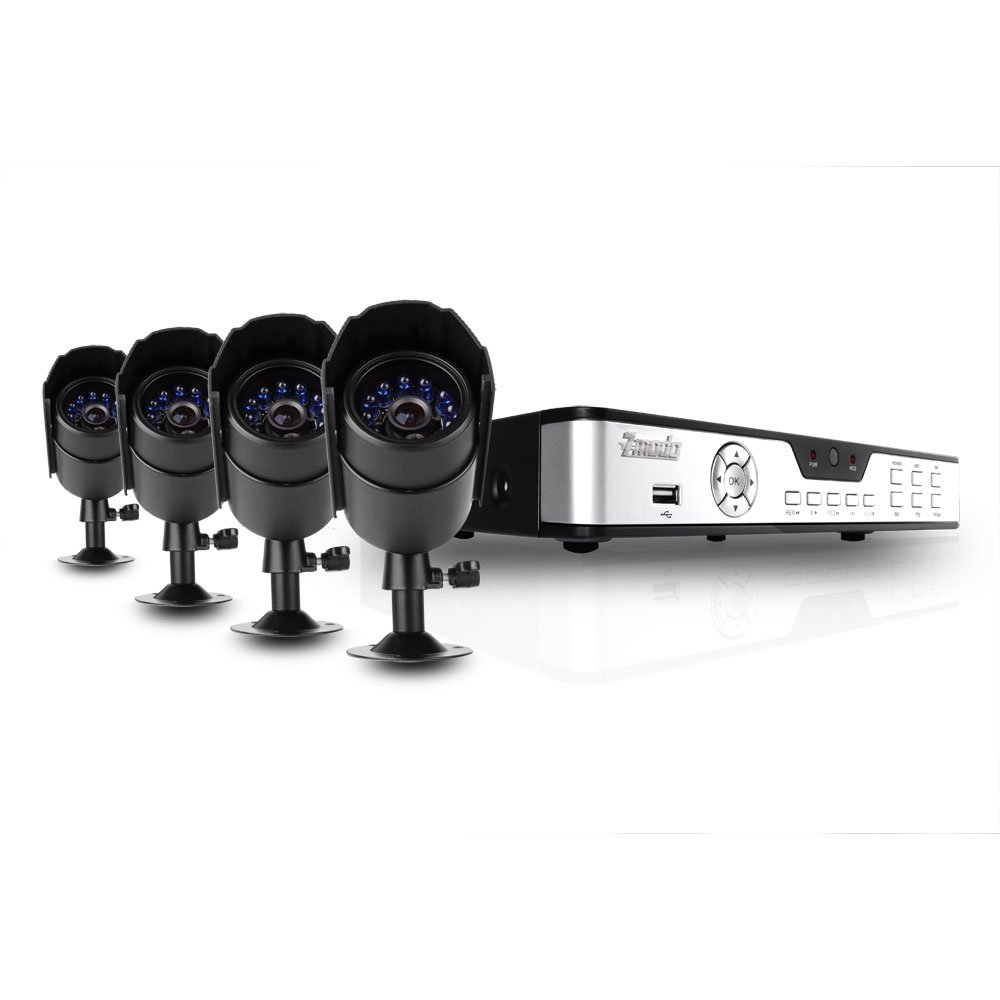
Figure 1: Zmodo PKD-DK4216-500GB DVR System components, including the DVR unit, four night vision cameras, power adapters, cables, a USB mouse, and a remote control.
Konfiguracja i instalacja
1. Rozpakowanie i sprawdzenie komponentów
Ostrożnie rozpakuj wszystkie elementy i sprawdź, czy w zestawie znajdują się następujące elementy:
- 1 x Zmodo 4-Channel DVR Unit with 500GB Hard Drive
- 4 x Night Vision Security Cameras
- 4 x Camera Power/Video Cables (60ft each)
- 1 x zasilacz DVR
- 1 x Camera Power Splitter
- Mysz 1 x USB
- 1 x Pilot zdalnego sterowania
- 1 x Instrukcja obsługi (ten dokument)
2. Połączenia DVR
Before powering on the DVR, connect all necessary peripherals.
- Podłącz monitor: Use a VGA or BNC cable to connect your monitor to the corresponding port on the DVR's rear panel.
- Podłącz mysz: Plug the USB mouse into one of the USB ports on the DVR (front or rear).
- Podłącz kamery: Connect each camera's video cable (BNC connector) to an available video input port on the DVR's rear panel.
- Podłącz zasilanie kamery: Use the camera power splitter to connect all four cameras to a single power adapter. Plug the power adapter into an electrical outlet.
- Connect DVR Power: Plug the DVR power adapter into the DVR and then into an electrical outlet. The DVR should power on automatically.
- Połączenie sieciowe (opcjonalnie): Dla pilota viewing, connect an Ethernet cable from your router to the LAN port on the DVR's rear panel.
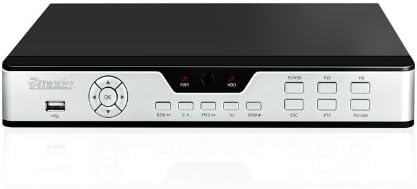
Figure 2: Front panel of the DVR, showing the USB port, navigation buttons, and status indicators.

Figure 3: Rear panel of the DVR, displaying BNC video inputs, VGA output, audio inputs/outputs, LAN port, and power input.
3. Instalacja kamery
Mount the cameras in desired locations, ensuring a clear field of view and protection from direct weather exposure. The cameras are designed for both indoor and outdoor use and feature night vision capabilities.
- Securely mount each camera using the provided hardware.
- Dostosuj kąt kamery tak, aby objąć wybrany obszar nadzoru.
- Route the camera cables to the DVR, ensuring they are protected from damage and moisture.

Rycina 4: Przód view of a Zmodo camera, showing the lens and infrared (IR) LEDs for night vision.

Rysunek 5: Strona view of a Zmodo camera, illustrating its bullet design and adjustable mounting bracket.
4. Początkowa konfiguracja rejestratora DVR
Upon first power-up, the DVR will guide you through initial setup steps, including setting the date, time, and administrator password. Follow the on-screen prompts using the USB mouse.
Instrukcja obsługi
1. Podstawowa nawigacja
The DVR interface is primarily controlled using the USB mouse. Right-click to access the main menu, and left-click to select options and navigate through menus.
2. Tryby nagrywania
Rejestrator DVR obsługuje różne tryby nagrywania:
- Ciągłe nagrywanie: Nagrywa 24/7.
- Nagrywanie z wykrywaniem ruchu: Nagrywa tylko wtedy, gdy w kamerze zostanie wykryty ruch view. Dzięki temu oszczędzasz miejsce na dysku twardym.
- Zaplanowane nagrywanie: Nagrania z określonych pór dnia lub tygodnia.
Configure recording settings for each camera through the DVR's main menu under 'Record Settings'.
3. Odtwarzanie wideo
Aby ponownieview nagrano footage:
- Z menu głównego wybierz opcję „Odtwarzanie”.
- Wybierz interesującą Cię datę i kanał kamery.
- Use the timeline to navigate through recordings. Motion-triggered events are often marked for easier identification.
4. Remote Access (Internet & 3G Phone)
Rejestrator DVR obsługuje zdalne sterowanie viewing via Internet Explorer on a PC or through dedicated applications on 3G-enabled smartphones (Blackberry, Android, iPhone, iPad).
- Konfiguracja sieci: Ensure the DVR is connected to your router via Ethernet. You may need to configure port forwarding on your router and set up a Dynamic DNS (DDNS) service if you do not have a static IP address. Refer to your router's manual and Zmodo's online support for detailed network setup instructions.
- Dostęp do komputera: Open Internet Explorer and enter the DVR's IP address. You may be prompted to install an ActiveX control.
- Dostęp mobilny: Download the appropriate Zmodo application from your smartphone's app store. Follow the in-app instructions to add your DVR using its IP address or DDNS hostname.
Konserwacja
1. Zarządzanie dyskiem twardym
The 500GB hard drive will automatically overwrite the oldest recordings when full. Regularly back up important footage to an external USB drive if needed. You can configure hard drive settings and format the drive through the DVR's system menu.
2. Czyszczenie
Periodically clean the camera lenses and the DVR unit with a soft, dry cloth. Avoid using harsh chemicals or abrasive materials that could damage surfaces.
3. Aktualizacje oprogramowania sprzętowego
Check the Zmodo official website for any available firmware updates for your DVR model. Firmware updates can improve performance, add features, or fix bugs. Follow the instructions provided with the update carefully.
Rozwiązywanie problemów
- No image on monitor:
- Ensure the monitor is powered on and correctly connected to the DVR's VGA or BNC output. Verify the DVR is powered on and its power adapter is securely connected.
- Cameras not displaying video:
- Check that all camera power and video cables are securely connected to both the cameras and the DVR. Ensure the camera power adapter is functioning.
- Zdalny dostęp nie działa:
- Verify the DVR is connected to your network. Check your router's port forwarding settings and DDNS configuration. For PC access, ensure ActiveX controls are enabled in Internet Explorer. Consult Zmodo's online support for detailed network troubleshooting guides.
- Słaba jakość widzenia nocnego:
- Ensure there are no obstructions directly in front of the camera lens that could reflect the infrared light. The effective night vision range is up to 50 feet; objects beyond this distance may appear less clear.
- DVR not recording:
- Check recording schedules and motion detection settings. Verify the hard drive status in the DVR's system menu. Ensure the hard drive is not full (though it should overwrite automatically).
Specyfikacja produktu
| Marka | Zmod |
| Numer modelu | PKD-DK4216-500GB |
| Technologia łączności | Przewodowy |
| Liczba kanałów | 4 |
| Pojemność pamięci masowej | 500 GB (Hard Drive Installed) |
| Źródło zasilania | Elektryczny przewodowy |
| Pozycja Wymiary (dł. x szer. x wys.) | 17.13 x 11.14 x 6.85 cala |
| System operacyjny (zgodny) | Android (dla aplikacji mobilnej) |
| Kompatybilne urządzenia | Smartfony |
| Technologia słabego oświetlenia | Tak |
| Zakres noktowizora | 50 stóp |
| Szybkość klatek | 30 klatek na sekundę |
| Tryb nagrywania | Ciągły, wykrywanie ruchu |
| Łączna liczba portów USB | 1 |
| Interfejs sprzętowy | Ethernet, BNC, VGA |
Informacje o gwarancji
This Zmodo product is covered by a manufacturer's warranty. For specific details regarding warranty duration, coverage, and claims procedures, please refer to the warranty card included with your product or visit the official Zmodo webZachowaj paragon jako dowód zakupu.
Obsługa klienta
For technical assistance, troubleshooting, or further inquiries, please contact Zmodo customer support through their official website. Online resources, FAQs, and support forums may also be available to help resolve common issues.
Zmodo Official Webstrona: www.zmodo.com